Using the Scene Explorer
We introduced the Scene Explorer tab as part of our growing support for USD, making navigating and exploring scenes easier. The scene explorer contains panels for two scene graphs:
-
 USD Scene Graph- Inspect and manipulate the properties and attributes of prims in the stage hierarchy.
 -
 Katana Scene Graph - The Katana Scene Graph for non-USD items.
 There is also a panel above the scene graphs, showing the Collections in the project. This is collapsed by default. See more about this at Collections in the Scene Explorer.
Note: The Katana Scene Graph is explained in Using the Scene Graph.
The workflow for the Scene Explorer will be familiar if you’ve used the Katana Scene Graph. Both the USD Scene Graph and the Katana Scene Graph panels in the Scene Explorer share working set columns for essential operations, including visibility in the viewer and renderer. However, the USD Scene Graph adds two USD-specific working set columns so that you can have more control over payloads and prim activation.
As you can see in the image below, the Scene Explorer tab includes both the USD Scene Graph and the Katana Scene Graph beneath.
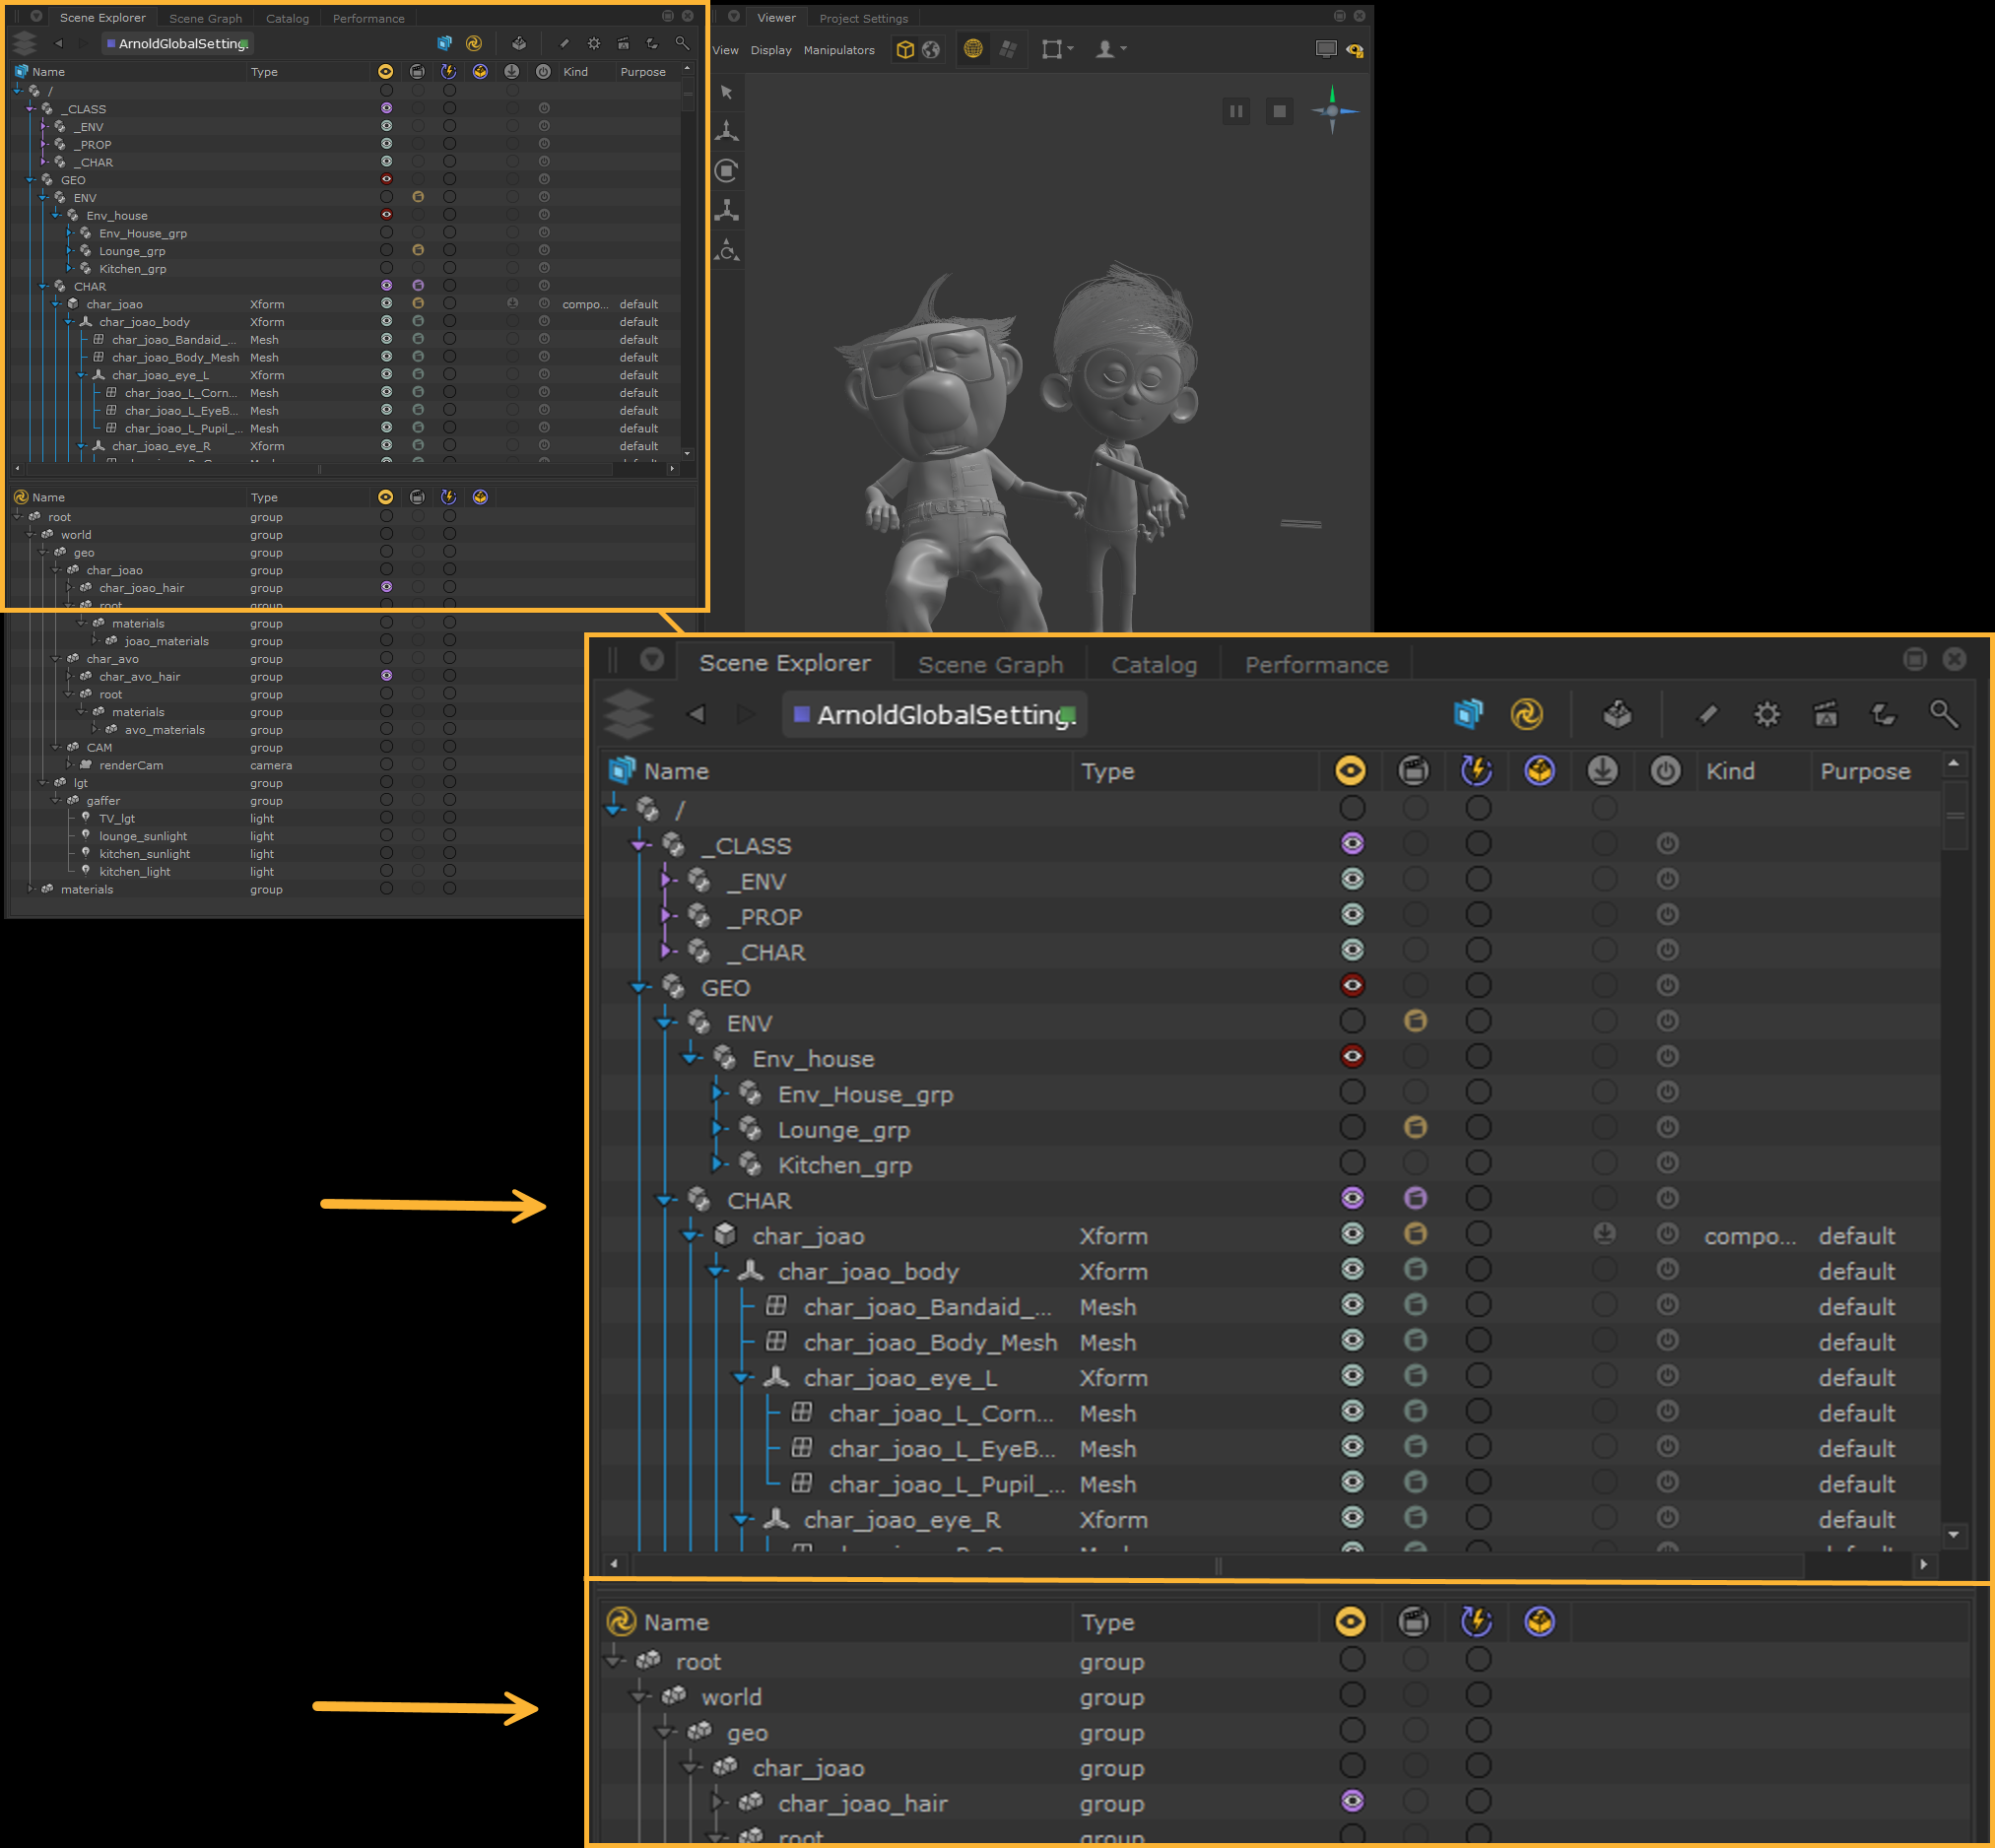
The Scene Explorer. The top section is the USD Scene Graph, and the bottom is the Katana Scene Graph.
Each scene graph is identified by the USD or Katana logo in the top-left corner of the panel next to the Name column.
Note: To hide the Katana Scene Graph in this panel, either drag the top of the panel bar either to the top or bottom or by toggling either the USD or Katana logo located at the top of the panel.
Viewing Scene Graphs
Use the three selection buttons at the top of the Scene Explorer tab to display or hide the USD Scene Graph, or/and the Katana Scene Graph, or/and the Collections panel.
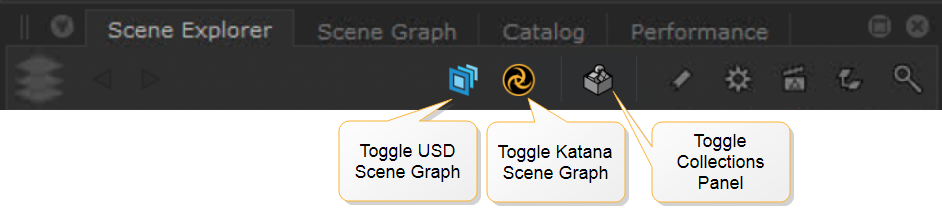
If a panel is hidden, its icon is greyed-out.
USD Scene Graph Columns
Data Columns
The USD Scene Graph part of the Scene Explorer tab has four columns of key information for each item:

-
Name - The name of the prim.
-
Type - The data category of an element.
-
Kind - The organizational role of an element in the hierarchy. It is categorized as values such as component for leaf level items or assembly for a collection of components. This can be modified using the UsdKindSet node in Katana.
See Kind in Pixar’s USD Glossary. -
Purpose - The category for visibility of components or primitives. For example, a default purpose generally means that it is a primary element of the scene, and is involved in various processes, such as rendering, simulation, and interaction within the viewport. A proxy purpose would indicate its use in viewports but not in renders, whereas a render purpose indicates use in renders but not viewports.
See Purpose in OpenUSD's USD Glossary.
By default all purpose types are displayed in the Viewer. However, you can choose which are shown by selecting Display > Purposes in the Viewer tab.
Note: When prims with the proxy purpose are added to Katana, by default they have their render visibility turned off.
Common Working Set Columns
The USD Scene Graph shares four working set columns with the Katana Scene Graph:
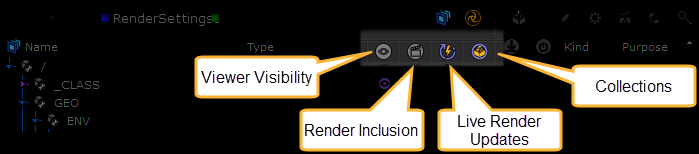
The Viewer Visibility, Render Inclusion, and Live Render Updates columns control visibility in the viewer and renderer. To find out how to work with these, see Working Sets.
The Collections working set shows which locations have a collection on them. See Collections in the Scene Explorer.
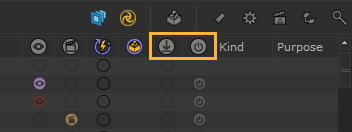
USD-Specific Working Set Columns
The USD Scene Graph includes two columns for payload management and prim activation/deactivation. See Payloads in the Scene Explorer, and Activating and Deactivating Prims.
Styling in the Scene Explorer
Prim Specifiers determine the order of operations when building up a USD scene. Seeing whether prims are defined, over or class helps you to quickly debug your USD composition.
The Scene Explorer allows you to quickly gain visibility of your scene setups, via visual cues to indicate information such as prim specifiers, visibility, instance proxies..
In the Scene Explorer, the tree lines styling will change based on certain prim rules:
• Defined prims show a blue branch in regular font
• Abstract (class) prims show a purple branch
• Instance proxy prims are displayed as dotted lines
Additionally, font styling is used to indicate the following:
• Over prims in undefined locations show a dimmed font
• Inactive prims show a dark strike-through font
Abstract prim - Example:
Abstract prims can be locations under a class, such as the example seen below, and are often utilised to tentatively bring assets in the scene, to be later placed on the stage. A class prim defines a prim meant to act as a template for other prims. They ensure uniformity and reusability throughout the scene by allowing other prims to reference, inherit or specialise it, to inherit its characteristics.
Abstract prims will be present in the usd document, however will not be present on the stage. Therefore abstract prims indicated via purple hierarchical lines in the Scene Explorer, cannot be previewed in the Viewer tab.
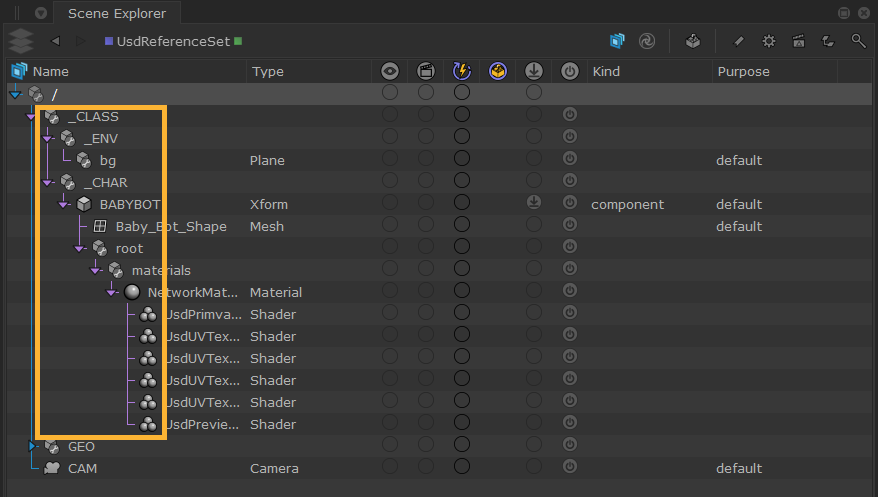
Note: This image showcases an example that can be found under Help > Example Projects > Native USD > Importing and Building USD stages.
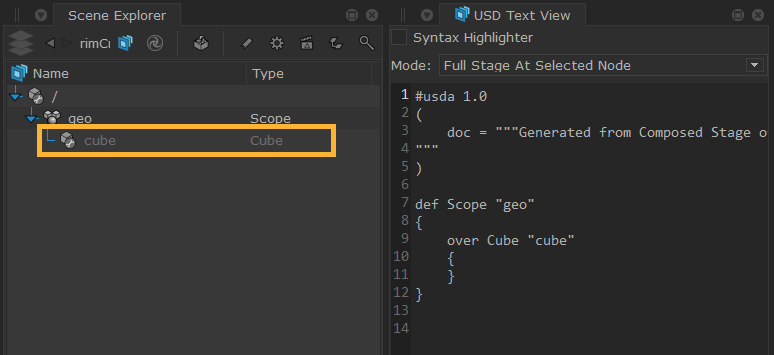
Undefined over - Example
An undefined over is an override made on a primitive that is not defined. Here we are doing an override on a cube, but this cube was not previously created with the “def” primSpec. These undefined overs are shown in the Scene Explorer as dimmed.
Inactive locations - Example
Inactive locations will be seen in the Scene Explorer as dimmed and strike-through.
In the example, the lenses of the glasses have been set to inactive in the incoming USD document. This is indicated via the Scene Explorer, the same way that pruned locations are seen in Katana’s geolib’s panel in the Scene explorer.
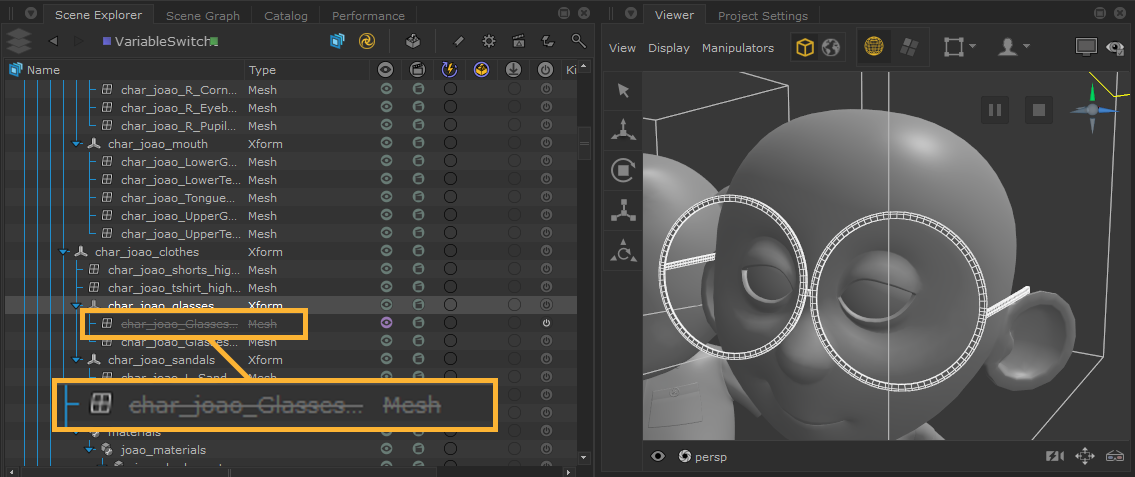
Note: Locations in USD cannot be deleted! The closest thing it has to removing elements permanently is by setting the active property on the prim location.
Another way you can identify inactive prims, is through the Active working set column . The icon against the Active column will have changed if a prim is inactive: ![]() See Activating and Deactivating Prims.
See Activating and Deactivating Prims.

Another way to see whether a prim is active, is through the Attributes tab, under the Metadata section. See Inspecting USD Properties Using the Attributes Tab.

Tip: The UsdActiveSet node can be used to make a location either inactive or active, this will persist in the scene and output USD document. Alternatively, the actions made in the Active working sets within the Scene Explorer are temporary.
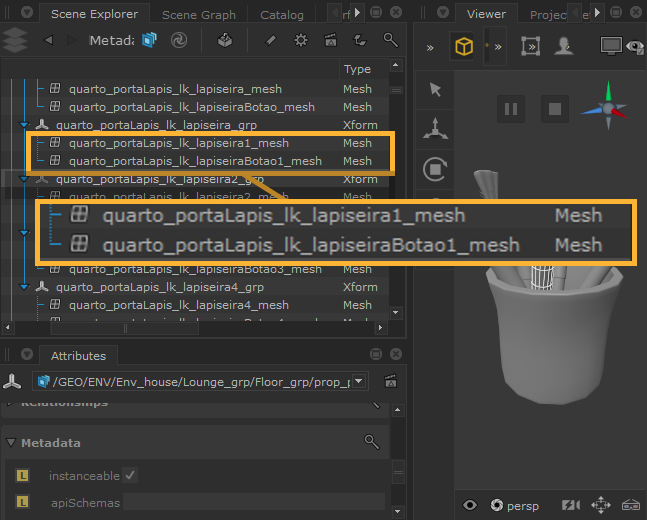
Instance proxies - Example:
Additionally, prims that have the property instanceable set to true, will be indicated in the Scene Explorer via dotted lines. This is to indicate prims that are an instance (an uneditable copy) of another prim location. This means any changes made to the instance proxy prims (prims that are downstream) will be ignored.
In this example, the pen and the pencil pot are all derived from the same prim, and therefore are all instances of that prim. This is a great way to build your stage in USD for prims that are repeated many times, as it can greatly improve performance.
To learn more about Scene Graph Instancing, refer to Scenegraph Instancing in OpenUSD's USD Glossary.
To learn more about Prim Specifiers, see Specifier in OpenUSD's USD Glossary.