Search is based on keyword.
Ex: "Procedures"
Do not search with natural language
Ex: "How do I write a new procedure?"
Contact Support
Connection Setup
Before we can send a projection to Mari, we need to establish a connection between the two applications.
Nuke
When Mari is launched from inside Nuke or a command is sent to Mari through the Mari menu or toolbar, Nuke's command port is automatically enabled. To manually set this, or adjust other settings related to the Nuke<>Mari Bridge:
| 1. | Click Edit > Project Settings > Mari. |
The Project Settings tab for Mari displays.
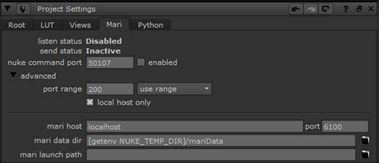
| 2. | Check enabled and set the command port. When enabled, Nuke listens to Mari on the specified command port. |
Note: Only one Nuke session can listen on the given port number. If the port number is already in use, Nuke attempts to listen on another port number within a range starting at the given port number. To change this behavior, click Edit > Project Settings > Mari > advanced and adjust both the port range and use range settings.
| 3. | If both Nuke and Mari are running on the same computer, you should leave the mari host field blank, and ensure local host only is checked. If they are running on separate machines, enter the machine name or IP address of the computer running Mari here and uncheck local host only. These settings are automatically set when a command is successfully sent from Mari to Nuke. |
Note: Checking local host only tells the application to only listen for connections from the local machine. This can prevent accidental connections from different machines and is therefore more secure, but this must be turned off when you want to use the Nuke<>Mari workflow across the network.
| 4. | Enter the port number that Mari is set to receive commands on in the port field. This number should match the Mari Command Port number set in the Scripts section of the Mari Preferences dialog. This value should only be changed if the default is already in use by another application. This is automatically set when a command is sent from Mari to Nuke. |
| 5. | Set the mari data dir. This field specifies the location of the directory used for the data rendered and exported from Nuke and Mari. |
Note: The settings for connecting Nuke to Mari are stored separately in each script.
Mari
In Mari, there are a number of settings that we need to check before we can receive commands from Nuke.
| 1. | Open the Mari Preferences dialog by navigating to Edit > Preferences. |
| 2. | Select the Scripts tab and ensure that the Mari Command Port is Enabled. The default Port number should only be changed if it is already in use by another application. This number should match the port number set in Nuke under Project Settings > Mari. |
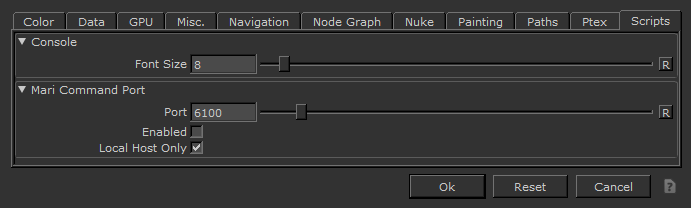
| 3. | As with the Nuke connection setup, if both Nuke and Mari are running on the same computer, ensure local host only is checked. If they are running on separate machines, uncheck this. Refer to the note on the local host option in the Nuke section for more information. |
| 4. | In the Mari Preferences dialog, click on the Nuke tab. |
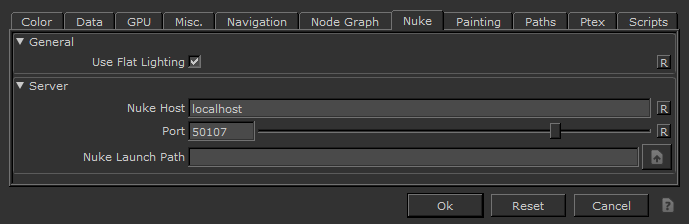
| 5. | Enter the machine name or IP address of the computer running Nuke in the Nuke Host field. If both Mari and Nuke are running on the same computer, you should leave this field blank. This is automatically set when a command is sent from Nuke to Mari. |
| 6. | Enter the port number that Nuke is set to receive commands on in the Port field. This number should match the Nuke command port set in Nuke under Project Settings > Mari. This value should only be changed if the default is already in use by another application. This is automatically set when a command is sent from Mari to Nuke. |
You are now ready to exchange data between Nuke and Mari.
Note: If you intend to launch Mari from Nuke from the Mari > Launch Mari menu, you can set the environment variable MARI_INSTALL_PATH so that you don’t need to point to the Mari executable every time. For example, MARI_INSTALL_PATH=/usr/local/Mari<version>/mari.