Search is based on keyword.
Ex: "Procedures"
Do not search with natural language
Ex: "How do I write a new procedure?"
Contact Support
Creating a Custom Shader
| 1. | To add a new shader, either: |
• right-click on an empty space in the Shaders palette,
• in the Shading menu, select Add New Shader, or
• in the Shaders palette, click the ![]() icon.
icon.
| 2. | Select from the shaders listed in the dropdown menu (Phong or Blinn, for example), or select Choose Diffuse and Specular to manually set the diffuse and specular options for your shader. |
If you selected a shader from the dropdown menu, the new shader displays in the list, with shader components shown at the bottom of the palette.
If you selected Choose Diffuse and Specular from the dropdown menu, the Create Shader dialog appears.

| 3. | Select your Diffuse and Specular shader options and click OK. |
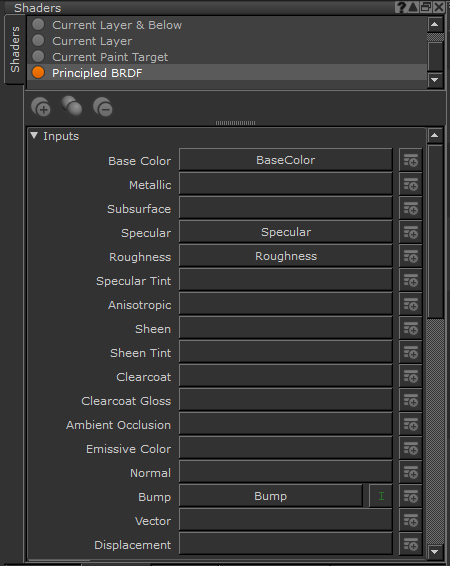
| 4. | All shaders are created with the Current Channel in the Diffuse Color shader component. You can change this, and set the other components by clicking on the dropdown menu next to the component name and selecting the channel. |
| 5. | If you haven’t yet created a channel to use in a specific shader component, click the add channel icon |
The Add Channel dialog box appears. Select the options for your channel from the dialog and click Ok.
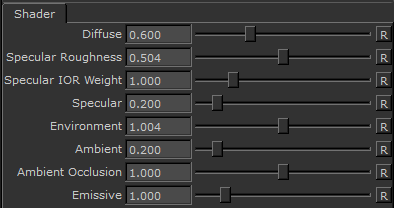
| 6. | Once you’ve set a channel to the shader component, adjust the value or level of the component, using the sliders. |
You can add as many shaders as you need and compare them or switch back to the default shaders at any time.
Tip: Shaders don’t affect the contents of the channels. For example, if you have a shader with channels set in both the diffuse and specular color inputs, the model on-screen displays the effects of both channels. However, the channels are still separate and contain different data.
Tip: If you build a shader that takes data from multiple channels, it can be hard to remember which channel you're currently editing. In this case, you can switch back to one of the default shaders, which just shows the contents of the current channel, layer and below, layer, or paint target.
Tip: You can also duplicate an existing shader by selecting Duplicate Shader from the Shading menu or the right-click menu in the Shaders palette. The default shaders cannot be duplicated.
To duplicate or copy a shader:
• right-click on the shader and select Duplicate Shader from the dropdown menu,
• select Duplicate Shader from the Shading menu,
• click the ![]() icon in the Shaders palette, or
icon in the Shaders palette, or
• select the shader and use the Ctrl/Cmd+C shortcut to copy and Ctrl/Cmd+V shortcut to paste.
A copy of the shader appears with the same name as the original but also a number to differentiate between the original and the copy.
You can give the shader a new name by double-clicking it in the list and typing the new name.
Tip: You can set a keyboard shortcut for the shader by right-clicking it and selecting Assign Shortcut from the dropdown menu. See the section on Using Shortcuts for details.
Tip: You can right-click any of the shaders, or within the shader dialog, to access the dropdown menu for more shader options. Right-clicking an existing shader also selects it.