Search is based on keyword.
Ex: "Procedures"
Do not search with natural language
Ex: "How do I write a new procedure?"
Creating Materials with the Material Ingest Tool
Materials are created from multiple texture files, procedurals or plain colors, which can be used to accurately represent how light interacts with real-world materials. This method of shading is called Physically Based Rendering (PBR). You can apply these materials to your assets for a more realistic result as well as establishing a base line look for your asset before adding more bespoke paint and crafting details. The Material Ingest Tool allows you to create materials from texture files. Once you acquired these texture files, you can start the ingestion.
Here are examples of texture files:
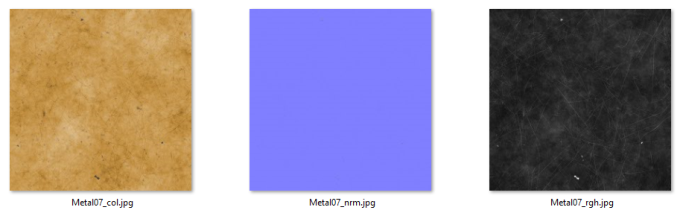
Notice that these files contain a material name, in this case Metal07. They also contain a stream name (shader input) to describe the intended target shader input, in this case: col, nrm, and rgh. They all have the same extension (.jpg). This naming pattern information is important to know before creating your materials so that you can fill in the material preset properties correctly.
Mari provides a set of predefined materials (presets), which are built for the Principled BRDF shader, in the Shelf palette, in the Mari Materials tab (see Storing Resources Using Shelves), but you can also create your own manually using the Node Graph (see Working with Materials in the Node Graph) or the Material Ingest Tool.
To create materials using the Material Ingest Tool:
| 1. | Navigate to Tools and select Material Ingest Tool. |
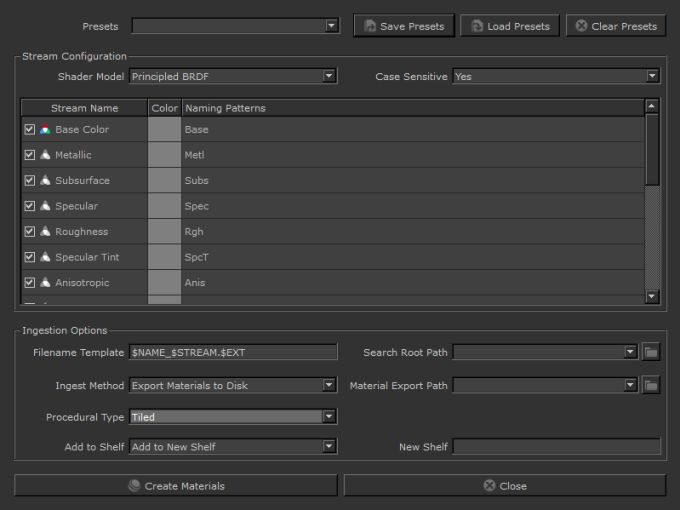
This opens the Material Ingest Tool Dialog.
| 2. | Select a preset from the Presets list according to which texture files you are using. |
Note: The Presets dropdown list contains the names of all preset files found in C:\Program Files\Mari 4.5v2\Bundle\Media\Settings\MaterialIngestPresets
To load custom presets from another location, use the MARI_MATERIAL_INGEST_PRESETS_SEARCHPATHS environment variable. See Environment Variables That Mari Recognizes.
OR
Click the Load Presets button if you already have a material preset saved on disk, then browse to the .mip file and click Open.
This loads the preset properties in the Stream Configuration and Ingestion Options sections.
Stream Configuration section:
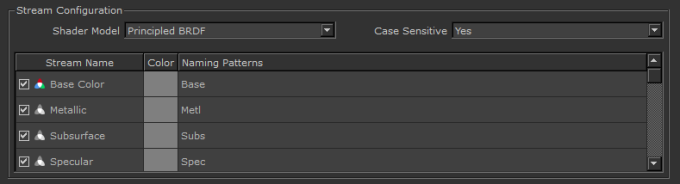
| 1. | In the Stream Configuration section, select a Shader Model. |
The table containing the stream properties updates accordingly.
Note: This table is used to match the texture files' naming patterns to the shader input they are targeted for.
| 2. | Select whether the stream naming patterns is case sensitive if your texture files follow varying capitalization conventions. |
| 3. | In the Stream Name column, disable the checkbox if you want to skip the creation of any procedurals for that stream. |
To disable multiple streams at once, Ctrl+click the required rows, then right-click and select Uncheck Selected. Likewise, select Check Selected to enable the streams.
| 4. | Double-click the color swatch to set a color for the streams in case a matching texture file cannot be found. To set a color for multiple streams at once, Ctrl+click the required rows, then right-click and select Set Color. |
This opens the Select Color dialog. Pick a color and click OK.
Tip: Drag the Select Color dialog window to expand it.

Note: A Constant procedural is created for Scalar streams. If the RGB values of the Scalar stream's color are unique, a Vector procedural is created.
It is recommended to set the default color of your Shader's Normal stream to 0.5, 0.5, 1.0, which is the default for a flat normal map. This way, it does not affect the normals at this value.
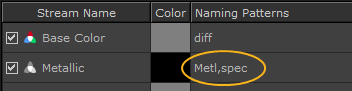
| 5. | By default, the Naming Patterns use the streams' short names, but you can change this by double-clicking the name and editing it. If you need to specify more than one naming pattern, use a comma (,) to separate them. |
To reset the Naming Patterns to their default, Ctrl+click to select them, then right-click and select Reset to Short Names.
Note: It is recommended to enter the names in the order of importance as when multiple naming patterns are found, the first matching pattern in the row is used and the rest is ignored.
Ingestion Options section:
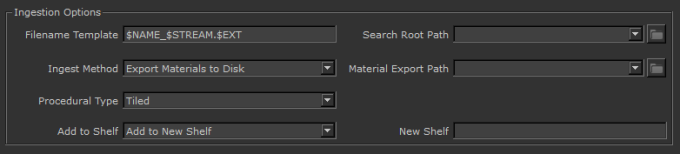
| 1. | Depending on the naming pattern information of your texture files, set the Filename Template. The default value is $NAME_$STREAM.$EXT For example: Metal_col.jpg |
Here are the template options:
Required:
• $NAME - specifies the name of your material. You can use any set of alphanumeric characters including underscores, spaces, dashes, and periods.
• $STREAM - indicates where in the file name the pattern specified per stream should be matched.
Optional:
• $EXT - specifies any supported image extensions.
• $CHAR - ignores any arbitrary characters.
• $NUM - ignores any numbers.
• $ANY - ignores any alphanumeric characters including underscores, spaces, dashes, and periods.
• $SEP - specifies the system's path separator, forward slash / or backslash \.
• $NUM$CHAR can be used together to match against textures with their resolution in the filename, for example: myMaterial_color_4k
Note: You can use multiple file templates by separating them with the pipe | symbol. If the first template is matched, the rest is ignored.
To search for texture files in subfolders, you can use the backslash \ symbol, for example, to match myMaterial\PNG\diffuse.png use the template $NAME\$CHAR\$STREAM.$EXT
| 2. | Browse to select a Search Root Path from where the Material Ingest Tool searches for collections of files matching the specified patterns. |
This searches through the sub-folders of the selected path.
| 3. | Choose the Ingest Method, whether to export your materials to disk or build them in your project. |
If you have selected Export Materials to Disk, browse to or enter the Material Export Path in the field on the right-hand side.
| 4. | In the Procedural Type field, select which image based procedural node to generate materials with: |
• Tiled - uses one image to tile across the model.
• Tri Planar Projection - uses the same image to project onto the surface of your model from three different directions (Top, Front, and Right).
Note: Select Tri Planar Projection if you don't want patterns to be a tiled repeat or if you are working in a PTex project. PTex projects cannot use Tiled as they have UV seams while Tri Planar doesn't.
| 5. | In the Add to Shelf field, select which shelf to add your materials to. You can add them to the Menu, Personal, or Project shelves or you can create a new shelf. Select Do Not Add to Shelf, if you don't require to add them to a shelf. |
Note: Materials are added to the Personal shelf by default.
If you have selected Add to New Shelf, enter the name of the New Shelf in the field on the right-hand side.
| 6. | Click Create Materials to generate materials. |
The ingestion starts and you can see its progress on the progress bar. Once completed:
• If you have selected Export Materials to Disk:
• Your materials are exported in .mma files to the specified location.
• If you chose to add your material to a new shelf, the material displays in the selected shelf.
• If you selected Build Materials in Project, your materials are added as Tiled or Tri Planar Projection nodes in the Node Graph.
Note: Materials are available across your Mari projects that use the same shader as the one selected.
Tip: If you'd like to save your preset for future use, click Save Presets and browse to the location where to save it.
This saves your preset as an .mip file.
| 7. | If you need to create more materials, repeat the same steps, otherwise click Close to exit |
Note: The Material Ingest Tool dialog remembers the last settings used.
Note: To apply materials to your scene refer Working with Materials in the Layers Paletteto or Working with Materials in the Node Graph.
Sorry you didn't find this helpful
Why wasn't this helpful? (check all that apply)
Thanks for your feedback.
If you can't find what you're looking for or you have a workflow question, please try Foundry Support.
If you have any thoughts on how we can improve our learning content, please email the Documentation team using the button below.
Thanks for taking time to give us feedback.