Search is based on keyword.
Ex: "Procedures"
Do not search with natural language
Ex: "How do I write a new procedure?"
Adding and Merging Alembic or FBX Geometry
Each of the objects or entities, shown in the Object Hierarchy Tree, has a checkbox next to it for selecting which objects are merged. The Merge Type in the New Project dialog's Mesh Options determines how the objects are handled on merge: as a Single Mesh or Just Merge Nodes. Toggling the Merge checkbox of a parent object ticks the checkboxes of all the child objects as well, and signals that the parent and child objects should be merged into one GeoEntity, or object in Mari. You can also select a root object and toggle the Merge checkbox to determine if any other objects are merged into the root. When a camera appears in the Object Hierarchy Tree, the camera is shown with the Merge checkbox ticked by default. Cameras are not stored in a hierarchy in Mari, thus the state of the checkbox cannot be changed.
Merging objects can happen in a number of ways, so that different parts of the geometry (child objects) are merged with the parent object to create one GeoEntity, several child objects are merged together but not merged with the parent object, or several parent objects in an Alembic or FBX file are merged together so there are fewer geometries being created on project creation.
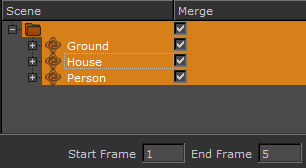
In an example Alembic file, where there are three parent objects (Ground, House, and Person), the following are examples of common ways to merge objects:
• Everything is merged together - select the merge checkbox for each of the selected parent objects and the root folder.
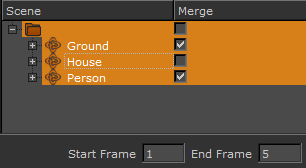
• Specific selected objects are merged together - selected objects with the Merge checkbox ticked are merged together. Any selected objects that do not have the merge checkbox ticked are loaded as separate objects.
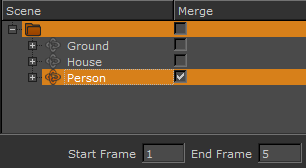
• Selected objects aren't merged but selected cameras are merged by default - none of the selected objects are merged together but the selected camera has the Merge checkbox ticked by default and is disabled so that it cannot be changed.
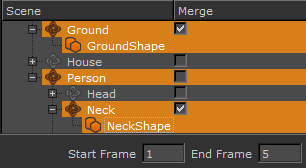
• Selected objects are partially merged - selected child objects are merged into the selected parent object but the parent object is not merged into the other selected parent objects.
• Selected frame ranges are merged - selected objects with a frame range specified are merged into a single geometry.
To merge Alembic or FBX geometry on project creation, refer to the steps in Creating a New Project with Alembic and FBX Files for more information. If you have already created a project and want to load in merged Alembic or FBX geometry, follow the steps below.
Merging Objects on Object Import
To merge objects that you are importing into an existing Mari project:
| 1. | Open the Objects palette and click the |
The Add Objects dialog appears.
| 2. | Select the Alembic or FBX file with the objects that you want to import into the project, and click Open. |
The Add Object Settings dialog appears.
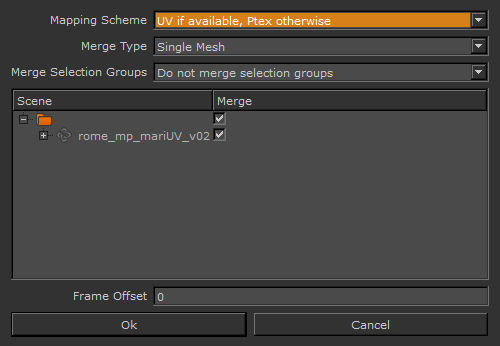
| 3. | Set the Mapping Scheme, Merge Type, and Take fields. These are the same as the fields in the New Project dialog, described in Creating a New Project with Alembic and FBX Files. |
| 4. | Select the objects that you want to import into the project, and click the Merge checkbox for each of the objects that should be merged together on import. |
| 5. | If all the frames are loaded into the project, the dialog specifies this, and does not show a start and end frame range. |
| 6. | You can also set a Frame Offset for the start position for loading the objects. |
For example, if you want to import frames 1005 to 1010, with an .obj file, you would select files xxx.1005.obj, which would populate the start frame field with 1005 and end frame field with 1010.
Whereas with an .abc or .fbx file, you would select the file and that would populate the start frame field with 1 and the end frame box with 5.
In order to load the frames correctly into Mari's timeline, starting at 1005, you need to set the offset to 1004, so that it loads the geometry into Mari's timeline at 1005 to 1010. Failure to do this causes Mari to load the geometries at Mari's frame 1 to 5.
| 7. | Click Ok to import the objects or Cancel to abandon the import and close the dialog. |
Sorry you didn't find this helpful
Why wasn't this helpful? (check all that apply)
Thanks for your feedback.
If you can't find what you're looking for or you have a workflow question, please try Foundry Support.
If you have any thoughts on how we can improve our learning content, please email the Documentation team using the button below.
Thanks for taking time to give us feedback.