Search is based on keyword.
Ex: "Procedures"
Do not search with natural language
Ex: "How do I write a new procedure?"
Creating Multiple Channels from Presets
Mari includes channel presets. These are sets of the “standard” channels required to paint various types of assets - for example, the channels required for a vehicle or a digital double. You can use these presets to create a group of channels at once. If you already have some existing textures for the new channels, you can automatically load these into the new channels as they are created.
Tip: You can customize the channel presets functions by writing your own channel preset and channel template files, to create custom presets and templates. For more information, refer to the steps below and the Extending Mari section.
| 1. | To create multiple channels from presets: |
• right-click in the Channels palette, and select Channel Presets, or
• from the Channels menu, select Channel Presets.
The Channel Presets dialog opens.
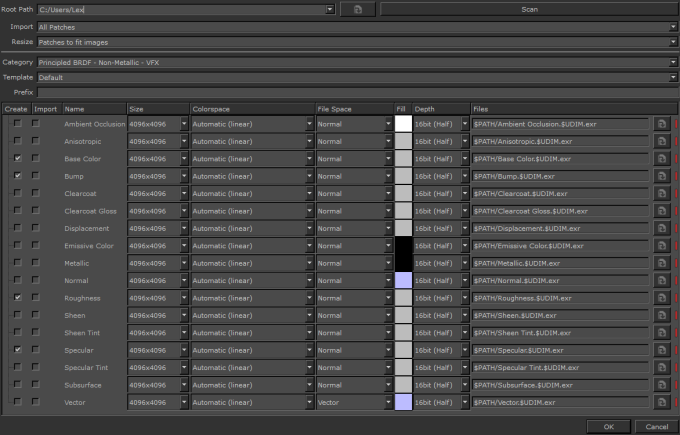
| 2. | The Root Path is the base directory for your Mari project. Mari looks here for textures to import when creating the channels. If the textures are in a different directory, change the Root Path to point to the appropriate directory, or use the |
| 3. | If you want to import existing textures into the channels as you create them, select whether to import All Patches or only the Selected Patches. |
| 4. | If you want to import existing textures, select in Resize how Mari should deal with patch/image size mismatches (for example, when trying to import a 2048x2048 image into a 1024x1024 patch). This can be either: |
• Patches to fit images - for example, Mari would automatically resize a 1024x1024 patch to 2048x2048 to fit the image.
• Images to fit patches - for example, Mari would automatically resize a 2048x2048 image to 1024x1024 before importing it onto the patch.
| 5. | Click Category and select a Mari channel preset. |
| 6. | Enter in a Prefix to assign a designation to the channels. This allows you to organize them according to categories in your list. |
Note: The list of channels at the bottom of the dialog box allows you to set whether you want to create the preset channels from scratch or from an imported file.
| 7. | Select the channels to create and import from the list by clicking in the boxes. You can either click to check the boxes individually, or right-click the list and select Add Custom, Create All, Create None, Import Existing, or Import None. |
| 8. | You can change any selected channel's Size, Colorspace, File Space, Fill, Depth, or Files path. |
| 9. | If you want to import textures listed for the channel, check that Mari has found them (as indicated by a green bar |
| 10. | Once you are happy with the channels and textures selected, click OK. |
Mari creates the channels, and imports any selected textures.
Tip: Depending on the number of channels and the size of the textures, the import could take a long time. Consider taking a little break!
Tip: To toggle quickly between the last two selected channels (while in the painting canvas), press T. For other options, such as locking or resizing a channel, right-click in the Channels palette or click on the Channels menu.
Sorry you didn't find this helpful
Why wasn't this helpful? (check all that apply)
Thanks for your feedback.
If you can't find what you're looking for or you have a workflow question, please try Foundry Support.
If you have any thoughts on how we can improve our learning content, please email the Documentation team using the button below.
Thanks for taking time to give us feedback.