Search is based on keyword.
Ex: "Procedures"
Do not search with natural language
Ex: "How do I write a new procedure?"
Configuring the Lighting
Mari has five lights; four basic point lights, which appear on the drawing canvas, and one environment light.
Lighting Modes
Mari comes with five lighting modes for lighting the model:
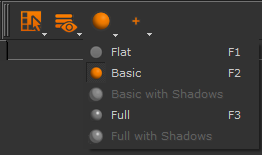
• Flat - a flat, uniform, directionless light.
• Basic - basic diffuse lighting without specular.
• Basic with Shadows - basic lighting with diffuse and specular lighting, as well as shadows.
• Full - full lighting with diffuse and specular lighting.
• Full with Shadows - full lighting with diffuse and specular lighting, as well as shadows.
Video: To learn how to control the lighting used to texture Mari assets, watch Understanding Lighting in Mari.
This video shows the workflow using Mari 3. Even though the Mari 4 workspace is different, the workflow remains the same. To have a look at the main UI differences, see Mari 3.3 vs 4.0.
You can change the lighting on the main mesh by clicking on the Project Controls toolbar:
|
Flat |
Basic |
Basic with Shadows |
|---|---|---|
|
|
|
|
|
|
|
|
|
Full |
Full with Shadows |
|
|
|
|
|
|
|
|
In Basic and Full modes, you can set basic point lights or an environment light. This lets you control the intensity and direction of the lighting from different directions relative to the model.
Mari only stores custom light settings as part of the project (they cannot be independently saved to a file).
To enable shadow processing,
To Configure the Lighting
| 1. | From the Project Controls toolbar, switch between Flat, Basic, Basic with Shadows, Full, and Full with Shadows lighting: |
Note: If the GPU > Shadow Maps > Allowed option is turned off
| 2. | To set individual lighting directions, make sure you're in full lighting mode. If it's not already visible, open the Lights palette by clicking View > Palettes > Lights: |
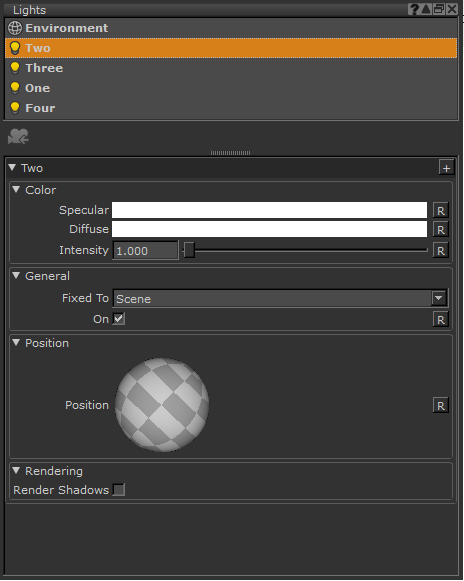
The top half displays the lights available, and the bottom shows the details of the selected light. The lights currently in use have a “lit bulb” icon.
Tip: Mari has four basic point lights and an environment light. You cannot add or delete these lights. If you don't want a particular light, turn it off. As Mari saves the lights with the project, if you need the same lights in another project, you need to set them up separately.
| 3. | To turn individual lights on or off, click on the |
The basic lights work a little differently to the environment light in the Lights palette. To configure the basic lights, follow the steps below:
| 4. | To change a light, first select it. In the bottom half of the palette, set the light's: |
• Color - you can set separate values for the Specular (shiny highlights) of the light and Diffuse (the color the light shines on surfaces), and change the Intensity value for the light.
• Fixed To location - whether the camera is fixed relative to the Scene or the Camera.
|
This... |
means... |
Example |
|
Scene |
The light always shines on the same part of the model, no matter how you move the view. |
If you only have one light on, pointing at the left side of the model, the right side is always in darkness, no matter how you move the view. |
|
Camera |
The light always shines from the same direction relative to the camera view. This means that it illuminates different parts of the model depending on how the model appears in the camera. |
If you only have one light on, pointing from the left of the camera, it illuminates whatever part of the model(s) is visible on the left side of the current view. |
Video: Watch the demo.
This video shows the workflow using Mari 3. Even though the Mari 4 workspace is different, the workflow remains the same. To have a look at the main UI differences, see Mari 3.3 vs 4.0.
Moving a Light Around
|
Select... |
then... |
|
The Transform Selected Objects tool |
click on the light and drag it around the canvas, or use the transform handles to adjust it. |
|
The sphere control in the Lights palette
|
click and pull the sphere around to move the light. |
|
The Move to Camera Position icon |
the light is repositioned to your current camera position. |

You may need to zoom out from your object in order to see the lights.
Note: The Move to Camera Position icon can be used in both perspective and orthographic view; however, be aware that this feature does not account for zooming of the camera in the Ortho view.
Rendering Shadows
| 1. | To enable casting shadows from the selected light, in the Lights palette, click the Rendering > Render Shadows checkbox. This does not impact the light itself, but the model casts shadows depending on the light’s position. |
| 2. | More options for shadows and depth projection settings are located |
Tip: Switch between the different lighting modes. Then try customizing a preset light. Play with its color settings and orientation. Try using the position sphere to control the light position. Notice the effects on your display?
Environment Light
The Environment light uses an image from the Mari Environment library, the Image Manager palette, or an imported image file to set environment lighting on the object(s) on the canvas. To configure the Environment light:
| 1. | Specify a texture to use for the environment. You can either: |
• select an image from the Mari Environment library by clicking the blank image space under Environment > Texture > Image
• click either of the arrow keys under Environment > Texture > Image,
• select an image in the Open an Image dialog by clicking the load ![]() icon under Environment > Texture > Image,
icon under Environment > Texture > Image,
• drag an image from the Image Manager to the blank image space under Environment > Texture > Image, or
• drag an image from a system file manager to the blank image space under Environment > Texture > Image.
| 2. | To adjust the Environment light, set the light's: |
• Color - you can set the Intensity value for the light.
• Fixed To location - whether the camera is fixed relative to the Scene or the Camera.
|
This... |
means... |
Example |
|
Scene |
The light always shines on the same part of the model, no matter how you move the view. |
If you have an environment image that is bright on one side, that side of the model is brightly lit and the other side is dark, no matter how you move the view. |
|
Camera |
The light always shines from the same direction relative to the camera view. This means that it illuminates different parts of the model depending on how the model appears in the camera. |
If you have an environment image that is bright on one side, whatever part of the model visible on that side in the current view is illuminated. |
• Resolution - this adjusts the resolution of the light to be either 64, 128, or 256. This only applies to the light and not the background (canvas) image.
| 3. | To move a light around, set the Up Axis to Axis X, Axis Y, or Axis Z, to adjust which part of the environment image is interpreted as up. This adjusts the background (canvas) image as well. This is especially useful if the environment image is read into Mari wrong-side up and you want to adjust the direction of the environment lighting. |
| 4. | To specify whether you want the environment light image to show on the canvas click on the dropdown menu under Environment > Texture > Background and select Show or Hide. |
| 5. | To set how the background (canvas) image appears, adjust the following under Environment > Texture: |
• Rotation - rotates the image on a 360 degree scale so that you can adjust how the background image appears on the canvas against the object(s).
• Cubemap Type - choose from None, LatLong, or Cross to set how 2D image is converted to 3D. Mari attempts to automatically interpret the Cubemap Type but if the image is a .dds, it isn't necessary to set this option.
Note: When exporting .dds files, they should be encoded as 8.8.8.8 ARGB files to avoid any complications when bringing them into Mari.
• the Blur - this adjust how much the background (canvas) image is blurred, if at all. For low resolution textures, the blur may not appear as smoothly as you might like. Try using a higher resolution texture to improve this.
| 6. | To set the texture animation for the background (canvas) image, adjust the following under Environment > Texture Animation: |
• Animation - whether the background (canvas) image is Static or can Rotate.
• Speed - sets the speed of the animation rotation of the background (canvas) image.
Note: If the Background is set to Hide, or the Speed is set to 0.000, it doesn't matter if the Animation is set to Rotate, it won't appear to be moving. Ensure that both of these controls are set correctly in order to see texture animation.
Sorry you didn't find this helpful
Why wasn't this helpful? (check all that apply)
Thanks for your feedback.
If you can't find what you're looking for or you have a workflow question, please try Foundry Support.
If you have any thoughts on how we can improve our learning content, please email the Documentation team using the button below.
Thanks for taking time to give us feedback.