Search is based on keyword.
Ex: "Procedures"
Do not search with natural language
Ex: "How do I write a new procedure?"
Importing Textures to Layers
| 1. | Start Mari and open your project. |
| 2. | To import, select a layer from the Layers palette and do one of the following: |
• from the Layers menu, select Import > Import into Current Layer to import textures into the currently selected layer, or
• from the Layers menu, select Import > Import into New Layer to import textures into the layer stack as a newly created layer.
Tip: The Import menu options are also available from the right-click dropdown menu on the main canvas and in the Layers palette.
The Import dialog displays.
Note: The Import into Current Channel/Layer options occur in both the Channels and Layers menus, and the right-click menus in either palette. The result of importing textures into the selected channel’s layer stack occurs regardless of which menu option you use.
Video: Have a quick look at the Importing texture maps into Mari video.
This video shows the workflow using Mari 3. Even though the Mari 4 workspace is different, the workflow remains the same. To have a look at the main UI differences, see Mari 3.3 vs 4.0.
Importing Individual Files
To individually pick which files to load for each patch:
| 1. | Click the NamedFiles tab. |
The tab shows all the patches on the object.
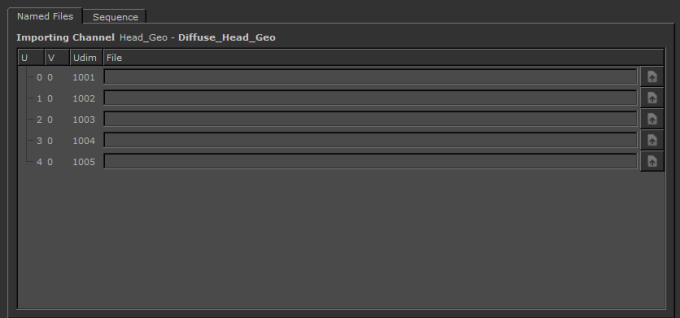
| 2. | For each patch, set the file you wish to import. |
You can either:
• type the file path and name directly, or
• use the open ![]() button to open a navigation window to find the file.
button to open a navigation window to find the file.
You can now set resize details and import the textures.
Note: When the image source resolution is non-square, or unsupported by Mari, the image is resized to the nearest power-of-two square size bigger than the original. You are informed of the resize change in the Image Import Summary, and is further detailed when View Summary is turned on.
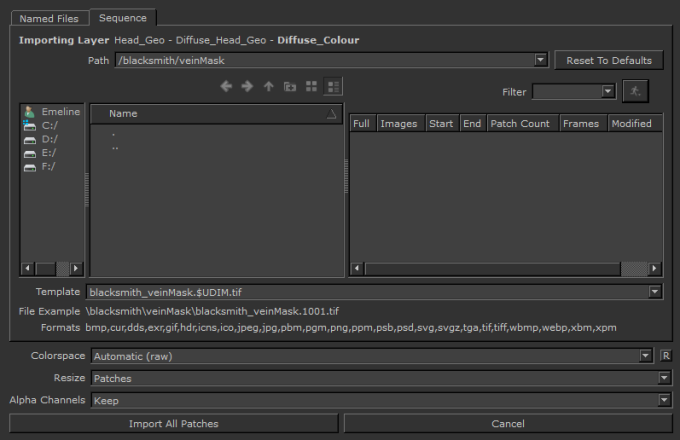
Importing a Sequence of Files
If your patches have a consistent naming/numbering system, you can import them as a sequence.
| 1. | Click the Sequence tab. |
The tab shows all the patches on the object.
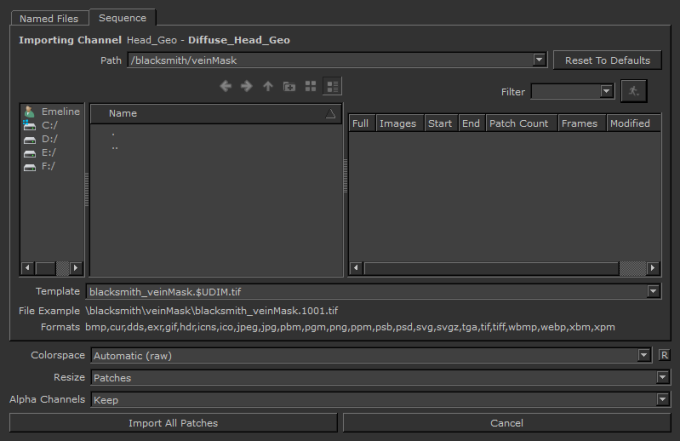
| 2. | Enter the location of the files to import in the Path field. |
Note: This isn’t the name of the files themselves. It’s the name of the directory in which the sequence of files exists.
Tip: Make sure you check the path and name carefully, especially if you have been swapping between assets - Mari defaults to the last place you've exported. Don't risk overwriting your textures!
You can either:
• enter the full path to the directory containing the files (or pick from the dropdown), or
• use the navigation controls to navigate to the directory:

When you've selected the path, the file area shows all the existing image sequences under that path.
| 3. | If you are looking for a specific folder or file, you can use the Filter field to specify a name or file format to search for. |
Note: The Walk  button is toggled off by default. When enabled, Mari looks in all folders of the selected location (refer to the Path field in the Import dialog) and displays all folders and files in the right pane.
| 4. | Either use the default filename template or set a Template for Mari to use when gathering the names of images in the selected sequence. |
You can either:
• Edit this line manually. As you edit, the FileExample updates with the name of an example file in the sequence.
• Click on an existing set of images in the main list. The Template automatically populates with the corresponding values.
If you edit the line manually, you can use any of the following variables, which Mari replaces with the appropriate values when it imports the images:
• $ENTITY - the name of the object.
• $CHANNEL - the name of the channel.
• $LAYER - the name of the layer.
• $NODE - the name of the node.
• $UDIM - the UDIM patch value.
• $FRAME - the animation frame number.
• $NUMBER - the number of the file within the batch (for example, “$NUMBER of $COUNT” gives strings like “22 of 28”).
• $COUNT - the total number of files in the channel.
• $COLORSPACE - the chosen colorspace for the selected images.
• $[METADATA VALUE] - any user-defined variables (for example, if a patch has a user attribute called “PROJECT”, with a value of “Project1”, Mari replaces the variable “$PROJECT” with “Project1”).
Note: The steps above assume you are importing a sequence of patches with the UDIM number (1001, 1002, and so on.) in the file names. For more information on how the UDIM patch values are allocated, please see the section on Using UDIM Values.
Note: If you choose to import a layered .psd file, layers are imported directly into the selected channel. If attempting to import layers with the same name, Mari asks whether to update the layers or create new ones. You can now set resize details and import the textures.
| 5. | Set the Colorspace for data export. By default, Mari selects the colorspace determined by the value set in Default Import Colorspace in the Mari Preferences dialog under the Color tab. |
See Mari Preferences Dialog for more information.
| 6. | Set how Mari handles patch/image size mismatches in the Resize field. You can select either to resize the Images to match the patches, or to resize the Patches to match the images. |
| 7. | In the Alpha Channels field, choose to either Keep or Remove the alpha when importing channels. This can help decrease the resulting file size when exporting. |
| 8. | Click Import All Patches to import the textures or, if at least once patch is selected, this appears as Import Selected Patches. |
Mari imports the images and loads them into the layer stack of the selected channel.
Sorry you didn't find this helpful
Why wasn't this helpful? (check all that apply)
Thanks for your feedback.
If you can't find what you're looking for or you have a workflow question, please try Foundry Support.
If you have any thoughts on how we can improve our learning content, please email the Documentation team using the button below.
Thanks for taking time to give us feedback.