Multi-Channel Merge Node
Access: Nodes > Layer > Multi-Channel Merge
The Multi-Channel Merge node lets you combine two materials together. It may seem rather overwhelming to begin with but if you know how to use a Merge node, you know how to use this one.
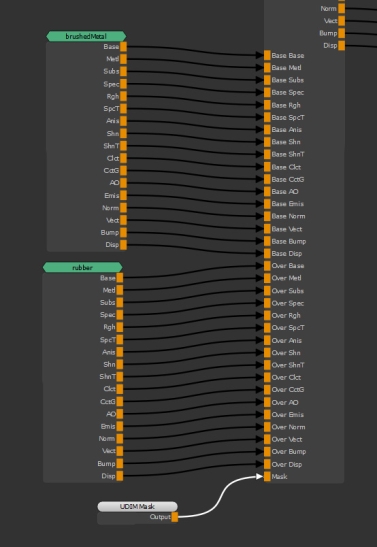
The Multi-Channel Merge node has the same inputs as a Merge node. These inputs are Base, Over and Mask, but the Multi-Channel Merge node has different types of outputs for each of the texture channels a material can output.
If you are working in the Node Graph with materials, a Multi-Channel Merge node is the easiest way to quickly combine materials together, with the ability to mask parts of a mesh out and change blend nodes on a per channel basis.
Note: To learn how to combine two materials together, see Multi-Channel Merge Node Workflow Example.
When you place down a Multi-Channel Merge node, Mari asks what kind of Shader Model you are using. You need to select the one that matches up with the materials that you are using in your scene as it chooses the input and output channels the node has based on the shader type.
Note: You can merge two multi-channel material nodes by pressing M on the keyboard to create a Multi-Channel Merge node. To learn more, see Merging Multi-Channel Material Nodes in the Node Graph.
Multi-Channel Merge Node Inputs
Base: Define which material and the corresponding channels to use as the base to be merged on top of.
Depending on the selected shading model you get different options. For the shading model there are 17 texture channels that can be inputted:
- Base - Base Colour
- Metl - Metallic
- Subs - Subsurface
- Spec - Specular
- Rgh - Specular Roughness
- SpcT - Specular Tint
- Anis - Anisotropic
- Shn - Sheen
- ShnT - Sheen Tint
- Clct - Clearcoat
- Cctg - Clearcoat Gloss
- AO - Ambient Occlusion
- Emis - Emissive
- Norm - Normal
- Vect - Vector
- Bump - Bump
- Disp - Displacement
Note: The texture channel names appear as full names on the node's input and output streams.
Over: Define which material and the corresponding channels to merge on top of the base.
Depending on the selected shading model you get different options.
Mask: Uses a black and white mask to merge the Over inputs onto the Base inputs.
Multi-Channel Merge Node Properties
The Multi-Channel Merge node has a slightly different UI compared to the standard Merge node and other nodes. You can turn off the merging of individual channels by enabling and disabling the orange checkboxes under the Shader Model panel.
Note: Hold Shift and double-click the Multi-Channel Merge node to expand each of the merges in the Node Properties. To learn about the properties for each merge, see Merge Node Properties.
Note: You are only able to enable and disable channels and change blend modes for nodes that lead into a Channel node. This is in case you want to put a paint material over a brick material, but want the brick bump or displacement to show through the paint. Disabling the bump the paint provides in this scenario allows the brick bump to show instead.
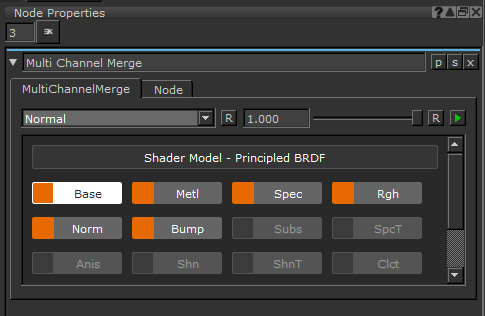
You also do not change the blend mode for every channel, when you change the blend mode you only do it for the current channel selected.
|
Amount text field, slider |
A modifier to the change the blend amount. 0 shows Base fully, and 1 blends the Over onto it fully. Default is 1. |
Blend Modes
Since the blend modes are a per channel basis, the example images change the blend mode on the Base Color node unless otherwise specified.
Tip: The materials used in the examples are available in the Materials tab of the Shelf palette - Bronze_Oxidized_Metal as Base, Bricks02 as Over. No mask is applied.
|
Normal |
Displays the Over on top of the Base. The Normal mode is used for layering operations. You can adjust the Amount to set how much of the Over input to show. Decreasing the Amount allows you to show the Base input. |
|
Copy |
This copies the information from the Over input and doesn’t involve any blending operations. Note: Adjusting the Amount has no effect. |
|
Clear |
Subtracts the opacity of the Over input from the Base input. It erases texture from the Base input using the alpha component of the Over input. For example, an Over input with 80% opacity leaves a Base input with 20% opacity. |
Darken
|
Darken |
Gives each pixel the darker of two possible values: the Base or the Over (whichever is darker). |
|
Multiply |
Darkens the color by multiplying the Base color information by the Over color information. |
|
Color Burn |
Burns the Base using the contents of the Over as input for the burn operation. |
Lighten
|
Lighten |
Gives each pixel the lighter of two possible values: the Base or Over (whichever is lighter). |
|
Screen |
Lightens the image by dividing the Base by the Over. Note: This is the opposite of Multiply. |
|
Color Dodge |
Dodges the Base using the contents of the Over to control the degree of dodging. |
|
Add |
Adds the values of the Over colors to the values on the Base. |
Contrast
|
Contrast |
The destination color moves away from the Over color by contrasting around the Over color. How much it contrasts depends on the alpha. |
|
Decontrast |
The destination color moves towards the Over color by decontrasting around the Over color. How much is decontrasted depends on the alpha. |
|
Overlay |
Uses the patterns and colors from the Over, but keeps the highlights and shadows from the Base. |
|
Soft Light |
In dark areas in the Base burns the Over onto the Base. In lighter areas, dodges it on. |
|
Hard Light |
Mimics a harsh spotlight. Makes light areas lighter using a screen effect, and dark areas darker using a multiply effect. |
|
Vivid Light |
In dark areas in the Base, adds the Over with more contrast. In light areas, adds it with less contrast. |
|
Pin Light |
For light areas in the Over, replaces pixels in the Base that are darker than the corresponding pixels in the Over. For dark areas in the Over, replaces pixels in the Base that are lighter than the corresponding pixels in the Over. Otherwise, leaves the Base unchanged. |
|
Hard Mix |
First performs a vivid blend, then thresholds the colors to their extreme values. The result is that the pixels can be one of eight colors - black, white, red, green, blue, cyan, magenta, or yellow. |
|
Sponge Desaturate |
Uses the Over as the input to desaturate the pixels on the Base. |
Inversion
|
Difference |
Inverts the colors by subtracting the values in the Over from those in the Base. |
|
Exclusion |
Inverts the colors, but with a lowered contrast. |
|
Invert |
Uses the Over as the input to invert the pixels on the Base. |
|
Inverse Difference |
Subtracts the colors in the Over from the Base, and inverts the result. |
Burn
|
Burn Highlights |
Burns the Base based on the highlights in the Over. |
|
Burn Midrange |
Burns the Base based on the middle range (that is, not the lightest or darkest pixels) of the Over. |
|
Burn Shadows |
Burns the Base based on the contents of the Over, with darker pixels being burned harder. |
Dodge
|
Dodge Highlights |
Dodges the Base based on the highlights in the Over. |
|
Dodge Midrange |
Dodges the Base based on the middle range (that is, not the lightest or darkest pixels) of the Over. |
|
Dodge Shadows |
Dodges the Base based on the contents of the Over, with darker pixels being dodged harder. |
Component
|
Hue |
Takes the luminance and saturation from the Base pixels, with the hue from the Over. |
|
Saturation |
Takes the luminance and hue of the Base color, with the saturation from the Over. |
|
Color |
Takes the luminance of the Base, and the color and saturation of the Over. |
|
Luminance |
Takes the hue and saturation of the Base color, and the luminance of the Over. Note: This is the opposite of the Color blend mode. |
Vectors
|
Paint Flow Vectors |
Changes the Over to tangent vector space. Keeps the vectors flat to the object’s surface in 2D space. Unlike Nudge Flow Vectors, the Paint Flow Vectors mode blends between the vectors instead of adding them. This mode is best for use with flow maps. |
|
Nudge Flow Vectors |
Changes the Over to tangent vector space. Keeps the vectors flat to the object’s surface in 2D space. The Nudge Flow Vectors mode adds the vectors together to get the blend result, and is best for use with flow maps. |
|
Paint Normal Vectors |
Changes the Base to tangent vector space. Allows the Z value to face outward in 3D space, so that vectors can face out from the object’s surface anywhere on the object. Unlike Nudge Normal Vectors, the Paint Normal Vectors mode blends between the vectors instead of adding them. This mode is best for use with normal maps. |
|
Nudge Normal Vectors |
Changes the Over to tangent vector space. Allows the Z value to face outward in 3D space, so that vectors face out from the object’s surface anywhere on the model. The Nudge Normal Vectors mode adds the vectors together to get the blend result, and is best for use with normal maps. |
|
Scale Vectors |
This is most useful with the basic Paint tool, while preferably using grayscale paint. Scale Vectors uses the intensity of color to control the length of the normal in 3D space. |
Normal Maps
|
Add Normal Maps |
Blends two RGB-encoded vector layers with the Add input by converting the raw values from the 0.0 to 1.0 colorspace-encoded range, to the -1.0 to +1.0 vector range. Then applying the blend factor to the Over input, adding the values and normalizing the values, before converting it back to the 0.0 to +1.0 colorspace-encoded range. |
|
Mix Normal Maps |
Blends two RGB-encoded vector layers with the Add input by converting the raw values from the 0.0 to 1.0 colorspace-encoded range to the -1.0 to +1.0 vector range. Then applying the blend factor to the Over input, adding the values and normalizing the values, before converting it back to the 0.0 to +1.0 colorspace-encoded range. |
|
Mix Reoriented Maps |
Blends two RGB-encoded vector layers in a way that preserves the strength and details of both the Base and the Over inputs. |
Multi-Channel Merge Node Workflow Example
Setting up Materials with a Multi-Channel Merge Node
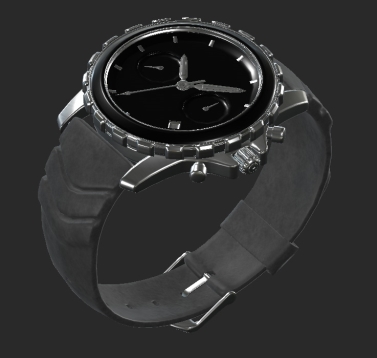
Working with the Multi-Channel Merge node and the Materials system allows you to quickly build up base textures for all your channels. In this example we will use three Material nodes to quickly get a watch asset filled in.
After creating your own materials you can save them to the Shelf to use later.
In this example, we are using custom built materials, but there are presets in the Mari Materials tab of the Shelf palette.
After placing down two Material nodes, you can add a Multi-Channel Merge node to combine them by selecting both Material nodes and pressing M on the keyboard.
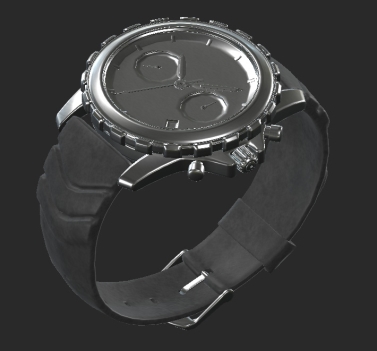
In this example, since the rubber strap is on its own UDIM, we can use a UDIM Mask node as the Mask input for the node. This merges the rubber over the brushed metal material on just the strap:
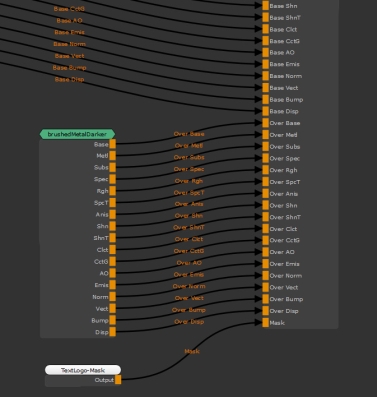
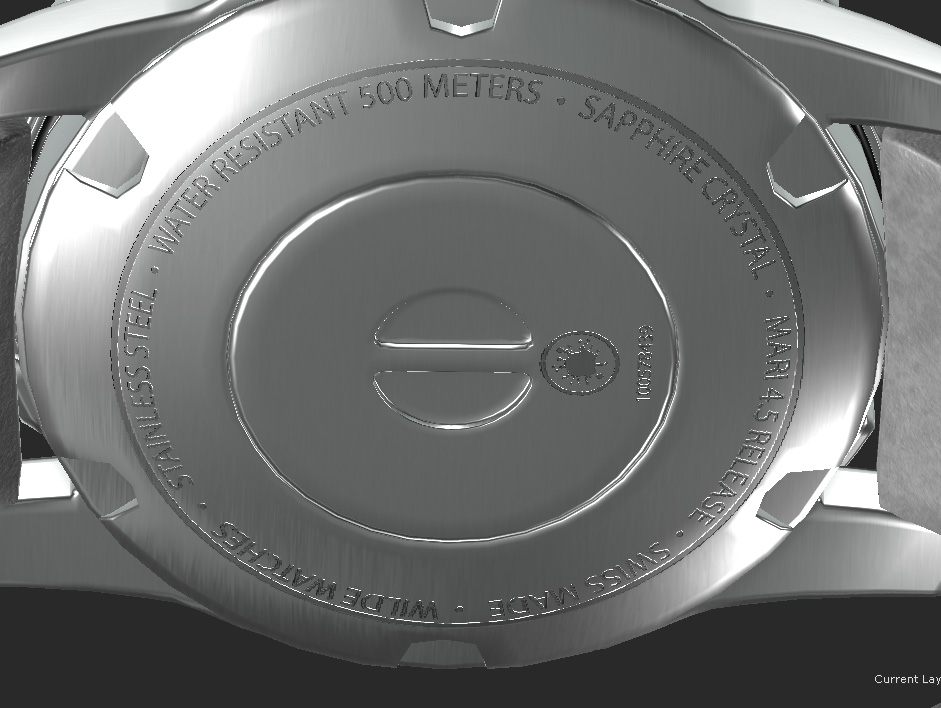
Lets add a third Material node. This is a copy of the base brush metal material, but darkened so that we can use for the text on the back of the watch.
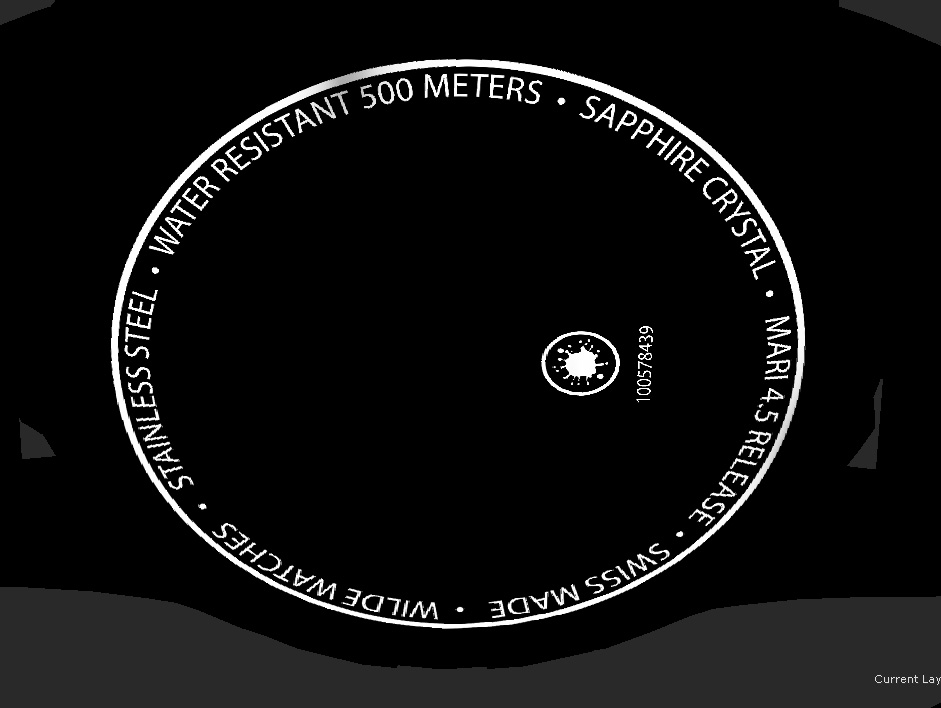
This time we will use a Paint node for the mask. By setting up a mask in an external graphic design program with text we can tell Mari where to make the metal darker. The mask in the example below has been imported into this Paint node. The Bump channel of this new material is also a darker value so it will push in, giving the impression of an engraving.
|
|
|
|
Mask |
Result |
Now we have base materials set up, we can use the outputs of the final Multi-Channel Merge node to input into the channels of our project.
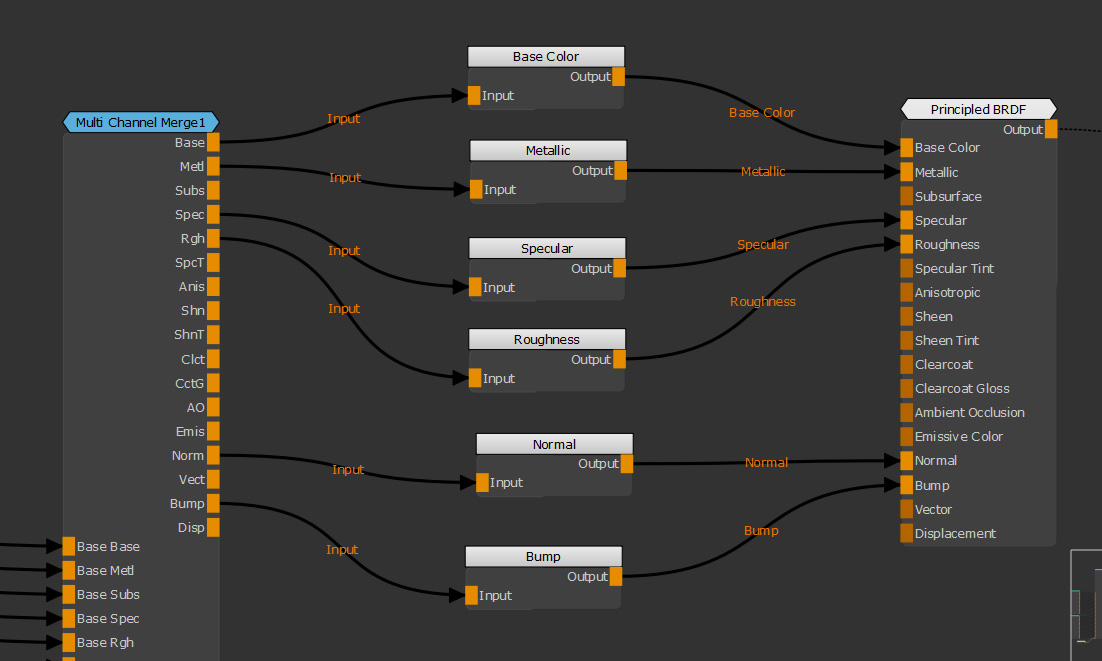
Note: When connecting merge nodes to end point nodes that use 8-bit color data, a dialog appears asking if you would like to automatically enable Use Blending Colorspace on the merge node. See Use Blending Colorspace to learn more.
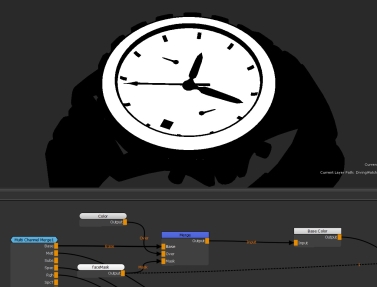
We can now add extra details between our Multi-Channel Merge node and the Channel nodes. We can add a darker color onto the face and dial of our mesh, like watches have in real life. By merging a color into the Base Color Node Graph with a mask we can add some extra variety. Below you can see the mask that the Color node in the following example is using.
And here is the final result, you can see how a simple change like that makes it look better.
With the Multi-Channel Merge node we have been able to set up textures for every channel of our scene that we can then go and add extra details onto. This is the power a Material workflow.
