Exporting Textures from Channels
Once you've finished working on your textures, to export the files (for example, for use in the next stage of the pipeline) select the channel(s) you want to export.
Video: To learn how to export textures out of Mari once you are done painting them, watch Exporting Textures.
Note: As the options below only export channels one dialog at a time, to export multiple channels at once,
From the Channels menu, select Export or Export Flattened.
| 1. | To export the channels without flattening them, do one of the following: |
• from the Channels menu, select Export > Export Current Channel to export the currently-selected channel, or
• from the Channels menu, select Export > Export All Channels to export all channels in the Channels palette, or
• from the Channels menu, select Export > Export Everything to export all channels for all objects in the project.
| 2. | To flatten the channels before exporting them, do one of the following: |
• from the Channels menu, select Export Flattened > Export Current Channel Flattened to flatten and export the currently-selected channel, or
• from the Channels menu, select Export Flattened > Export All Channels Flattened to flatten and export all channels in the Channels palette, or
• from the Channels menu, select Export Flattened > Export Everything Flattened to flatten and export all channels for all objects in the project.
Tip: The Export and Export Flattened menu options are also available from the right-click dropdown menu on the main canvas and in the Channels palette.
Note: All of the methods for exporting textures shown above follow the same instructions once they reach the Export Channels dialog.
The Export Channels dialog displays.
Exporting Individual Files
Exporting individual files lets you individually pick the patches to export, and where to export them.
Note: By default the Named Files tab doesn't display if you have more than 20 patches in your object.
To change this number, set the Patch Cutoff preference to a number greater than the number of patches in the file. Alternatively, you can use the MARI_NAMEDFILEIMPORT_SEQUENCELIMIT environment variable to override the preference setting. Please see the section on Environment Variables That Mari Recognizes for more information on environment variables.
| 1. | Click the Named Files tab. |
The tab shows all the patches on the object.
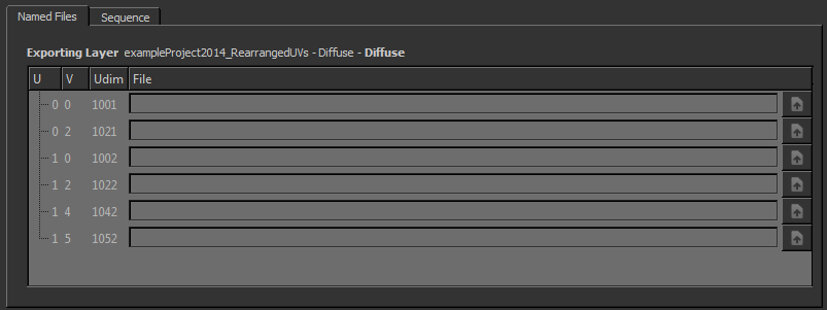
| 2. | For each patch, set the file to export it to. |
You can either:
• type the file path and name directly, or
• use the open ![]() button to open a navigation window to create a new file in a directory, or select an existing one to overwrite.
button to open a navigation window to create a new file in a directory, or select an existing one to overwrite.
| 3. | Select whether to enable Small Textures. |
With the small textures dropdown set to enabled, Mari exports any patches filled with a constant color as 8x8 pixel textures, no matter what resolution the patches are in Mari.
• Enabling Small Textures saves disk space if you're exporting a channel that hasn't been fully painted.
• Disabling Small Textures lets Mari always export patches at their full size (even if they haven't been painted).
| 4. | Click Export All Patches to export the textures. |
Mari exports your textures to disk in the background.
| 5. | To check the progress of the export click the |
Mari shows the export progress.

Exporting a Sequence of Files
If your patches have a consistent naming/numbering system, you can import them as a sequence.
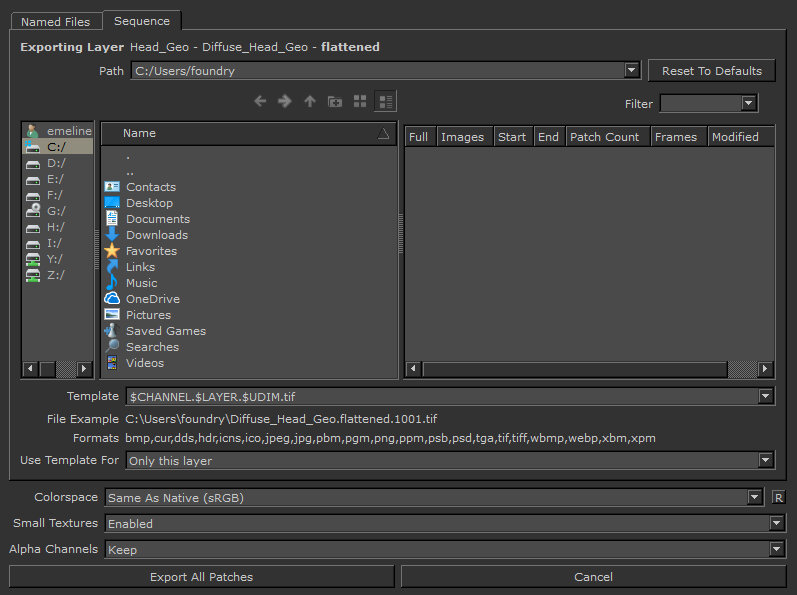
| 1. | Click the Sequence tab. |
| 2. | Enter the location to export the files to in the Path field. You can either: |
• enter the full path to the directory (or pick from the dropdown), or
• use the navigation controls to navigate to the directory.
Tip: Make sure you check the path and name carefully, especially if you have been swapping between assets - Mari defaults to the last place you've exported. Don't risk overwriting your textures!
| 3. | When you've selected the path, the file area shows all the existing image sequences under that path. |
| 4. | If you are looking for a specific folder or file, you can use the Filter field to specify a name or file format to search for. |
| 5. | Either use the default filename template or set a Template for Mari to use when generating the names of images in the selected sequence. |
You can either:
• Edit this line manually. As you edit, the File Example updates with the name of an example file in the sequence.
• Click on an existing set of images in the main list. The Template automatically populates with the corresponding values.
If you edit the line manually, you can use any of the following variables, which Mari replaces with the appropriate values when it exports the images:
• $ENTITY - the name of the object exported.
• $CHANNEL - the name of the channel exported.
• $LAYER - the name of the layer exported.
• $NODE - the name of the node.
• $UDIM - the UDIM patch value.
• $FRAME - the animation frame number.
• $NUMBER - the number of the file within the batch (for example, “$NUMBER of $COUNT” gives strings like “22 of 28”).
• $COUNT - the total number of files in the channel.
• $COLORSPACE - the chosen colorspace for the selected images.
• $[METADATA VALUE] - any user-defined variables (for example, if a patch has a user attribute called “PROJECT”, with a value of “Project1”, Mari replaces the variable “$PROJECT” with “Project1”).
| 6. | Set the Use Template For field to determine if the template above is used for Only this layer (the selected layer in the channel’s layer stack) or Everything (to include all layers in the stack). |
| 7. | Set the Colorspace in which you want to export the data. By default, Mari selects Automatic, which is determined by the file name, size, and type of data in the channel. |
| 8. | Decide whether Small Textures is enabled or disabled. |
• Enabling Small Textures saves disk space and exports any patches that you haven't painted yet, or have painted as a single color, as 8x8-pixel textures.
• Disabling Small Textures lets Mari always export patches at their full size (even if they haven't been painted).
| 9. | In the Alpha Channels field, choose to either Keep or Remove the alpha when importing channels. This can help decrease the resulting file size when exporting. |
| 10. | Click Export All Patches to export the textures. |
Mari exports your textures to disk in the background.
| 11. | To check the progress of the export click the |
Mari shows the export progress.
Note: The steps above assume you are exporting a sequence of patches with the udim number (1001, 1002, etc.) in the file names. For more information on how UDIM numbers are allocated to patches, please see Using UDIM Values.