Workflow
Sending a Projection Setup
To send a
| 1. | Select the Project3D node and the Geometry node that the projection is applied to, or select multiple nodes at once to send to Mari. |
Note: If you want to merge the
| 2. | If Mari is not already running, select Mari > Launch Mari or click on the Mari icon in the Mari panel to launch it. |
| 3. | In |

This pre-renders the texture to the location specified in mari data dir. The name of the pre-rendered file is derived from the node name and the current frame. If you sent the texture to Mari before, you are asked if you want to overwrite the file. If you select No, the existing file is used.
Note: You can also opt to export the projection instead of sending it to Mari using the
To export:
1. In ![]() in the Mari panel.
in the Mari panel.
2. Set a directory location in the Export Mari Projection dialog.
3. In Mari, select
This lets you send files between the two applications without a socket connection.
Note: When exporting files to disk in
Sending or Importing Projections to Mari
Once the projection has been sent or imported into Mari, follow these steps to set up the projections in your project:
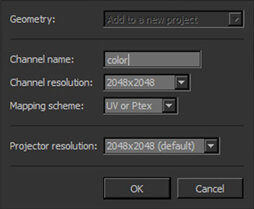
| 1. | If there is no project open in Mari, the script creates a new project and asks you to create a channel for your projection. In the Mari - New Projection dialog, you are prompted to enter a Channel name, set the Mapping scheme, provide a Channel resolution and finally, select the Projector resolution for the new channel. |
Note: Ensure that you don't compromise the incoming image's resolution by selecting a texture size that is too low.
If you already have a project open (for example, if you are re-importing the projection), you are asked if you want to apply the incoming projection to the current project or open a new project.
| 2. | Mari sets up: |
• objects in the Objects palette for each Geometry node sent or exported from
• projectors in the Projectors palette for each Project3D node sent or exported from
• the channel that you specified in the Mari - New Projection dialog in the Channels palette, and
• all the sent or imported cameras, created as layers in the specified channel’s layer stack, with masks to help blend projections together.
Depending on the complexity of the projection being sent or imported into Mari, this may take some time.
| 3. | Images are also imported into the Image Manager to keep track of the projection textures sent or imported into Mari. |
Sending or Exporting Projections to Nuke
Once you have finished your texture work in Mari, you have several options to send the data back to
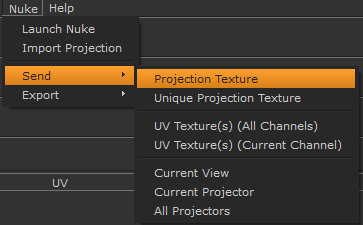
| 1. | Select |
| 2. | Once the texture has been written to disk, |
| 3. | Select |
| 4. | Select |
| 5. | Once the texture has been written to disk, |
| 6. | Select |
| 7. | Once the texture has been written to disk, |
| 8. | Select |
| 9. | Select |
Warning: If you create a projector in Mari and intend to send it to
| 10. | Select |
Note: You can also opt to export the projection instead of sending it to
To export:
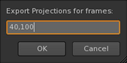
1. In Mari, select any of the seven options from the Mari > Export menu.
2. Set a directory location in the Export Nuke Projectors dialog.
3. In Nuke, select Mari > Import Projection and select the file in the Load Mari Projection dialog to import the projection into
This lets you send files between the two applications without a socket connection.
Note: When exporting files to disk in
Sending a Sequence Projection Setup
In addition to sending a single projection setup,
This workflow is the same as Sending a Projection Setup, with the exception of a Frame Range dialog that asks for the frames that the snapshots should be taken from.
Note: When planning to return a UV texture from Mari for a Geometry node, you should uncheck the Geometry node's Image Aspect checkbox at this stage. If you don’t, the image size changes when plugging in the UV map later on, causing a line-up error.
To send a
| 1. | Select the Project3D node and the Geometry node that the projection is applied to. |
| 2. | Click Mari > Send > Sequence Projections. |
| 3. | Enter the frame numbers in the Frame Range dialog. |
| 4. | Like before, if there is no project open in Mari, the script creates a new project and prompts you to specify a channel for your projections. You are prompted to enter a Channel name, set the Mapping scheme, provide a Channel resolution and finally, select the Projector resolution for the new channel. |
| 5. | Once your projections have been imported, Mari creates separate projectors for each frame in the sequence. |
| 6. | Proceed with the necessary texture work and, following the steps outlined in Sending or Exporting Projections to Nuke, send the data back to Nuke. |
Sending Image Nodes
You can also send any number of Read nodes directly from
• All Read Nodes - To send all Read nodes in the Node Graph.
• Selected Read Nodes - To send only the selected Read nodes in the Node Graph.
• Selected Nodes - To send all Read nodes in the Node Graph. These appear in the Image Manager in Mari.
Sending a Lookup Table (LUT)
To ensure that images in Mari look the same as they do in