Creating and Deleting Individual Channels
To create a channel:
| 1. | Open the Channels palette by: |
• right-clicking on the toolbar, and selecting Channels from the dropdown menu, or
• from the View menu, selecting Palettes > Channels.
The Channels palette displays, showing the channels in the current project, a quick channel creation bar, and channel attributes in the bottom pane.
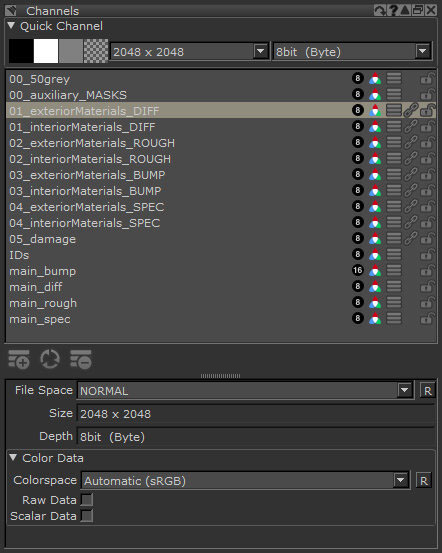
Note: A selection of channel presets are created based on your shader model. Mari creates the Principled BRDF - Non-Metallic-VFX shader by default.
| 2. | Add a single channel by: |
• right-clicking in the Channels palette, and selecting Add Channel,
• clicking the ![]() button, or
button, or
• from the Channels menu, selecting Add Channel.
The Add Channel dialog box displays, allowing you to set the options for the new channel.
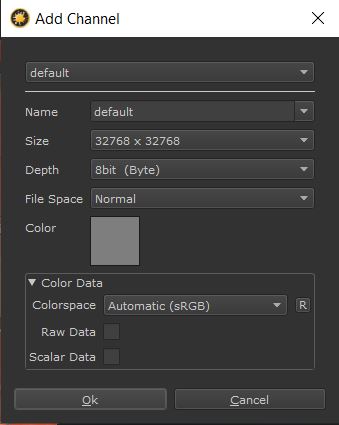
| 3. | The dropdown list at the top shows the names of channels that you've created recently. Select one from the list. |
The Name, Size, Depth, File Space, and Colorspace populate automatically.
Tip: If you have never created a channel, the dropdown at the top of the dialog does not appear, and the Name field is not populated automatically.
| 4. | As needed, you can change: |
• Name - the name to identify the channel (which you can change later).
• Size - the patch size for the new channel.
• Depth - the color depth (8-, 16-, or 32-bit).
• File Space - the type of file space used for vector painting: Normal, Vector, Vector (flipped Y), or Normal (flipped Y).
• Colorspace - the colorspace to which the channel data or mask data is converted.
• Color - the default color of the channel, on creation.
Note: If you are working with a Ptex project, the patch Size option appears grayed out, as the .ptx format doesn’t work with patches.
| 5. | If you intend on cloning from, or painting through, either 16-bit or 32-bit images, the Depth needs to be set to either 16bit (Half) or 32bit (Float), respectively. In addition, the color depth of the paint buffer needs to match the depth of the channel. |
Furthermore, if you do not want the range of 16-bit or 32-bit images clamped to values between 0 and 1, you need to uncheck the Clamp checkbox under the Paint Buffer settings in the Painting palette.
| 6. | Set the Colorspace for the channel to which the channel data is stored. Automatic determines the colorspace based on the Depth (data type) and whether it is color data or scalar data. |
| 7. | Set the Colorspace for the channel's masks to which the mask data is stored. Automatic determines the colorspace based on the Depth (data type) and whether it is color data or scalar data. |
Tip: If you are not familiar with colorspaces, you may want to keep the default colorspace that Mari automatically selects for the Colorspace fields. For more details on the color and mask data,
| 8. | Select the initial Color for the channel. To select a different color, click on the swatch and choose a color with the color picker. |
| 9. | Click Ok to add the channel to the object. |
Mari creates your new channel, and displays it in the Channels palette.
Note: If you are adding channels in a project with more than one object, instead of the Ok button, there are two buttons in the Add Channel dialog. You can opt to either add a channel to only the selected object or to all objects in the project, or cancel.
Note: If you have already created a channel with a given name and attempt to create a new channel with the same name, Mari increments the name to differentiate between the original and new channel. For instance, if you already have a "diffuse" channel and create another channel named "diffuse", Mari automatically gives it the name "diffuse1".
To create a copy of a channel, press Alt+drag-and-drop the channel. Mari creates your new channel as a copy of the original - including the layers, but not all the paint in those layers.
To delete a channel:
• right-click on the channel in the Channels palette, and select Remove Channel,
• with the channel selected, click ![]() ,
,
• from the Channels menu, select Remove Channel, or
• with the channel selected, press Delete on the keyboard.
If you have other objects in the project that have a channel with the same name, you have the option of removing the channels from only the selected object, or all objects in the project.