Setting the Main View Options
You can set the view options separately for the UV and 3D views.
| 1. | Switch to the view you want to set the view options for. |
| 2. | Either: |
• right-click on the canvas and select Display Properties from the dropdown menu, or
• from the View menu, select Display Properties.
The Display Properties dialog displays.
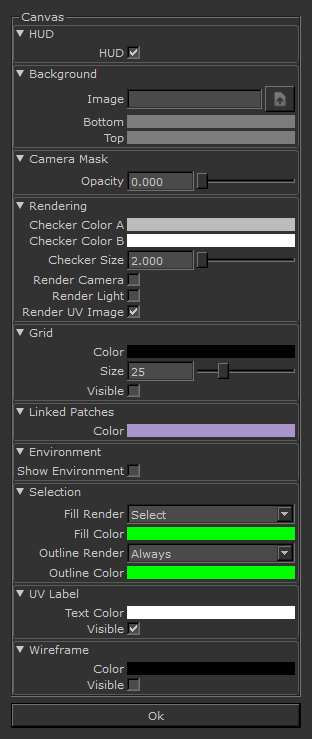
| 3. | To turn the onscreen display of the project information (Current Tool, Tool Help, Current Channel, and so on) off, uncheck the HUD box. |
| 4. | Under the Background section, set the window background. |
|
To set the background to... |
do this... |
|
an image |
enter the path to the image in the Image field. Use the button next to the field to open a dialog to find your image. |
|
a single color |
set the Bottom and Top fields to the same color. Click on the fields to set the color. |
|
a gradient between two colors |
set the Bottom field to the color for the bottom of the window, and the Top field to the color for the top of the window. Click on the fields to set the color. |
| 5. | To set the global setting for the canvas Environment light background image, set the Show Environment checkbox. This control allows you to set the canvas background image from the environment light independent of the display settings within the light. |
| 6. | If you want to display a reference grid in a 3D view, set the details under the Grid section. |
The Visible switch turns the onscreen grid on and off, while the other fields let you set the Color and Size of the grid displayed.
| 7. | To show the wireframes on the model, turn the Visible option on under Wireframe. |
You can set the wireframe color in the Color field.
Tip: You can turn the wireframe display on/off using the ![]() button on the Canvas toolbar, or using the keyboard shortcut Shift+W.
button on the Canvas toolbar, or using the keyboard shortcut Shift+W.
Tip: If the WireframeColor has a high alpha value, it may be hard to see onscreen. If you have the wireframe turned on but cannot see it on your model, check that the WireframeColor isn't too transparent.
| 8. | If you want to adjust the Camera Mask Opacity, use the text field or the slider to select a value between 0 and 1. |
| 9. | To select the color that you want shown when selecting Linked Patches, click on the color swatch to select from the color picker. You can also select the Linked Patch color from within the Patches palette. |
| 10. | Under the Rendering section, you can control which additional parts of the scene display onscreen: |
• Checker Color A - changes color A of the transparency checkerboard to the selected swatch color.
• Checker Color B - changes color B of the transparency checkerboard to the selected swatch color.
• Checker Size - changes the individual transparency checkerboard squares to the selected size using either the text field or the slider. The default value is set to 10.
• Render Camera - shows the camera view onscreen.
• Render Light - shows the lights as globes on the main canvas.
• Render UV Image - if this is off, the UV view shows the patches as they appear as part of the model. If this is on, the UV view shows the patches as they appear when exported (that is, as square images, with overpaint areas around the corners of the patches).
Tip: You can also turn Render UV Image on/off using the ![]() button on the Canvas toolbar.
button on the Canvas toolbar.
| 11. | If you're setting properties for the UV view, under the UV Label section, set the details for the text labels shown over the individual patches: |
• Text Color - click the swatch to set the color for the text on the labels.
• Visible - uncheck this to stop showing the text labels in the UV view.
| 12. | If you're setting properties for 3D views, under the Selection section, set the details for highlighting shown on selected areas: |
• Fill Render - when to show the highlighting in the middle of the selected areas. One of:
• Always - Mari shows the highlighting the whole time the area is selected.
• Select - Mari only shows the highlighting while you are actually selecting the area.
• Never - Mari does not show the selection highlighting.
• Fill Color - click the swatch to set the highlight color for the middle of the selected areas.
• Outline Render - when to show the highlighting around the outline of the selected area. You can set this to Always, Select, or Never, as for Fill Render (above).
• Outline Color - click the swatch to set the highlight color for the middle of the selected areas.
| 13. | Click OK to save your settings. |