Caching and Uncaching Layers
Layers can be cached in order to prevent Mari from slowing down. A large number of layers, or computationally-expensive layers, can lower performance. Fortunately, caching layers can mitigate this.
Warning: Changing colorspace settings of a channel removes any cache from all layers of that channel.
Each layer displays a colored bar to the right of the layer. This tells you how expensive the layer is and its cached state. Inexpensive layers are green, cached layers are light blue, the top layer when using Cache Up To Here is dark blue, and as the layers become more complex or higher up in the layer stack they progress to yellow, orange, and red.
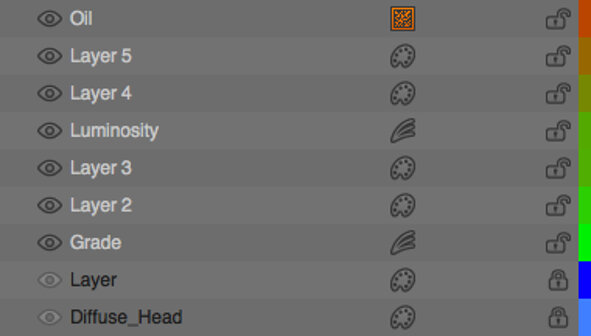
When a layer has been cached, that layer is locked. Any change you may wish to make requires you to unlock the layer. For more information about locking other selected items, see Hiding and Locking.
| 1. | To cache a layer, or layers: |
• with the layer(s) selected, from the Layers menu, select Caching > Cache Layers, or
• right-click on the layer and select Caching > Cache Layers from the dropdown menu.
| 2. | To cache all layers up to a point in the layer stack: |
• with the layer selected, from the Layers menu, select Caching > Cache Up To Here, or
• right-click on the layer you want to cache up to and select Caching > Cache Up To Here from the dropdown menu.
Like caching a single layer, all layers cached using Cache Up To Here are locked and cannot be edited until uncached.
Note: Cache Layers and Cache Up To Here both cache material layers across all siblings channels. See Managing Materials in Mari for more information on materials.
Tip: You can also combine these two functions in order to work more quickly on your layer stack.
| 3. | To uncache a layer, or layers: |
• with the layer selected, from the Layers menu, select Caching > Uncache Layers,
• right-click on the layer and select Caching > Uncache Layers from the dropdown menu, or
• click the locked padlock icon ![]() .
.
The cached layer is unlocked and uncached.
| 4. | To uncache all layers that have been locked with Cache Up To Here: |
• with the layer selected, from the Layers menu, select Uncache Up To Here,
• right-click on the layer you locked with Cache Up To Here, and select Uncache Up To Here from the dropdown menu, or
• click the locked padlock icon ![]() .
.
The cached layer stack is unlocked and uncached.
Note: If you have used the Cache Up To Here option for your caching, you can only right-click on the top layer in the cached stack to uncache. This layer is indicated by a blue cache bar.
Alternatively, you can uncache and unlock a layer by clicking on the padlock icon ![]() . This uncaches and unlocks all the cached layers locked by Cache Up To Here.
. This uncaches and unlocks all the cached layers locked by Cache Up To Here.
If you want to try caching and uncaching layers while using both the Cache Layers and Cache Up To Here options, try the following:
• Cache Up To Here in your layer stack when, for instance, you need to increase the frame rate while working on a large layer stack.
If you want to make changes to a layer under the Cache Up to Here layer but want to keep your frame rate low, Cache Layers on any computationally expensive layers around the layer you want to edit.
• Uncache Up To Here on your original, top layer in the cached layer stack.
You can now edit just that one layer, while still having some of the expensive layers around it cached to prevent your performance suffering.
Article: Take a look at the Caching Layers to Improve Performance and Cache colours and their meanings in Mari articles for more information.