Setting How Colors Are Displayed Onscreen
Mari sets how colors are displayed for each project separately. You can set this using either the Color Manager (View Transform) palette, the View Transform toolbar, or adjust the individual colorspaces of the project in the Project Settings dialog.
Note: The Color Manager (View Transform) palette is deprecated since Mari 4.0v1. You can display using an environment variable, see Environment Variables That Mari Recognizes.
|
1.
|
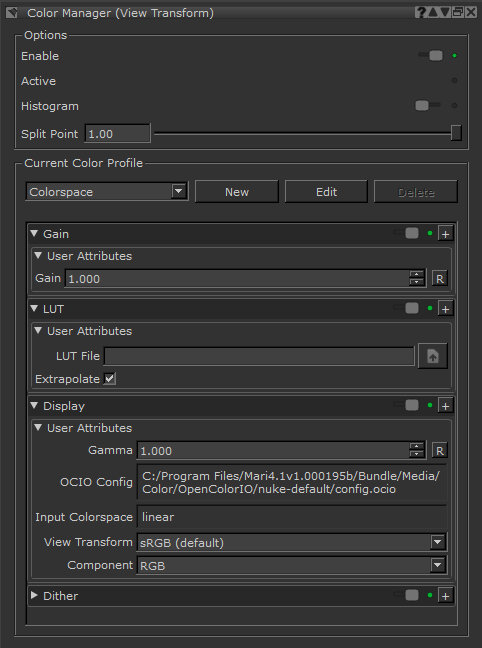
Open the Color Manager (View Transform) palette: |
• right-click on the toolbar, and select Color Manager (View Transform) from the dropdown menu, or
• from the View menu, select Palettes > Color Manager (View Transform).
The Color Manager (View Transform) palette shows color display settings for the current project.
|
2.
|
Under Options, select the main display options: |
• Enable - when selected, applies the color profile selected in the Current Color Profile section (see below).
• Histogram - when selected, a histogram displays in the bottom left of the canvas, showing details of the color balance in the current channel.
• Split Point - where (and whether) to split the canvas between color-corrected and uncorrected. The default is with the slider at the far right, at 1.00, showing the entire canvas with color correction. Moving the slider changes the split. For example, moving it halfway along (to 0.50) makes Mari display a split halfway across the screen, with color-corrected on the left and uncorrected on the right.
|
3.
|
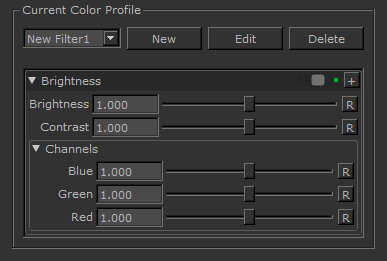
Under Current Color Profile, select a color profile from the list, or click New or Edit to create a new color profile or edit the current one. |
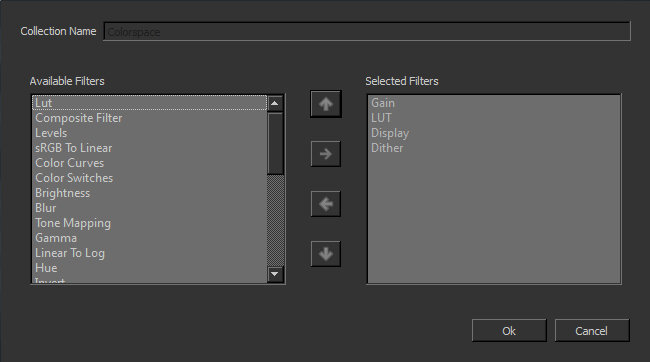
The Edit dialog box displays the filters available for building up a color profile. For the Colorspace Color Profile, three filters - Gain, LUT, Display, and Dither - are selected by default and cannot be deleted.
|
4.
|
Select filters to use from the Available Filters list, and click the right arrow button to move them to the Selected Filters list. Choose the order in which to apply the filters in the Selected Filters list, using the up and down arrow buttons. Then click OK. |
The Current Color Profile dialog box lists the selected filters.
|
5.
|
To view and configure how Mari applies a selected filter, click to expand it, then set its properties. |
|
6.
|
You can delete color profiles from the list by selecting a profile and clicking Delete. |
Tip: For more details on Mari’s filters, see Filtering Images and Paint.
|
1.
|
If the View Transform toolbar is not enabled, click  or select Enable in the Color Manager (View Transform) palette. or select Enable in the Color Manager (View Transform) palette. |

|
2.
|
Click  to select an OCIO configuration file. to select an OCIO configuration file. |
Note: This option is only available if color management is switched off. If you want to turn color management off, navigate to File > Settings > Colorspace and disable Color Management Enabled.
|
3.
|
Set the colorspace of the current channel or image values from the Input Colorspace dropdown menu. |
|
4.
|
If you want to set up a LUT, click  , choose Select, and browse to a file in the Select LUT File dialog. , choose Select, and browse to a file in the Select LUT File dialog. |
|
5.
|
Select the colorspace transform to apply to the scene using the View Transform dropdown menu. |
|
6.
|
View the individual channels for the scene using the Component dropdown menu. |
|
7.
|
Specify the amount of exposure adjustment applied before the view transform by either entering a multiplier (exposure value), dragging on the slider, or adjusting the F-Stop value in the Gain controls. |
|
8.
|
Finally, specify the amount of Gamma correction applied after the gain viewer process by entering a gamma level or by dragging the gamma slider. |
Note:
For more information see View Transform Toolbar .
Using the Project Settings
During project creation, you can set the colorspace you want to use for different aspects of your project. However, you might find that after you've created your project, you want to change these colorspace settings. You can do this in the Project Settings. Follow the steps below to adjust your settings:
|
1.
|
Navigate to File > Settings. |
The Project Settings dialog displays.
|
2.
|
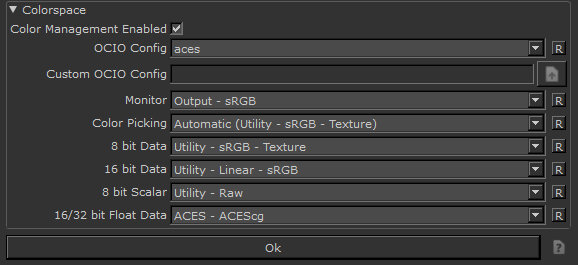
Enable or disable the OpenColorIO color management using the Color Management Enabled checkbox. |
|
3.
|
Specify the OCIO Config file to use. The options given are shipped OpenColorIO configuration files that handle colorspace or user-defined configuration files (Custom) that you can set up yourself. |
|
4.
|
If you chose Custom for the OCIO Config field, you need to specify, or browse to, the configuration file that you want to use for this project. |
|
5.
|
Set the Monitor field to specify which is the default colorspace, that applies to thumbnails and UI elements. Though it can be whatever colorspace you want, it's recommended that this is the same colorspace as the one that you intend to use for the view transform. |
|
6.
|
Set the Color Picking field to specify which colorspace is used for all the color pickers and swatches in the project. |
|
7.
|
Set the 8 bit Data field to specify which is the default colorspace for 8-bit (Byte) channels, as well as for reading and writing image files with 8-bit data. |
|
8.
|
Set the 16 bit Data field to specify which is the default colorspace for reading and writing image files with 16-bit data. |
|
9.
|
Set the 8 bit Scalar field to specify which is the default colorspace for masks, heights, normals, depths and, generally, any non-color image with 8-bit data. See Color Data and Scalar Data for more information. |
|
10.
|
Set the 16/32 bit Float Data field to specify which is the default colorspace for 16- and 32-bit (Float) channels, as well as for reading and writing image files with floating point data. |
Note: You don't need to specify all of these settings, either on project creation or while working on the project, as Mari automatically inserts default options for these fields.
Note: A 16-bit channel is in half format, which is floating-point and should take the default from the 16/32 Bit Float Data setting, not the 16 Bit Data option. The 16 Bit Data option is for 16-bit integer formats and is currently only used in Mari for importing or exporting images in that format, such as some .tiff files. Mari currently doesn't support 16-bit integer channels.