Baking in Mari With the Bakery
Baking is an essential part of the texture artist's toolbox. It enables the display of detail from high-res (high poly) models on low-res models, thereby requiring fewer computational resources to create. You can also streamline creating certain types of materials and effects without having to repaint each time. Let’s say you need an edge wear mask on an object, instead of painting a new mask from scratch each time, you can generate a curvature map as a a basis.
In essence, baking refers to the process of converting and flattening dynamically computed 3D geometry into a 2D texture map. The baked texture map is essentially a frozen snapshot of the surface properties, which can then be applied to a lower poly mesh to generate detail within the shader.
High-resolution 3D source data is often too computationally expensive to use when rendering, texturing, or animating. Instead, a 2D texture map can efficiently draw the same details without loss of fidelity.
Example: Imagine the surface of a game character’s skin is cracked and creviced. You can add realism by using ambient occlusion to calculate the shadows that may lie within the cracks. However, calculating these shadows for every frame in a render or animation would require a lot of computational resources. Instead, you can convert this shadow detail into a 2D map known as an Ambient Occlusion map that can be used on the surface of the character to replicate the crack details. The use of a map means that no frame-by-frame recalculation is needed as the map detail is fixed ahead of time.
Capturing Details With Baked Texture Maps
There are many types of mesh maps that can be captured by baking including curvatures, ambient occlusion (AO), and normal maps. This provides a way to collect valuable details such as where shadows lie within ambient lighting conditions, the position of geometry edges, and the thickness of areas within the mesh.
Once generated, the texture map can add surface information and depth to textures and materials, allowing simpler models to display complex visual details without processing heavy geometry. These baked maps can then be used to drive advanced materials, influencing how the textures interact with light and capturing information that may otherwise need to be uniquely painted for each asset.
Note: To find out how to add texture maps to layers, see Importing Textures to Layers.
Mari offers default recipes for the following bake item types:
- Ambient Occlusion - Simulates how an ambient light source affects an asset, especially in crevices and in areas where the asset will cast a shadow upon itself. This creates soft areas of shadow and light.
- Displacement - Captures height information from a high-poly model's surface details, enabling realistic texture and geometry effects on a lower-poly model.
- Normal - Encodes the angles of the surface normals from the high-poly model, which gives the low-poly model the appearance of more complex surface detail.
- Position - Records the 3D position of every point on the model's surface, providing valuable information for directional shading and material effects.
- Thickness - Measures the distance between the top and bottom sides of a surface. This type can be used in subsurface scattering or to simulate various materials such as cloth, skin, or wax.
- Curvature - Highlights the edges and curves of a model by analyzing the bending of its surface. This is useful for highlighting details and can be employed to create edge wear effects in texturing.
The Bakery
Mari provides a dedicated tool for baking mesh maps called the Bakery. Click the Bakery button in the top toolbar to open the Bakery window.

Bakery Workflow Overview
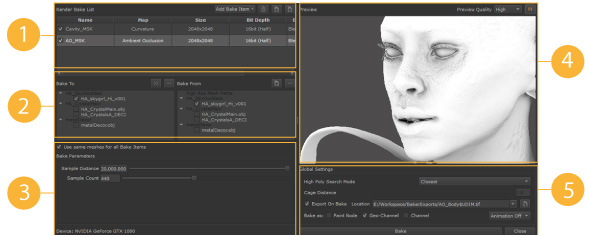
The Bakery offers a simple workflow for baking maps. The numbered steps below correspond to the numbered panels in the UI screenshot above.
- Populate the Render Bake List - Add a list of item types to bake, such as ambient occlusion, and set the texture map's properties, such as size and bit depth.
- Configure Bake From and Bake To meshes - Choose your high-res mesh to bake from and your lower-res mesh to bake to.
- Adjust the bake item's Bake Parameters.
- Preview the result for any of the bake items.
- Choose Global Settings - Adjust the general settings and start the bake.
Adding and Editing Bake Item Maps
To add an item to bake, select the texture map recipe from the Add Bake Item dropdown in the top toolbar of the Bakery window.
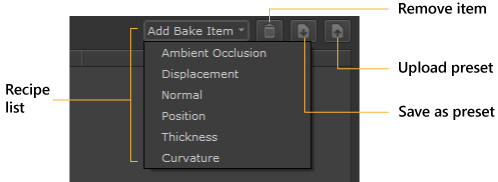
- To remove an item, highlight it in the list and use the trashcan.
- You can also store and upload presets for later use.
See Capturing Details With Baked Texture Maps for more details on each type.
Adding bake recipes populates the Render Bake List.

Every item type shares properties that determine how the texture is generated.
Bake Texture Map Properties
For each item in the list, you can edit the following texture properties:
Note: Map is not editable as it is a fixed property that describes the map type.
| Name | Name is the map type by default, but you can edit this as needed, particularly if you have multiple maps of the same type. |
| Size | Choose the resolution of the texture map. There are eight options ranging from 256x256 to 32768x32768 (32K). |
| Bit Depth | Choose from three possible bit depths to define the range of colors in each channel for the texture map:
|
| Edge Bleed | Choose the bleed behavior for the edges around the bake textures.
|
Each item type offers a set of parameters that affect the appearance of the bake result. To see these, click on the item to populate the Bake Parameters section.
Choosing Meshes for Baking
When baking, you typically take the 3D data from a mesh, which is baked onto a texture that is applied to a different, usually lower poly mesh.
The two meshes are built with equivalent parts so the bake can work smoothly.
The mesh to bake from and the mesh to receive the texture are show in two adjacent panels:

- The Bake To panel displays the lower poly meshes to receive the baked texture.
- The Bake From panel lists the higher poly meshes that provide the data for the bake.
Note: There may be a case when the source and the target meshes are the same model. In certain cases, the mesh may contain enough information to generate a useful map. For example, a simple position map.
The meshes in each panel have a checkbox so that you can select which meshes are involved in the baking process.
A typical workflow would follow these steps:
- By default, the Bake From panel lists the same meshes as your project meshes. You can upload a different high-res mesh using the upload button
 .
. - Select the meshes in the Bake To panel to receive the baked items.
- Propagate the selection from the Bake To meshes to the equivalent meshes in the Bake From panel using the Copy button
 .This ensures a match between the selections.
You can select individually, or clear all selections in each panel using the Clear Selection button ![]() .
.
You also have the option to decide which meshes are used in the bake for each item in the Render Bake List . Toggle Use same meshes for all Bake Items as follows:
- On - The same selection of meshes is used for all the recipes in the list. Select this when you don’t want to customize the mesh selection on a per-item basis.
- Off - Turn off if you want a different mesh selection for each item. This lets you customize the bake per-bake item. For example, when baking an environment, say a kitchen, you many not want a fruit bowl to cast an occlusive shadow on a tabletop. Simply deselect the fruit bowl in the mesh hierarchy to eliminate it from the bake.
Setting Bake Item Parameters
Each bake item type offers key parameters to customize the look of the texture map. When editing the parameters, you can use the Preview window to check the results. See Previewing the Bake Item.
Note: A position map has no parameters as the source mesh topology derives the position data.
Ambient Occlusion Bake Parameters
Ambient Occlusion (or AO) is a shading technique that adds depth and realism by simulating how diffused light interactss with objects. It introduces soft shadows in areas with limited light exposure, like creases, holes, and closely spaced parts, which can be beneficial in making a material seem more believable..
| Sample Distance | Sample Distance s the maximum distance the rays will travel in order to search for occluding surfaces. |
| Sample Count | Sample Count is the number of rays used to determine shading. More samples mean smoother, more accurate shading but take longer to compute, while fewer samples are faster but can look noisier. |
Displacement Map Bake Parameters
Displacement in texture painting is a technique that uses a texture map to change the geometry of a surface. Unlike Normal or Bump maps that only simulate depth, displacement maps physically move the vertices to add genuine depth and detail to the model without increasing the polygon count.
| Bias | Bias helps avoid unrealistic shading near object edges. It prevents too-dark areas by adjusting how close an obstruction needs to be to affect the shading. This makes the shading look more natural. |
Normal Map Bake Parameters
Normal maps are used to imitate physical depth on a flat surface without modifying its geometry. It fakes recessions and bumps on the surface, creating the illusion of depth and complexity without adding extra resolution to your model.
| Bitangent | Bitangent in normal maps is a vector that works with tangent and normal vectors to form a 3D surface coordinate system. This setting is crucial for properly aligning textures and lighting effects.Choose from:
|
| Invert Y | Check this to reverse the direction of the Y-axis in the bitangent vector. Enabling this option helps fix mismatches in normal map orientation between various software or rendering engines. It can help ensure that the textures are displayed correctly. |
| Normalization | Normalization in baking normal maps ensures all normal vectors are the same uniform length - standardized to a unit vector. This corrects vector lengths for consistent shading, accurate surface detail, and uniform lighting effects.Choose from:
|
| Space | Choose the coordinate system to use to interpret the normals:
|
Thickness Map Bake Parameters
A Thickness map in capturess the thickness of a 3D model’s surface. This data is idealfor simulating subsurface scattering and other realistic lighting effects in materials such as skin or marble that have varying densities.
| Sample Distance | The sample distance is the depth range used to measure thickness from the model's surface. This setting determines how deep Mari looks inside the model, affecting the light scattering effects in the final render. |
| Sample Count | Sample count is the number of samples taken within the defined sample distance to determine the thickness at each point. A higher sample count means more points are evaluated, leading to a more accurate and detailed thickness map. However, higher sample counts are more computationally expensive. |
Curvature Map Bake Parameters
A Curvature map creates a gradient where lighter areas represent convex regions of the mesh and darker areas are more concave. Curvature maps are commonly used as a starting point for creating wear along material edges or for accumulating dirt in mesh cavities.
| Metric | Choose a different method (or metric) for calculating and representing the curvature of a surface.
|
| Multiplier | Multiplier adjusts the intensity and contrast of the curvature details to make the effects either more pronounced or subtler. A higher multiplier enhances the highlights and shadows on edges and details for a more dramatic effect. A lower multiplier gives a more subtle enhancement. |
| Output | Output is the type of curvature information to highlight in the baked map. Choosing the right output depends on which aspects of the model you want to emphasize in your texture.
|
| Sample Offset | Sample Offset controls how far the baking process samples geometry from the model's surface. A larger offset captures broader features, whereas a small offset captures the finer details of the model's curvature. |
| Sample Count | Sample Count refers to the number of samples the baking algorithm uses to calculate the curvature. A higher sample count generally leads to a more accurate and smoother curvature map, as the algorithm has more data points to analyze the surface's curvature. A higher sample count will increase baking time as it is more computationally expensive. |
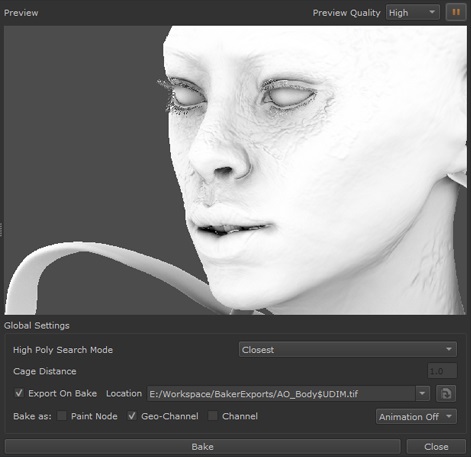
Previewing the Bake Item
The Preview panel in the Bakery lets you visually preview the outcome of your recipes with their current parameters to ensure the final bake output is as expected.
When you adjust the Bake Parameters, the preview auto-updates.
To show a preview click the play button  at the top-right of the Bakery.
You can set the Preview Quality to Low, Medium, or High, which in turn affects the preview speed.
Baking and Global Bakery Settings
| High Poly Search Mode | When sampling data, choose how to locate the high poly mesh in relation to the low poly mesh.
|
| Cage Distance | The Cage Distance is the distance by which the cage extends outwards from the surface of the low-poly mesh. It’s essential to get this right as too small, and details can be missed. Too large, and this may add artifacts from neighboring geometry. This setting is only active if Cage is selected for the High Poly Search Mode. |
| Export On Bake and Location | Check Export on Bake if you want to save your baked textures to disk. If checked, choose a Location using the browse button , or from a list of recent locations. |
| Bakes as: | Choose how to import the baked result into Mari. You can choose from one or more of the following:
|
| Animation | If you have an animated object and want to include multiple frames, select whether to include them in the bake:
|