Setting Shader Details
For all of the custom shaders (those not mentioned in the Default Shaders list), the lower pane in the Shaders palette consists of inputs and sliders for the selected shader. The inputs you have available depend entirely on which of the shaders you have selected. The input fields allow you to specify which channel corresponds to which shader component. For example, if you're using the Current Channel shader, you don't need to specify a channel, because you are viewing only the selected channel on the model. However, if you have a Unreal shader selected, you are viewing whatever channels you have chosen for each component, such as Base Color or Roughness.
Once you've assigned a channel to the shader input, you can adjust the effect of that channel by adjusting the corresponding slider under the inputs.
Note: This does not apply to all shaders. In the case of the Principled BRDF shader, its slider values are overridden by the values of the users active shader inputs.
Following on from the example above, if you have assigned a channel to the Bump input of the Unreal shader, you can then adjust the Bump Weight slider to control how heavily the bump affects the texture.
| 1. | Select the shader you want to customize from the Inputs list at the top of the Shaders palette. |
The bottom of the palette displays that shader's details.
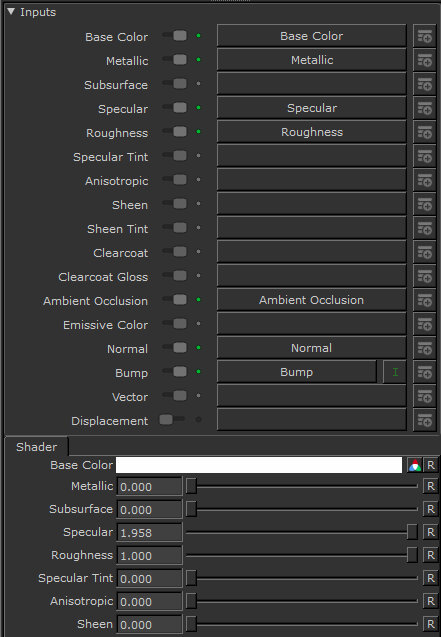
| 2. | You can build up your shader by assigning channels to the various shader component inputs in the bottom pane of the palette. |
To assign a channel to an input, click on the dropdown menu and select a channel from the list.
Tip: Click the ![]() toggle to change the influence of channels connected to the shader without disconnecting them from the shader input. The Displacement shader input is toggled off by default.
toggle to change the influence of channels connected to the shader without disconnecting them from the shader input. The Displacement shader input is toggled off by default.
| 3. | If you haven’t created a channel for a designated input yet, you can create channels from the Shaders palette. |
To create a new channel, click the ![]() icon next to the input for which you want to use the channel.
icon next to the input for which you want to use the channel.
The Add Channel dialog box displays.
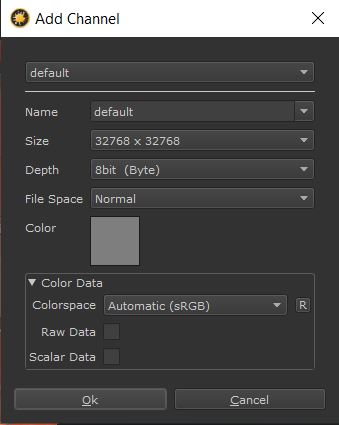
| 4. | Enter a Name for the channel (recent names are available in the dropdown list). Select the size, depth, colorspace, and file space settings for your channel and click OK. |
Mari adds the channel to your shader and automatically makes it the active channel for the designated input.
Tip: To learn more about each of the settings in the Add Channel dialog,
| 5. | With some shaders, once you’ve set up the inputs of each of the shader components you want to use, you can fine-tune these settings using the sliders in the bottom pane of the palette. This does not apply to the Principled BRDF. |
If you prefer, you can fine-tune the slider settings using the text field instead.