UV Unwrap
The UV Unwrap tool provides an elegant solution to creating UV maps from almost any kind of mesh, from hard surface to organic. UV unwrapping unfolds the mesh at the seams and lays it out on a flat page.
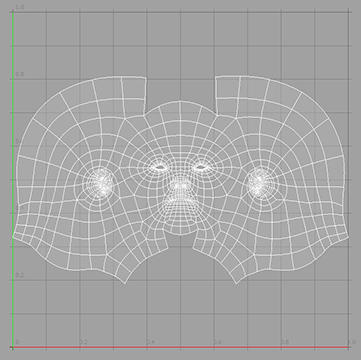
UV mapping focuses on managing the stretching and the distortion that comes with representing a 3D surface in a 2D plane. Therefore, put some thought into which edges to select for the best results.
For more information about UV maps, see Working with UV Maps.
Tip: Try to hide any seams in the least accessible areas (such as the back of a head under the hair or under the arms). The UV Unwrap tool acts on any visible foreground geometry, so you may want to hide any geometry that should not be affected.
UV Unwrap Workflow
| 1. | Once you have your mesh ready in the viewport, under the main menu bar, click UV to open the UV layout. |
| 2. | Activate the Edges selection mode, and select the edges along which you want to unwrap the mesh. Select a continuous loop of edges over the geometry to define the outer edge for separated UV islands. This makes it easy to unwrap an entire character into multiple islands simultaneously. Hold Shift to select multiple edges. |
The selected edges become the boundaries of UV islands. A UV island is a connected group of polygons in a UV map.
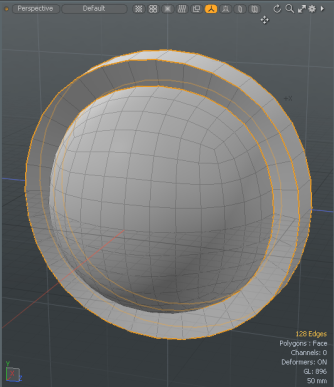
| 3. | In the left panel, click Unwrap. |
| 4. | Click and drag in the UV viewport to increase or decrease the number of Iterations. |
The UV map now displays separate UV islands.
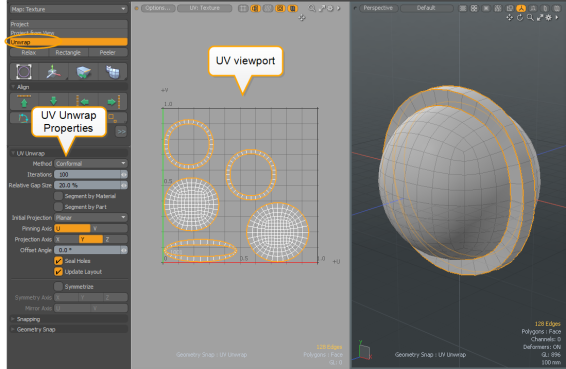
Usually, when Modo uses more iterations, the resulting UV map is better, although only up to a point.
| 5. | Adjust the UV Unwrap Properties to adjust the final unwrap quality. |
The tool works in real-time (depending on the density of the target mesh), and you can try different permutations to achieve the best result.
Tip: Once you have defined a map, you can apply additional adjustments with the UV Relax tool to improve the results produced by the Unwrap tool.
Procedural UV Unwrap
Here's how to use the UV Unwrap mesh operation in procedural modeling.
| 1. | Once you have your mesh ready in the viewport, in the menu bar, click Layout > Layouts > UV to open the UV layout |
| 2. | Activate the Edges selection mode, and select the edges along which you want to unwrap the mesh. Select a continuous loop of edges over the geometry to define the outer edge for separated UV islands. This makes it easy to unwrap an entire character into multiple islands simultaneously. Hold Shift to select multiple edges. |
The selected edges become the boundaries of UV islands. A UV island is a connected group of polygons in a UV map.

| 3. | On the right panel, open the Mesh Ops tab, and click Add Operator. |
Tip: If the Mesh Ops tab is not visible on the right panel, click the More Tabs or New Tab icon and select New Tab > Data Lists > Mesh Ops. ![]()
| 4. | In the Add Mesh Operations dialog, click Mesh Operations > UV, and double-click UV Unwrap. |
Tip: To quickly locate a mesh operation, click the filter icon and type the first couple of letters of the mesh operation you are looking for in the Search All field. 
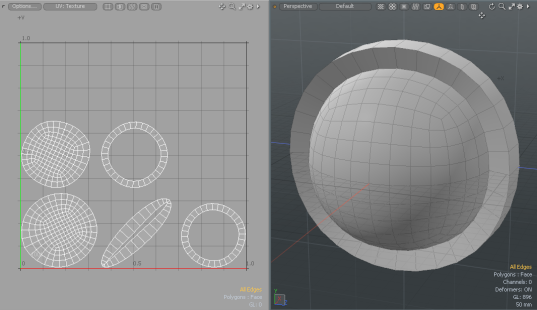
The UV map displays separate UV islands. As a result, the number of seams have reduced in the texture file. This is the goal you want to achieve when creating UV maps.
UV Unwrap Properties
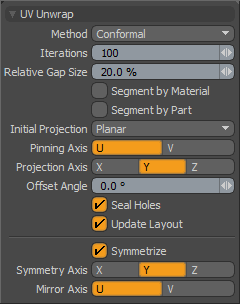
The direct modeling UV Unwrap properties can be found in the lower left panel when the tool is active. If you're using the UV Unwrap mesh operation, the properties can be found in the lower right panel. Click the UV Unwrap sub-tab on the right side of the panel to open them.
|
UV Map |
Procedural modeling only. Defines the name of the UV texture map used for the mesh operation. |
| Method | Specifies the UV unwrapping evaluation methods for Modo to use. There are two different UV unwrapping evaluation methods: Conformal and Angle Based. Conformal uses the ABF++ algorithm for angle-based flattening, and is good for organic shapes. The Angle Based option uses the Least Square Conformal Map algorithm and may be better for hard-surface types of geometry. Try both and see which option produces the most desirable result. |
| Iterations | Determines the number of iterations for the global solver to run across the UV data. This is the amount of unwrapping. With the value set to 0 (zero), the UV view appears as if you just used a UV projection method based on the Initial Projection and the Projection Axis settings for the tool. Increasing the number of Iterations unwraps the data. The number of iterations necessary is largely dependent on the complexity of the target mesh. |
| Relative Gap Size | Dictates how much space Modo places between the UV boundaries. If your UV data has multiple islands (contiguous geometry pieces), there needs to be a gap between these UV chunks. Increasing this value pushes the UV data further apart as well as scaling the resulting UV data down to accommodate the needed space. |
| Segment by Material | When enabled, if you are unwrapping a contiguous mesh that has different materials assigned to various polygon groups, Modo uses these groups of materials to create continuous UV sections while unwrapping. This option provides a quick way to unwrap a single mesh into several UV segments that can either be left in a single UV map or pasted into separate UV maps. |
| Segment by Part | When enabled, this works like Segment by Material, but Modo uses the Part tags from the polygons. |
| Initial Projection |
Determines how Modo creates the initial UV projection: Planar, Cylindrical, Spherical, Use Current Map, and Group Normal. The first three settings rely on the Projection Axis setting. • Planar - Projects the 3D model into UV space based on a simple plane that is projected across the model in the user-defined axis. • Cylindrical - Creates a virtual cylinder around the mesh • Spherical - Creates a virtual sphere for the projection. For more information about the projection modes, see the Create UV Tool topic. • Use Current Map - Uses the current state of the UV map as a starting point rather than projecting new UVs. This is useful if you already have created some reasonable UV map and want to use the Unwrap tool to further refine the UVs without destroying your existing UV map. • Group Normal - Uses the average normal of the selected polygons to determine the initial projection plane. This can be useful on geometry that is mostly facing the same direction, but this may not produce the right results if the mesh is complex and has many overlapping areas. To see the axis in 3D that Modo would use for the Group Normal projection, move the pointer over the 3D viewport and press Ctrl+A. Doing this aligns the viewport to the average normal of the selected polygons. |
| Pinning Axis | Determines the UV axis to favor when shuffling the UV boundaries during the unwrap. U is the horizontal axis, and V is the vertical axis. |
| Projection Axis | Defines the axis' orientation for the Planar, Cylindrical, and Spherical projections. |
| Offset Angle | Adds some rotation to the resulting unwrapped UVs. This can be useful if your original mesh is not aligned to the World Axis. By adjusting this value, you can see the effect on the map in real time. |
| Seal Holes | When enabled, creates a virtual polygon to close any holes and improve the unwrapping effect. If the target mesh is not water tight (such as a head with open eye sockets), the unwrap algorithm can sometimes have difficulty resolving these open areas. |
| Update Layout | When enabled, forces the UV layout to remain within the 0 to 1 UV coordinate space. |
| Symmetrize | When enabled, produces a perfectly symmetrical UV map when Modo unwraps a perfectly symmetrical mesh (such as a character). To use, select the Symmetrize checkbox and then specify the Symmetry Axis that the originating mesh is symmetrical across and the Mirror Axis that defines the UV axis and that the result should be symmetrical against. You may need to increase the number of Iterations to make the mesh fully symmetrical. |
| Symmetry Axis | Defines the axis that the originating mesh is symmetrical across. |
| Mirror Axis | Defines the symmetry axis that the resulting unwrapped UV should mirror across. Generally, this is the same as Pinning Axis. |