Search is based on keyword.
Ex: "Procedures"
Do not search with natural language
Ex: "How do I write a new procedure?"
Slice
Found in the Mesh Edit sub-tab of the Modeling toolbox, the Slice tool sets a slicing plane through the currently-selected geometry. The slice plane is interactively set by dragging out the tool across a 3D viewport. The first click in the 3D view sets the Start position for the slice. Clicking and dragging extends the slicing plane out to the End position, which can also be dragged interactively. The orientation of the plane is relative to the Work Plane, drawing perpendicular to its current position. The Start and End positions are simply X,Y, and Z positions that are set with the mouse, or numerically on the Tool Properties panel.
As long as the tool is active, you can drag the cutting plane by clicking on either of the blue end handles, or clicking and dragging anywhere along the pink line that connects the start and end points. To create a new slice using the same basic length and axis, but set a new center position, you can middle-click at the new location. The slice plane jumps up to that location and create a new slice. To begin a completely new slice, use the Shift+click and drag shortcut. This leaves the previous slice in place and begins a reset slice action at the mouse down position.
Tip: To improve your modeling workflow, use the Select by Previous Operation mesh operation. The following Name options are available for the Slice tool: Intersecting Edges and Cap Sections. For more information, see Select by Previous Operation.
Slice Properties
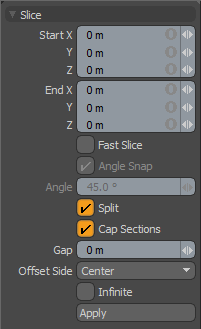
The following Slice options are available:

|
Slice |
|
|---|---|
|
Start X/Y/Z |
Determines the beginning position that defines the slicing plane. You can edit the position interactively in the viewport, or accurately define values with the XYZ coordinate inputs. |
|
End X/Y/Z |
Determines the ending position that defines the slicing plane. You can edit the position interactively in the viewport, or accurately define values with the XYZ coordinate inputs. |
|
Fast Slice |
When this option is enabled, the slicing action won't occur, as the plane is edited until the mouse button is released. This can help to increase performance when slicing dense meshes. |
|
Angle Snap |
When snapping is enabled (press the X key to temporarily toggle snapping states), the slicing plane snaps (jumps) to the nearest specified angle. |
|
Angle |
Determines the snapping angle for Angle Snap in degrees of rotation. |
|
Split |
Slices the surface into distinct separated surfaces on either side of the slice line. |
|
Cap Sections |
With the Split option enabled, the Cap option adds a polygon cap to the separated objects, where there are enclosed volumes. |
|
Gap |
With the Split option enabled, the Gap option increases the thickness of the cutting plane, eliminating a larger portion of the target surface. |
|
Offset Side |
Adjusts the placement of the gap to be above, below or centered on the cutting plane. |
|
Infinite |
With the Infinite option enabled, the defined line section is extended indefinitely beyond the Start and End values. Tip: To slice everything you want, enable the Infinite option, and then make sure that you are inside the mesh layer you want to slice with either everything selected or nothing selected. |
Procedural Slice
Slice is also available as a procedural mesh operation. You can add the tool in the Mesh Ops tab. In the Model layout, you can find the list on the right side of the interface, next to the Item List.
To add the Slice mesh operation:
| 1. | In the Mesh Ops tab, click the Add Operator button, and navigate to Mesh Operations > Edit > Slice, or enter its name in the search bar. |
| 2. | Double-click it to add it to the Mesh Operations list. |
Slice is added to the list, and a slicing plane is set through the polygon mesh.
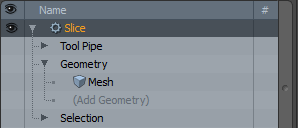
You can expand the Slice item in the list by clicking the small arrow in front of it. This reveals the inputs the operation uses:

Slice can use the following inputs:
• Tool Pipe - Allows you to add sub-tools to the operation.
• Geometry - This lists any geometry that is affected by the tool. Meshes are connected automatically if they are below the tool in the Mesh Operations list. You can connect additional meshes by clicking (Add Geometry) to open the Preset Browser. From there you can select an existing mesh or add a new, empty mesh.
• Selection - Allows you to select the elements to which you want to apply the operation.
Note: The Geometry input is only visible when the list is not in Solo mode. For more information, see Solo Mode.
The Slice mesh operation has the same properties as the traditional Slice tool. See Slice Properties.
Tip: To improve your modeling workflow, use the procedural modeling Delete operation. For more information, see Edit Commands - Delete/Remove.
You can also use the Select by Previous Operation mesh operation. The following Name options are available for the Slice tool: Intersecting Edges and Cap Sections. For more information, see Procedural Selection
Sorry you didn't find this helpful
Why wasn't this helpful? (check all that apply)
Thanks for taking time to give us feedback.