Search is based on keyword.
Ex: "Procedures"
Do not search with natural language
Ex: "How do I write a new procedure?"
Fusion Example
As a quick introduction to MeshFusion, let's work through a simple example that combines Qbic primitives. This example uses the 3D Tree to work with the Fusion (as opposed to the Schematic).
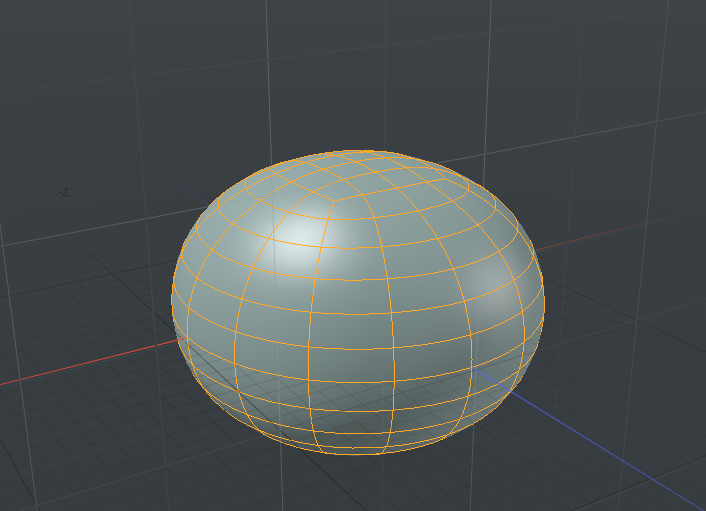
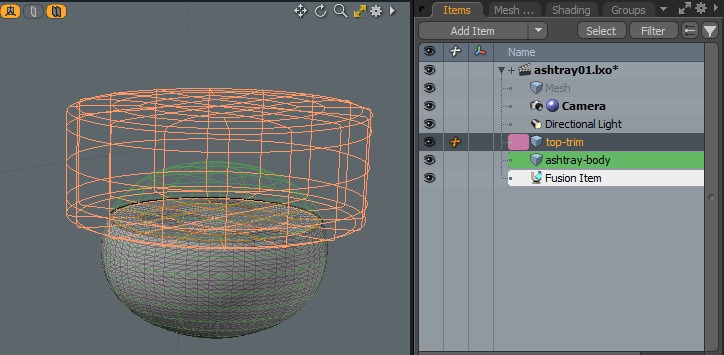
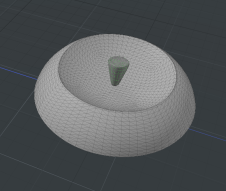
This example shows you how to model an ashtray and lid, pictured below.

Making the Bowl: Subtractive Trims
As you can see from the image above, the body of the bowl has an inside space and three grooves for the cigarettes around the outer rim. To make this, follow a sequence of subtractions as follows:
|
|
|
|
|
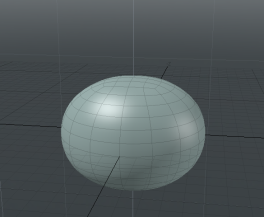
Add a sphere and flatten it slightly to start the ashtray body. |
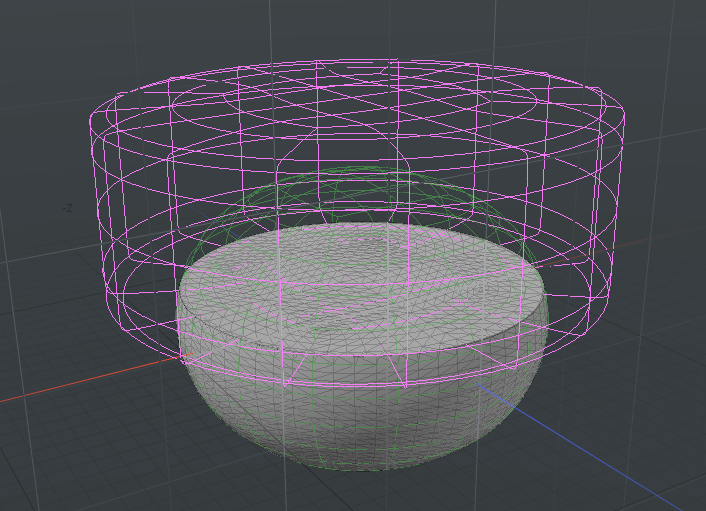
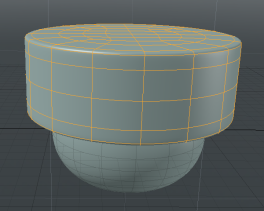
Trim the body by adding a flat cylinder. |
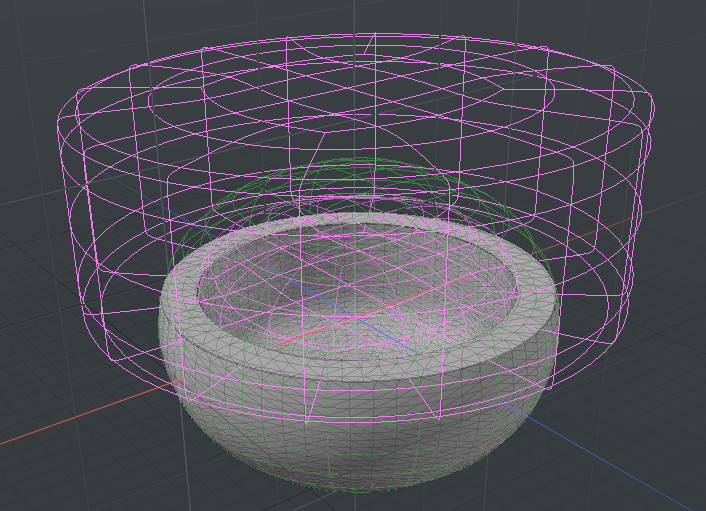
Trim the inside of the body with a capsule. |
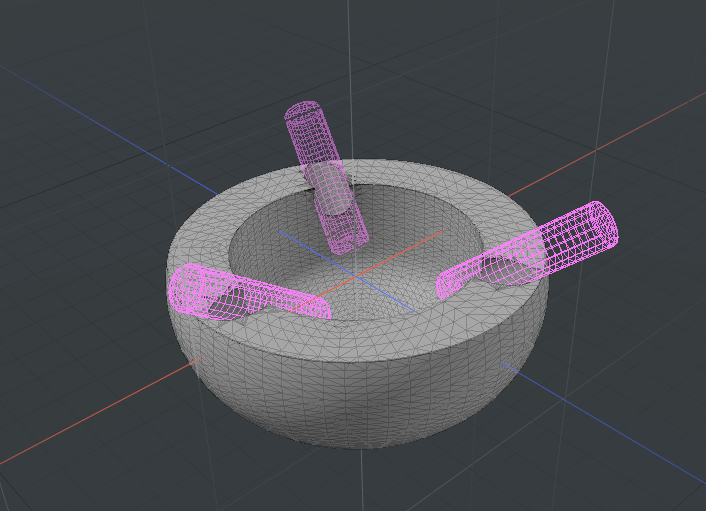
Add cylinders. Scale, position, and trim the rim to create grooves. |
To start the example, make sure you're in the Model layout with an empty scene.
Tip: Set your 3D viewport to the Model Fusion viewport style for optimal visualization of MeshFusion. To do this, in the top-left corner of the viewport, click the second button, then select Model Fusion from the list.
| 1. | Click the Fusion tab in the modeling toolbox on the left panel. |
| 2. | To start the ashtray body, let's add a Qbic sphere: Expand the Fusion Meshes menu at the lower end of the tab and click Qbic Geometry... to open the Fusion Qbic Preset window. The mesh primitives are in the Fusion Assets/Fusion Meshes/Qbics folder. Double-click Q-Sphere to add it to the scene. |
| 3. | Flatten the sphere to match the overall ashtray shape: Press R to activate the Scale tool. |
The Scale tool handles are displayed in the 3D viewport, and the tool's properties appear in the lower-left panel. Set Scale Y to 75%, then press Space to drop the tool.
| 4. | Trim the top off the body to match the overall shape of the ashtray. Let's use a cylinder primitive to remove the top: Add a Q-CylinderShort from the Qbic presets. |
| 5. | Press W to open the Move tool and set the Position Y to 370 mm and then press spacebar to drop the tool. |
Tip: It may help to assign identifiable names to the meshes in the Items list.
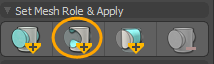
| 6. | Trim the sphere with the cylinder: The sphere should be a primary and the cylinder is a subtractive trim. Select the sphere, in the Fusion tab, click New Fusion..., and click New Fusion with Selected Meshes. |

| 7. | On the right panel, in the Items list, select both the sphere and the cylinder items |
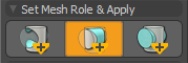
| 8. | On the left panel, in the Fusion tab, under Set Mesh Role & Apply, click the subtractive trim icon. |
The meshes are now drawn in wireframe: the primary mesh (sphere) is green, and the trim (cylinder) is magenta. They are color-coded in the Items list as well. A new Fusion Item is also created automatically.
The sphere is trimmed by the cylinder.
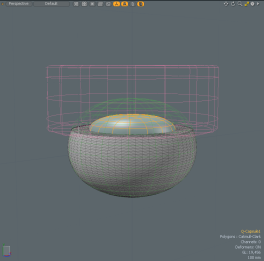
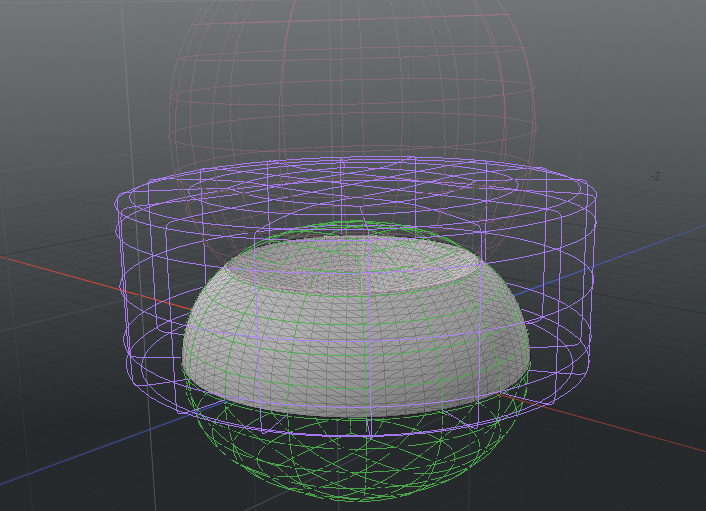
| 9. | Now hollow out the inside of the ashtray by using a capsule to trim the inside. From the Qbic presets, add a Q-Capsule1 to the scene. Rescale the capsule and move it in Y so that if it subtracted from the current fusion shape, it would hollow out the bowl of the ashtray, similar to the picture below. Make sure the capsule doesn't stick out underneath the bowl. |
Tip: Press R to activate the scale tool. Press W to activate the move tool. Press Space to drop the tool.
| 10. | In the Items list, select the capsule, and then select the sphere. |
| 11. | On the left panel, in the Fusion tab, under Set Mesh Role & Apply, click the subtractive trim icon. Press Space to drop the tool. |
The inside of the sphere is hollowed out by the capsule.
To add grooves to the ashtray:
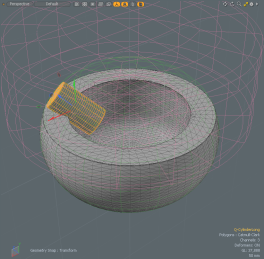
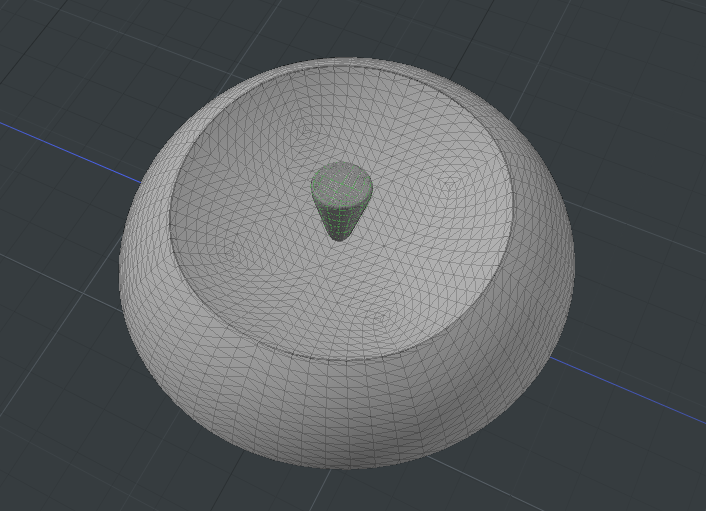
| 1. | You can now make further trims to add the grooves to the ashtray bowl. Add a Q-CylinderLong mesh to the scene, then resize, move, and rotate it so that it is overlapping the inside edge of the bowl as shown below. |
Tip: Press R to activate the scale tool. Press W to activate the move tool. Press E to activate the rotate tool. Press Space to drop the tool.
| 2. | To trim the bowl with the cylinder: select the cylinder and the sphere, then on the left panel, in the Fusion tab, under Set Mesh Role & Apply, click the subtractive trim icon. |
The edge of the bowl is trimmed by the cylinder.
| 3. | To make another groove, you can duplicate the cylinder, and move and rotate the duplicate to the appropriate position. To create a duplicate, in the Fusion tab, under Duplication, click the Duplicate mesh as a new Subtractive Trim |
![]()
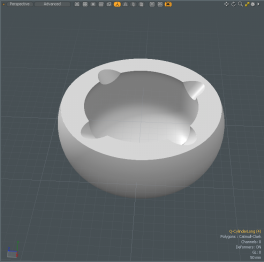
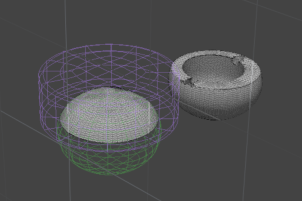
| 4. | In the Fusion tab under Fusion Display, click Source Mesh Visibility to hide the source meshes. |
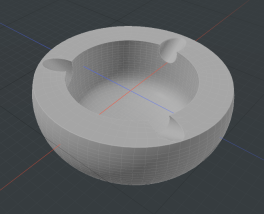
The bowl now looks like this:
Should you want to, you can now resize or reposition any of the source meshes to adjust the bowl or the grooves. If you move or resize a mesh, the fusion is updated in real-time to reflect the changes.
Note: When working with complex Fusion Items, updating might not be smooth enough. In such cases, you can use the Deferred Update option available in the Fusion Item's Properties panel. When this option is enabled, the mesh is only updated on mouse up. For more information, see Fusion Item.
Making the Lid: Intersection Trim and Union
To make the lid, let's introduce the other two Boolean operations: intersection and union. The lid is made using the following sequence of operations:
|
|

|
|
|
|
Add a sphere and flatten it slightly as before. |
Add a cylinder as before. This time intersect it with the flattened sphere. |
Subtract another sphere from the top of the lid. |
Add a small cone with the lid to add the handle. |
The lid is made with a new fusion operation and therefore has its own tree. You can add the lid to the existing scene.
| 1. | Click Qbic Geometry... and add a Q-Sphere and a Q-CylinderShort from the Qbics. To avoid confusion, rename the meshes to Lid Sphere and Lid Cylinder respectively. |
| 2. | To avoid overlap with the ashtray bowl, move both by 1.5 m in X. |
| 3. | Scale the Lid Sphere by 75% in Y and move the Lid Cylinder by 370 mm in Y. These are the same transforms that you performed when making the body. |
| 4. | The basic lid shape can now be made by intersecting the two shapes: Select the sphere and in the Fusion tab, click New Fusion..., and click New Fusion with Selected Meshes. |
| 5. | Select the cylinder and the sphere, and click Apply Intersection Trim |
The intersection is formed.
| 6. | To make the indentation in the lid, let's subtract a sphere: Add a Q-Sphere, position and size it so that it overlaps with the top half of the lid. When you're happy with the new size and position, trim the top of the lid with the sphere by selecting it along with the lid sphere, and clicking the Apply Subtractive Trim |
| 7. | Let's add a handle to the lid: Add a Q-CapsCone1, and size and position it on top of the lid. |
| 8. | Turn it into a primary by pressing Alt and clicking the Set Mesh Role to Primary |
You have now created the lid for the ashtray.
Tip: You can reposition and resize any of the source meshes to edit the lid in real-time.
Smoothing the Strips
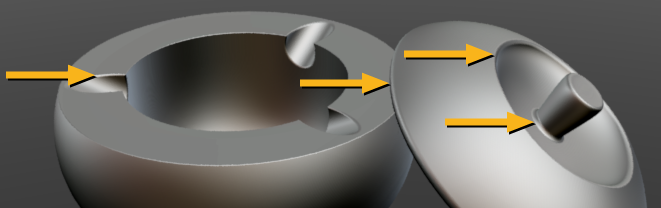
You may notice in the original image that some of the edge contours have been rounded. The edge around the grooves in the ashtray body have been widened, as have the edges around the indentation in the lid, and the edge of the lid. Also, the base of the lid handle has been rounded to make a smoother join with the lid. The image below points these out.
Let's edit a strip in one of the cigarette grooves in the ashtray body to see how this is done.
Tip: To make it easier to edit, click Source Mesh Visibility to hide the source meshes. The ghost source meshes disappear.
| 1. | In the Fusion tab, under Fusion Strips, click Update Strip Items. This ensures all strip items are up-to-date since your last Fusion edit. |
Note: To reveal the selectable strips, click Select All Strips. This selects and highlights all editable strips on the mesh. Click away from the mesh to deselect.
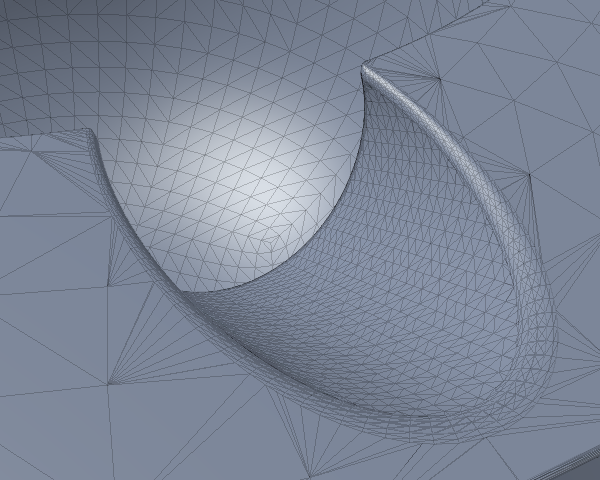
| 2. | Select the strips to edit: zoom in to one of the cigarette grooves and roll the mouse over the groove edge on the top of the ashtray. The strip highlights with a blue line. Click the blue line to select the strip. |
This also opens the Fusion Strips dialog. Move this out of the way.
| 3. | Roll over the second edge on the inside of the ashtray and Shift+click to include the strip in the selection. Both corners are now selected as shown below: |

| 4. | With a strip selected, you can edit the strip properties. On the Properties panel (lower-right), ensure you have the Fusion Strip tab selected. Set the Strip Width to 10%. This widens the strip and has a smoothing effect. |
You can now edit the other grooves, and the edges on the lid in the same way. Also try experimenting with the Strip Profile setting, which controls the roundness of the strip. A Strip Profile of 0% makes a flat bevel, at 100% it is fully rounded.
Note: To get the same material look as the ashtray at the top of this topic, a MatCap Shader was added to the Shader Tree, and the Matcap preset Metal01.png was used.
Converting to a Mesh
When you've finished creating a Fusion mesh, you can convert it into a regular mesh. This prepares it for 3D printing or for editing the geometry using standard geometry tools. Each Fusion Item in the Item List can be converted into a mesh using the Convert to Mesh Item button on the item's Properties panel. Before you do this, it is a good idea to seal the mesh by setting the Fusion Item to Airtight mode.
Note: For more information, see Fusion Mesh Conversion
Let's convert the ashtray body.
| 1. | Select the Fusion Item for the ashtray body in the Item List. |
| 2. | In the Properties panel (lower-right), ensure the Fusion tab is selected. |
| 3. | In the Fusion Mesh section, set the Mesh Mode to Airtight Final. |
Note: To reveal the Fusion Mesh section, click the double arrow button at the bottom of the Properties panel.
| 4. | In the Output Mesh section, click Convert to Mesh Item. |
| 5. | Click OK to replace the fusion item with the a regular mesh. |
| 6. | Click OK on the next dialog. |
The fusion item has now been converted to a mesh.
You can do the same conversion with the ashtray lid and then position the lid as required.
Sorry you didn't find this helpful
Why wasn't this helpful? (check all that apply)
Thanks for your feedback.
If you can't find what you're looking for or you have a workflow question, please try Foundry Support.
If you have any thoughts on how we can improve our learning content, please email the Documentation team using the button below.
Thanks for taking time to give us feedback.