Search is based on keyword.
Ex: "Procedures"
Do not search with natural language
Ex: "How do I write a new procedure?"
Creating Your Own Presets
Your workflow may involve creating similar components each time you start a project, such as a ground plane, a certain environment gradient, or maybe a specific material. Creating your own presets is a great way to streamline a workflow and speed up scene creation, eliminating repetitive tasks so you can concentrate on the important stuff.
Saving Presets
Modo provides different ways to save items in your scene as presets.
• Preset Drag-and-Drop - Drag-and-drop items from the 3D viewport or from one of the viewport tabs on the top-right panel onto the Preset Browser. For more information about viewports, see Understanding Viewports.
• Preset Viewport - Within the viewport tabs, for example Items or Shading, right-click on an item and select Presets > Save... or Presets > Save Assembly Preset... . For more information about viewports, see Understanding Viewports.
• Preset File Menu - Select your items in your scene and click one of the following options: File > Save Item Preset..., File > Save Assembly Preset..., or File > Save Environment Preset...
Note: Workflows vary when creating Presets depending on the type of item you have selected. For more information, see Creating Different Preset Types.
Preset Drag-and-Drop
| 1. | Click the Preset Browser palette icon found on the top left corner of the Modo interface. |
![]()
Alternatively, press F6 while working in any layout to open the pop-up palette. The Preset Browser is also found on the bottom panel of the Layout view.
| 2. | In the Preset Browser viewport, expand Assets on the left panel and open the directory you would like to save your preset to. |
Note: If the directory tree is hidden, drag the widget on the left side of the navigation panel.
| 3. | Drag an item in the 3D viewport into the Preset Browser. Alternatively, drag an item from a viewport tab on the right panel into the Preset Browser. |
Note: By holding your cursor on the Preset Browser a pop-up menu displays. Depending on type of item you have selected, the menu options will vary. The example below uses the Mesh item.
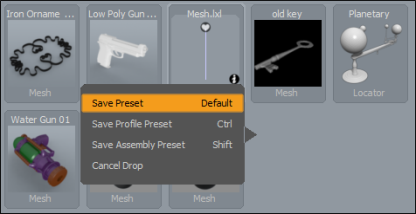
| 4. | Select from the pop-up menu the type of preset you want to save. |
The following menu options are available:
• Save Preset - Saves a preset made from almost any selected item type. For more information, see Item Presets
• Save Profile Preset - Saves a selected curve drawn in Modo as a preset. For more information, see Profile Presets.
• Save Assembly Preset - Saves an assembly made in Modo as an preset. For more information, see Assembly Presets.
• Create Material Preset - Saves selected Shading items as a preset. For more information, see Material Presets.
• Cancel Drop - Cancels the action.
Preset Viewport
The viewport tabs are located on the top-right panel. These viewports can be used to select and save items as presets.
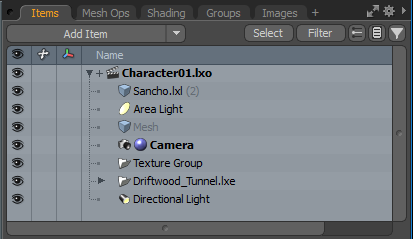
| 1. | On the right panel, open an appropriate viewport tab. For example, open Items, Shading, Mesh Ops or Groups. |
| 2. | Use Ctrl + click to select the appropriate items you want to save as a preset. |
| 3. | Right-click on your selection and select one of the following options. |
Note: Menus vary depending on which viewport tab you are working in. For example, Items, Shading, and Groups.
• Presets > Save... - Saves selected item as a mesh preset (*.lxl file).
• Presets > Save Assembly Preset... - Saves selected item as an assembly preset (*.lxp file).
• Save Preset... - Saves selected item as a preset (*.lxp file).
• Save Preset with Thumbnail... - Saves a selected item as a preset and uses an image of the item for the thumbnail (*.lxp file).
| 4. | Navigate to the location where you'd like to save your preset and then click Save. |
Tip: To make your new preset show up automatically in the Preset Browser, use the directory where your presets are stored and save it within that directory. This is usually under Luxology\Content\Assets. You can also create a new directory for saving presets. On the Directories list, click (add path), navigate to an appropriate directory, and then click Select Folder. The Preset Browser displays the name of that folder at the bottom of the navigation tree.
Preset File Menu
| 1. | Select the items you wish to save as a preset. |
| 2. | In the menu bar, click one of the following options: |
• File > Save Item Preset... - Allows you to save any selected item as a mesh preset (*.lxl file).
• File > Save Environment Preset... - Allows you to save your customized environment as an environment preset (*.lxe file).
• File > Save Assembly Preset...Allows you to save selected items and their hierarchy as an assembly preset (*.lxp file).
A file browser opens.
| 3. | Navigate to the location where you'd like to save your preset, type a file name, and then click Save. |
Tip: To have the preset automatically appear in the Preset Browser, save it to the location where your other presets are stored. This is usually under the Luxology\Content\Assets directory.
Creating Different Preset Types
Item Presets
Item presets can be made from almost any item type. They are saved as .lxl files and can be added to your scene in various ways, depending on what type of item they are. Any layer or collection of layers can act as a preset.
| 1. | Open any viewport tab on the top right panel. For example, open the Items tab. |
| 2. | Right-click on your selection and click Presets > Save... |
Material Presets
Any layer or collection of layers in a Shading tab on the right panel can act as a preset. The following example uses a Base Material item to create a preset.
Tip: You can also create a new directory for saving presets. On the Directories list, click (add path), navigate to an appropriate directory, and then click Select Folder. The Preset Browser displays the name of that folder at the bottom of the navigation tree.
| 1. | Click Layout below the menu bar to view the Preset Browser directories on the bottom of the interface. |
| 2. | In the Preset Browser viewport, open the Materials tab, and then open a directory you would like to save your preset to. |
| 3. | On the right panel, open the Shading tab. |
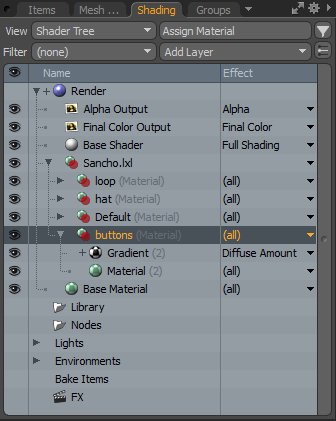
| 4. | Click + hold and drag the Base Material item onto a Preset Browser directory. |
Alternatively, right-click on a layer in the Shader Tree, then select Save Preset... from the dropdown menu. Navigate to the location where you'd like to save your preset. To make your new preset show up automatically in the Preset Browser, use the directory where your presets are stored and save within that directory. This is usually under Luxology\Content\Assets.
| 5. | From the pop-up menu, select Create Material Preset. |
Note: Quite often you may have a surface made up of multiple texture layers. In that case, you might want to create the preset from the Material Group (![]() ), as that includes all associated texture layers within the preset.
), as that includes all associated texture layers within the preset.
Tip: Fur is made up of texture layers, so making hair presets is just as easy as making surface presets.
Mesh Presets
Mesh presets require a small amount of setup to work properly. Mesh presets align themselves based on their relationship to Modo's origin when they are created. Therefore, it is recommended that you create mesh presets at Modo's origin.
You'll also want them resting on the ground, so they are facing the Y up (positive) direction. For example, when you create a light fixture that you are applying to a series of walls, each one is aligned to the wall in the orientation when placed. Once your model is properly positioned, you can save it as a preset.
Note: Item transforms are not considered in presets, so make sure you make your alignment changes at the component level, or use the Freeze command in the item's Properties panel.
| 1. | Click Layout under the menu bar, select the mesh item in the 3D viewport, and drag-and-drop it onto the Preset Browser. Alternatively, right-click on the mesh layer in the Items list and select Presets > Save... |
Tip: To create a new directory for saving presets, click (add path)on the Directories list and navigate to an appropriate directory.
Render Presets
Render Presets can be made from a number of settings on a render item, which contain core rendering attributes such as Frame, AA and ray trace settings, and Global Illumination settings.
| 1. | Right-click on the Render Item (the top-most item of the Shader Tree) and select Save Preset.... Alternatively, you can select the Render item and in the menu bar, click File > Save Item Preset... |
| 2. | To display the preset automatically in the Preset Browser, navigate to the directory where your presets are stored, and click Save. |
You can also create a new directory for saving presets. On the Directories list, click (add path), navigate to an appropriate directory, and then click Select Folder. The Preset Browser displays the name of that folder at the bottom of the navigation tree.
Tip: Addition Camera items can be added to a render preset. For example, automatic DOF and motion-blur cameras can be useful. When the saved Render Preset is applied to a scene, these additional camera items are added to the existing cameras used in your scene.
Profile Presets
Profile Presets can be made from curves drawn in Modo. For example use the Adding Curves, Bezier , or Sketch tools.
| 1. | Click Layout below the menu bar to view the Preset Browser directories on the bottom of the interface. |
| 2. | Expand Meshes and open a directory you would like to save your preset to. |
| 3. | Drag the curve item in the 3D viewport onto the Preset Browser. |
| 4. | From the pop-up menu, click Save Profile Preset. |
| 5. | Click Save. |
The following dialog displays.
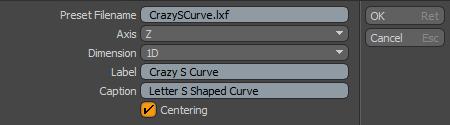
| 6. | Set the following options: |
• Preset Filename - Contains the name you specified in the previous dialog. You can edit this field.
• Axis - Specifies the axis that the profile was created on: either X, Y or Z.
• Dimension - Specifies whether the drawn profile is 1D or 2D.
• Label - Labels the preset.
• Caption - Provides a caption for the preset.
• Centering - When enabled, automatically centers the curve (if it was created away from the origin).
| 7. | Click OK to save. |
Assembly Presets
Assembly Presets can contain collections of multiple items, even including full hierarchies of rigged elements. For information about how to create an assembly using the Schematic Viewport, see Creating Preset Assembly Assets in the Schematic Viewport.
| 1. | Click Layout below the menu bar to view the Preset Browser directories on the bottom of the interface. |
| 2. | Open the Meshes tab and then open a directory you would like to save your preset to. |
| 3. | Select the root item of the setup in the Groups list, or all the individual items you want to save (from the various viewports such as related materials, if applicable). |
| 4. | Drag-and drop your selection onto the Preset Browser. |
| 5. | From the pop-up menu, select Save Preset. |
To save a rigged assembly preset, with channel connections, modifiers, and/or constraints, you have to save the Assembly preset from the Schematic Viewport.
| 1. | In the Schematic Viewport, create an Assembly node of all the elements you need. |
| 2. | Right-click on the header/title area of the resulting node and select the Save Assembly Preset option from the context menu. |
Note: Any scripts used by the preset needs to be saved into the root script location so they can be found automatically.
Environment Presets
Environment presets differ from Item Presets in that you can store complete scenes in them, including lights, environments, meshes, and so on. Using Environment Presets allows you to quickly switch out entire studio setups by double-clicking them in the Preset Browser. They are saved to .lxe files.
| 1. | In the menu bar, click File > Save Environment Preset... Alternatively, right-click on the environment material layer in the Shading tab on the right panel and select Save Environment Preset. |
| 2. | Navigate to the location you'd like to save your preset to, then click Save. |
Note: To have the preset automatically appear in the Preset Browser, save it to the location where your other presets are stored. This is usually under Luxology\Content\Assets. Modo saves your scene as an .lxe Environment Preset file and it becomes accessible from the Preset Browser.
Tip: You can drag and drop an Environment Preset from the Preset Browser into the Environment folder on the Shader Tree. A contextual menu appears, allowing you to either replace or add your selected Environment.
Using a Preset Mesh as a Replicator
Mesh presets are fully compatible with replicators, though they are not automatically applied as such. To use a preset mesh as a replicator:
| 1. | Double-click the mesh object in the Preset Browser viewport, so it is created as its own Mesh Item at the origin. |
| 2. | In Item mode, select the Point Source and the newly created preset item mesh. |
| 3. | Create the Replicator by clicking Item > Add Replicator. |
Please refer to Replicator topic for more information on working with Replicators.
Creating Preset Assembly Assets in the Schematic Viewport
You can create your own assembly item presets and share them with other users using the Schematic viewport. Your assembly alias preset can contain a selection of mesh items and their hierarchy, or comprise of a complex setup, using deformers and modifiers.
This is done by creating Assembly Presets containing a collection of multiple mesh items and their hierarchy, such as rigging elements. You can also create more complex assembly setups using mesh items, cameras, deformers, and modifiers. Once created, you can collapse these items into a first class item type, such as a Channel Modifier assembly, a Selection Operations assembly, and a Mesh Operations assembly to share as Presets. The following defines each type.
Channel Modifier
The Channel Modifier evaluates the various modifiers inside the assembly using the input values on the alias, and it passes the results to the output channels on the alias. A channel modifier is the simplest form of an assembly alias. Setting this option results in behavior that is identical to a first class channel modifier.
You can expose relationship graphs from items contained within the assembly, and any form of evaluation can be performed within the assembly, to calculate the results of the outputs from the inputs.
Mesh Operation
The Mesh Operation allows you to collapse the assembly to directly integrate it into the procedural modeling system. The assembly alias requires a single mesh operation inside the assembly to be evaluated by the procedural modeling system when the alias is evaluated. You can choose a mesh operation within the assembly, and when the alias is evaluated by the procedural system, the evaluation is redirected to the chosen item within the assembly.
Adding a mesh operation alias preset into the scene automatically attaches the alias item to the primary mesh.
Selection Operation
The Selection Operation allows a collapsed assembly to integrate directly with a mesh operation and it controls which elements it operates on. Like the mesh operation alias type, the selection operation requires an item with the assembly that can be evaluated by the procedural system, when the alias is evaluated.
Adding a selection operation alias preset into the scene automatically attaches the alias item to the selected mesh operation.
Assembly alias presets can be integrated into Modo scenes and they act like real items. No programming skills are required. If you can create an assembly, you can create an assembly alias preset. For more information about assemblies, see Assembly Presets.
This functionality allows technical users to create assemblies that are easier to use for others and it makes the scene appear tidier. The assembly and its contents are entirely hidden from the Schematic viewport and display as a single assembly alias item in the right-hand pane, under the Mesh Ops tab. These presets can be expanded later to apply modifications.
Creating an Assembly Alias Preset
To save assembly setups as assembly alias presets, create and save your presets using the Schematic Viewport.
In this example, an alias Selection Operation assembly is created which selects a specific element on a mesh by an index. Once the assembly alias preset is saved, it is used in a new scene. A simple grid mesh item is added to the scene and then used to apply the assembly alias preset to. A number is then entered for the index to update the mesh.
To create an alias selection operation assembly preset:
| 1. | Open the Setup layout. |
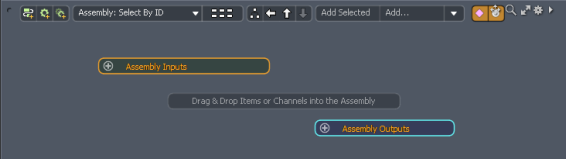
| 2. | In the Schematic viewport, click the Add new root assembly button. |

The New Schematic Assembly dialog displays.
| 3. | Type a name for your assembly, enable Make active, and click OK. |

The assembly displays in the Schematic viewport.
| 4. | Click Add..., expand Mesh Operations > Selection, and double-click Select By Range. |
| 5. | In the Properties panel, under the Select By Range tab, right-click Start and select Add Channel to Schematic or drag and drop it from the Properties panel onto the Select By Range item in the Schematic viewport. |
| 6. | Right-click End and select Add Channel to Schematic. |
| 7. | On the Assembly Inputs item, click the plus button. |
The Create User Channel dialog displays.
| 8. | In the Username field type ID, enable Use Minimum Value and then click OK. |
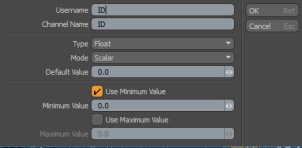
Note: The Channel Name is populated automatically.
| 9. | Hook the start and end items to the ID channel. To do this, drag the black circle for start, under Select By Range, and drop it onto the plus button for Assembly Inputs. |
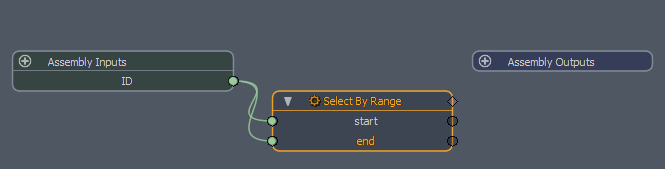
| 10. | Click View Parent Assembly. |

| 11. | Right-click on Select By ID and select Collapse to Item from the dropdown menu. |
The Assembly To Item dialog displays.
| 12. | Set Type to Selection Operation, set Source to Select by Range and click OK. |

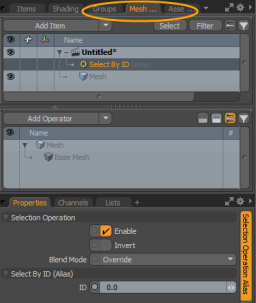
The assembly is hidden in the Schematic viewport and displayed in the right pane, under the Mesh Ops tab. Click the arrow beside your scene item to see the Select By ID (Alias). The Source is evaluated by the procedural system when this assembly alias preset is evaluated.
To save the assembly alias preset:
| 1. | With Select By ID (Alias) selected, click File > Save Assembly Preset. |
| 2. | In the File Name field, type Select By ID for the name of your preset and click Save. |
Note: The file is saved to the default Content > Aliases directory. Alternatively, browse to another directory to change the location where your preset is saved to.
| 3. | Click File > Close Scene. |
The Unsaved Changes dialog is displayed.
| 4. | Click Don't Save. |
To create a new scene and apply the assembly alias preset:
| 1. | In the Setup layout, click the Model Palette icon on the top left panel (alternatively, press F2). |
| 2. | Open the Toolbox Basic tab, select Cube, set the properties for your grid, and click Apply. The following image shows example properties. |
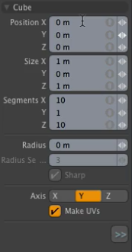
A simple grid is added to your scene.
| 3. | Press the Spacebar or press the Esc key, to drop your selection. |
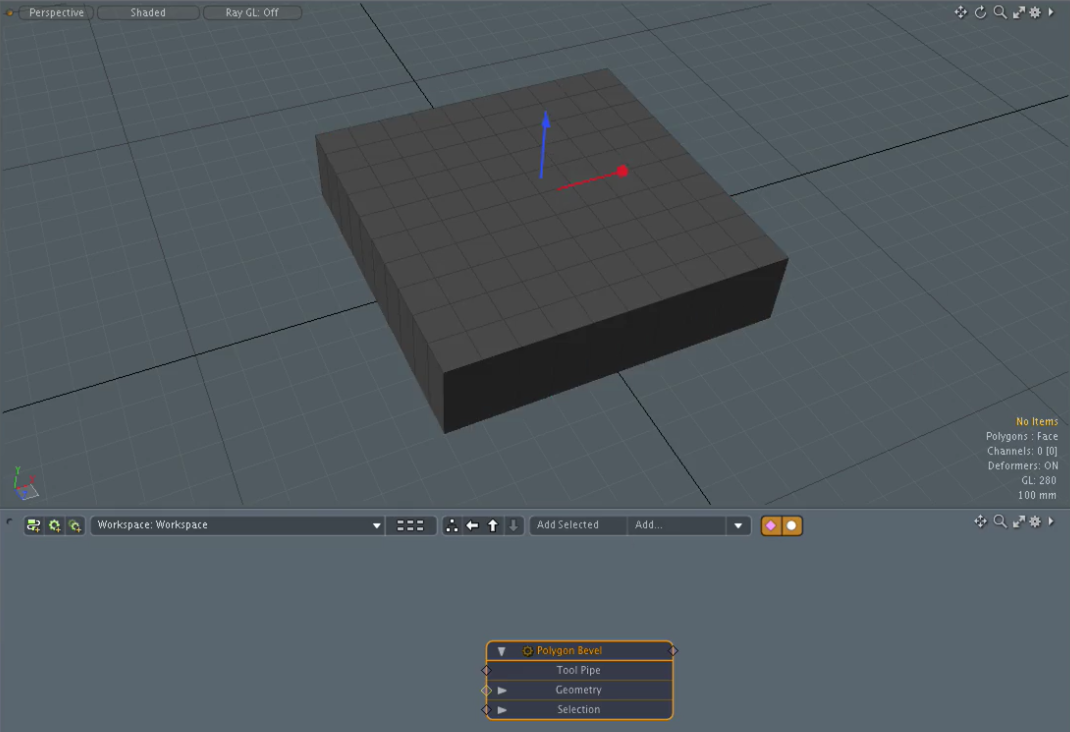
| 4. | In the Schematic viewport on the bottom of the Setup layout, click Add and select Mesh Operations > Polygon and double-click Polygon Bevel. |
| 5. | Click and drag the blue handle to change the bevel amount. |
| 6. | In the Mesh Operations tab, expand Polygon Bevel > Selection and click Add Selection. |
Tip: This can also be done in the Schematic viewport.
| 7. | From the Add Operation dialog, expand Assembly Aliases, and double-click Select By ID. |
The assembly alias preset, named Select By ID is automatically hooked up to the Polygon Bevel.
| 8. | Click the Select By ID (Alias) element to display its properties. |
| 9. | In the Selection Operations Alias tab, change the ID value to select that element by index. |
As you change the ID value, different elements on the grid are displayed with the assembly settings while the remainder of the gird remains flat.
Creating Assets Containing Embedded URLs
Modo allows you to create and share assets containing embedded URLs. This is useful when you want to add URLs to a custom preset to direct an artist to external URLs to get additional information from the Web. Once added to the Presets Browser for others to see, users can double-click on the asset to open the URL in a web browser. You can customize these assets in Modo to change the icon image and the URL.
There are a number of ways to create assets containing embedded URLs.
• In the Model layout, open the Images tab on the right panel, right-click on an image, and select Export as LRL. A *.lrl file is created using the image you have specified as the icon image.
Tip: If the Images tab is not displayed, click down arrow at the top of this viewport and select Data List > Clips.
• Click System > Create URL Preset. A *.lrl file is created using a default icon image.
• Run the command: image.createLRL url:<URL> <filename> <clip>.
• URL: Specify the desired URL to embed into the asset file.
• filename: (Optional) Specify the absolute path and file name for the output. If not given, a standard save dialog opens for the user.
• clip (Optional): Specify the clip name. If not specified, the current clip name is used.
To create a preset with an embedded URL:
| 1. | In the Model layout, click File > Load Image. |
| 2. | Browser to the a directory and double-click on an image to load it into Modo. |
Tip: Click All Formats to view all of the supported Load Image formats.
| 3. | In the right panel, open the Images tab. |
| 4. | Right-click on the loaded image and select Export as LRL. |
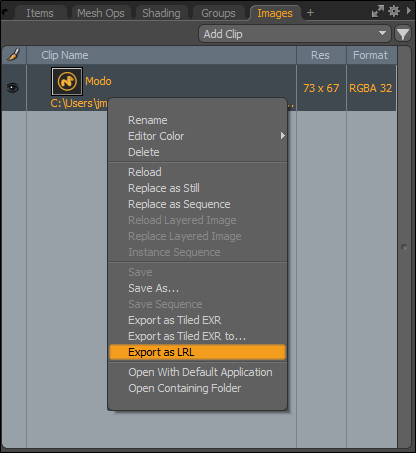
The Create URL File dialog displays.
| 5. | Type a URL into the URL field and click OK. For example, type https://www.foundry.com/products/modo. |
The browser displays the directory of the original file you uploaded.
| 6. | Type a name for the asset file and click Save. |
Modo automatically creates a file using the *.lrl extension with the URL embedded into the XML. This file uses the image you have specified as the icon image.
Sharing a *.lrl File
| 1. | In the Model layout, on top of the toolbox on the left panel, click the Preset Browser palette icon. Alternatively, press F6. |
| 2. | In the left panel, click (add path). |
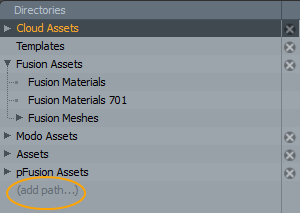
The browser windows displays.
| 3. | Navigate to the directory you have saved your *.lrl file to and click Select Folder. |
By default, the directory specified is saved to the Preset Browser under the Cloud Assets directory.
Editing a *.lrl File
| 1. | In Model layout, click the Preset Browser palette icon, expand Cloud Assets, and select your directory. |
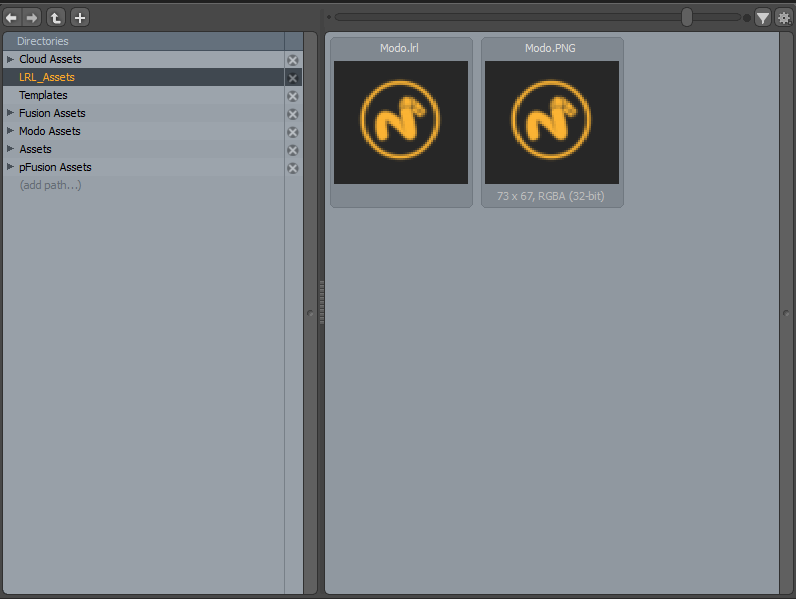
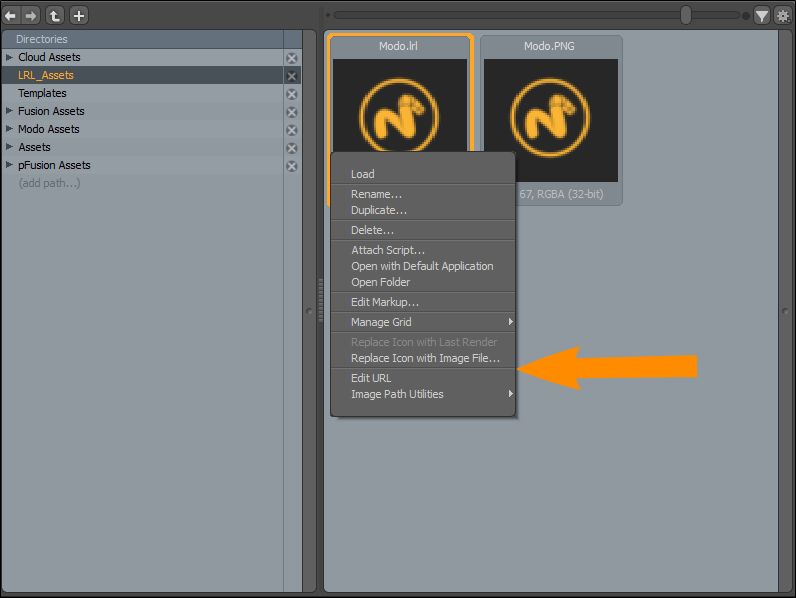
| 2. | Right-click on the *.lrl file. |
| 3. | Click any of the following menu items: |
• Replace Icon with Image File - Navigate to a new image to use as the icon image and click Open.
• Edit URL - The Edit URL dialog displays. Enter in a new URL and click OK.
Tip: Advanced Users: For information about how to limit what is displayed in the Preset Browser, see Preset Browser Advanced Filtering .
Sorry you didn't find this helpful
Why wasn't this helpful? (check all that apply)
Thanks for your feedback.
If you can't find what you're looking for or you have a workflow question, please try Foundry Support.
If you have any thoughts on how we can improve our learning content, please email the Documentation team using the button below.
Thanks for taking time to give us feedback.