Search is based on keyword.
Ex: "Procedures"
Do not search with natural language
Ex: "How do I write a new procedure?"
Preset Browser
The Preset Browser is a visual library of pre-defined objects, surfaces, kits, and settings available in Modo. Modo's share site presets and some Modo kits are stored in the cloud on a shared site for easy access. These presets are organized and categorized for quick visual browsing. Basic sets of Cloud Assets, Fusion Assets, Templates, and pFusion Assets are available when you install Modo.
You can create your own presets and add them to the Preset Browser or download shared assets from the Foundry community website.
Note: If you require direct downloads for the Modo 11 Content packages, links are provided for all operating systems from our Support Portal. For details, see Q100062: Help with the "Standard Content Wasn't Found" message.
As of Modo 12, all assets are available from the cloud and are accessible from the Preset Browser.
To open the Preset Browser:
• Click the Preset Browser palette icon found on the top-left corner of the Model layout.
![]()
• Alternatively, press F6 while working in any layout to open the pop-up palette.
• The Preset Browser is also found on the bottom panel of the Layout view. Under the main menu, click the Layout tab and on the bottom of the view, open the Items tab, and expand Cloud Assets.

Navigating the Preset Browser
The Preset Browser uses a familiar tree structure of nested folders.
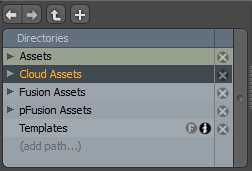
Browsing the Directory Tree
The directory tree is located on the leftmost column and contains a list folder names of the grouped presets. For instance, in the case of the Assets > Materials folder, there are a number of sub-folders that organize the material presets by finish.
Tip: If the Directory tree is not displayed, you can make it visible by left-clicking and dragging on the inside edge of the left side of the viewport (over the tiny row of stacked squares). The cursor changes to a small arrow when active. See Collapsing the Directory Tree.
To expand or collapse any sub-folder within the tree:
• Left-click the triangle to the left of each folder name.
To display the content of a folder in the main browsing window:
• Click the folder.
To add a new directory:
• Click (add path...), navigate to an appropriate directory, and then click Select Folder.
The Preset Browser displays the name of that folder in the navigation tree. Use this custom directory to save your own project assets to.
To remove parent directories from the tree:
You can remove parent directories displayed in your Preset Browser. Assets are not removed from your local drive.
• Click the ![]() icon on the column to the right of the folder names.
icon on the column to the right of the folder names.
A confirmation dialog opens to confirm the removal of the parent directory from the Preset Browser navigation panel.
Collapsing the Directory Tree
If you prefer not to use the directory tree, you can collapse it by clicking the Directory Tree ![]() button in the bottom-left corner of the viewport.
button in the bottom-left corner of the viewport.
When closed, navigate using the buttons in the upper-left of the window:

Forward, Back, Up to Parent, and Create New Folder respectively. The Forward and Back options are only available when folders have been navigated (much like a web browser).
Scaling the Thumbnails
You can scale the thumbnails using the slider at the bottom.

Switching Views
You can set how the Preset Browser displays information using the buttons in the lower right corner.

|
|
Thumbnails view with vertical scrolling. |
|
|
Thumbnails view with horizontal scrolling. |
|
|
List view, showing assets in a vertically scrolling list. |
|
|
Thumbnail grid view. You can arrange the thumbnails arbitrarily. |
Adding a Preset Directory
You can customize the Preset Browser. This is useful if you want to create a repository for project specific presets.
To create a preset directory:
| 1. | Navigate to the Preset Browser. |
| 2. | Click (add path...), navigate to an appropriate directory, and then click Select Folder. |
Searching for Presets
You can search for specific presets by Sorting or by using the Search feature. Search is located on the top-right of the preset interface. Click the Search ![]() button to open the search string input field. Type a term into the field to see all presets that contain the term in either the preset name or the preset's keyword tags. By default, the entire hierarchy is searched.
button to open the search string input field. Type a term into the field to see all presets that contain the term in either the preset name or the preset's keyword tags. By default, the entire hierarchy is searched.

The first matching item is highlighted in the search results. You can scroll through the list using the cursor keys, and then press enter to open the preset.
To change the search options:
• In the Search input field, click the More options ![]() button on the right of the search field, and select one of the following options:
button on the right of the search field, and select one of the following options:
• Simple Search - Locates assets using the text entered. Ignores case.
• Pattern Matching - Locates assets using the exact pattern of the text entered.
• Match Case - Matches the case of the search term against the preset name.
Note: If the cursor keys don't work on Mac OS X, try Alt+cursor to scroll through the options. This is due to a glitch in Modo's key handlers.
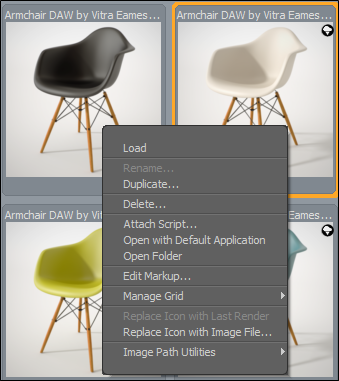
Using the Contextual Menu
Right-click on a preset to open a contextual menu for managing presets, as well as customizing the icon display.
|
Option |
Description |
|
Load |
Loads the currently-selected preset into the scene. For mesh presets, this creates a new item centered at Modo's origin. For materials, you need to select a material group in the Shader Tree before the material preset loads. |
|
Rename |
Applies a new label to the preset. |
|
Duplicate |
Opens a dialog requesting a new file name for a new duplicate preset file. |
|
Delete |
Removes the currently-selected preset. This also removes the file from the hard drive. |
|
Attach Script |
Opens an OS-specific dialog where you can specify a script - an .lxm macro file or a Python, Perl, or Lua script. This is useful to when you want an automatic setup for assets added to a scene. The target script attaches itself to the preset. The next time you add the preset, you can run the script by double-clicking it. Note: The Script must remain in the same disk location relative to the preset. |
|
Open with Default Application |
For non-Modo specific assets, such as image maps, this command uses the OS's default application to open the file for further editing. |
|
Open Folder |
Opens the file location in your OS's file browser. |
|
Edit Markup |
Opens the Dir Cache Markup Editor dialog as a pop-up for editing. For more information, see Editing Preset Metadata. |
|
Manage Grid |
When viewing the Preset Browser in Grid mode, you can easily organize the files in a specific order if the Sorting option is set to Manually. You can then use these options to add grid spacing lanes - additional lanes with which to organize and sort the presets. For more information about Grid mode, see Browser Mode. |
|
Replace Icon with Last Render |
Embeds the last F9 render result into the currently selected preset item. |
|
Replace Icon with Image File |
Opens an OS-specific file browser to select a saved image that is embedded into the currently selected preset item. |
|
Image Path Utilities |
The Image Path Utilities offer you a way to locate and repair presets with broken image file links (such as might occur when reorganizing the assets): • Fix Broken Image Paths - Fixes any broken image paths in the currently selected presets. • List Broken Image Paths (selected) - Produces a text report listing broken image paths found in the selected presets. • List Broken Image Paths (Folder) - Produces a text report listing broken image paths found under a folder hierarchy. • Image Use Report (Folder) - Produces a text report listing all image paths found under a folder hierarchy. • Image Use Report (selected) - Produces a text report listing all image paths found in the selected presets. |
Reviewing Cloud Asset Information
A cloud ![]() icon is displayed on cloud assets. Click this icon to download the asset. After downloading a cloud asset to your local drive, this icon is displayed in gray when you hover your cursor over the asset.
icon is displayed on cloud assets. Click this icon to download the asset. After downloading a cloud asset to your local drive, this icon is displayed in gray when you hover your cursor over the asset.
You can mark an asset as a favorite, rate the asset, and review information about the asset.
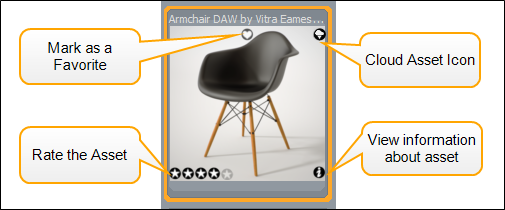
Tip: You can use the scale slider to change the size of the icons displayed in the Preset Browser. For more information, see Scaling the Thumbnails.
Editing Preset Metadata
The Preset Browser allows you to manually add additional markup (metadata) to presets to aid in organization and enhance filtering and searching of presets. This includes the ability to add keywords, comments, star ratings, and favorite presets.
Metadata can be added for your own personal use or to be shared. In addition, you can edit markup for a selected tree directory. All assets within that directory are updated.
The following markup options are available:
• User Markup - Metadata is only saved to your local assets.
• Shared Markup - Metadata is shared with others. Your updates are seen by clicking the Info ![]() icon for the updated Cloud Asset.
icon for the updated Cloud Asset.
Editing Markup for an Asset
To edit markup for a selected asset:
| 1. | In the Preset Browser, right-click on an asset, and select Edit Markup... |
The Dir Cache Markup Editor displays.
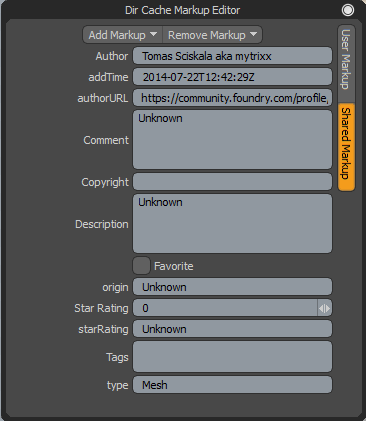
| 2. | Open the Shared Markup tab. |
| 3. | Add the string, for example Blue Chair, into the Comment field. |
| 4. | Close the Dir Cache Markup Editor dialog if it's obscuring the preset. |
| 5. | On the updated asset, click the Info |
The Comment field displays Blue Chair.
Filtering a Directory
To filter a directory:
| 1. | On the left panel, select a directory you would like to add metadata to, and click the Filter icon. |
![]()
The Dir Cache Markup Editor dialog displays.
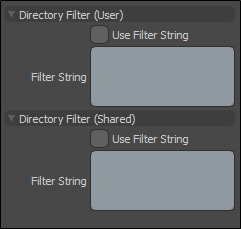
| 2. | Click Use Filter String under Directory Filter (User) and/or Directory Filter (Shared). |
| 3. | Type markup data into the Filter String fields. |
Adding a Custom Markup Attribute
To add a custom markup attribute:
| 1. | In the Preset Browser, right-click on an asset, and select Edit Markup... |
The Dir Cache Markup Editor dialog displays.
| 2. | At the top of the dialog, select Add Markup > Add Custom Markup... |
The Add Custom Markup Attribute window displays.

| 3. | In the Attribute field, type the name of your custom markup attribute. |
| 4. | In the Datatype field, click the drop-down arrow, select a datatype, and click OK. |
Downloading Presets
You can select which presets you would like to work with and download them onto your local drive.
To download presets:
• Double-click on the desired preset in the Cloud Asset folder.
• Drag-and-drop the asset into the 3D (OpenGL) Viewport.
• Drag-and-drop the asset onto one of the viewport tabs on the top-right panel. For more information about viewports, see Understanding Viewports.
The asset is downloaded to your Asset directory. In addition, the cloud ![]() icon is displayed in gray on the asset thumbnail to give you a quick visual reference of which assets you have previously downloaded to your local drive.
icon is displayed in gray on the asset thumbnail to give you a quick visual reference of which assets you have previously downloaded to your local drive.
Note: Modo checks if any of the selected cloud assets are more recent than the presets previously downloaded on your local system. You are prompted with a warning if you have an older version before downloading.
• Modo Kits can be downloaded and installed by double-clicking on the appropriate kit in the Cloud Assets > AddOns > Foundry > Kits directory. You must then restart Modo to complete the installation.
For information on how to create your own presets, see Creating Your Own Presets.
Importing Scenes
You have multiple options to bring a scene (.lxo file) from the Preset Browser into Modo.
When you right-click the scene file in the Preset Browser, you can choose from the following options:
• Load - Loads the scene independently from any other open scenes.
• Import - Imports the scene to the current scene.
• Import Reference - Imports the scene as a reference. This means that a link is created between the two scenes. If the referenced scene is modified in any way, for example, an item is added or its surfacing is changed, the referenced elements automatically update in the master scene upon re-opening. For more information on working with reference files, see Import Reference.
• Import Proxy - A proxy item is created in the current scene, which links to the imported scene. For more information on proxy items, see Render Proxy.
When you drag a scene to the 3D viewport and keep holding the left-mouse button, a menu appears with the same options. Select the required option and release the mouse button.
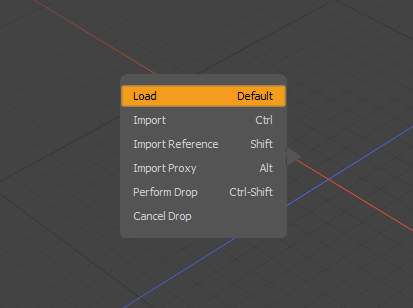
You can also use keyboard shortcuts with drag-and-drop:
• Import - Ctrl
• Import Reference - Shift
• Import Proxy - Alt
Preset Browser Options
The gear ![]() icon, in the bottom-right corner of the Preset Browser, opens the viewport options dialog, which allows you to further customize the information displayed in the viewport.
icon, in the bottom-right corner of the Preset Browser, opens the viewport options dialog, which allows you to further customize the information displayed in the viewport.
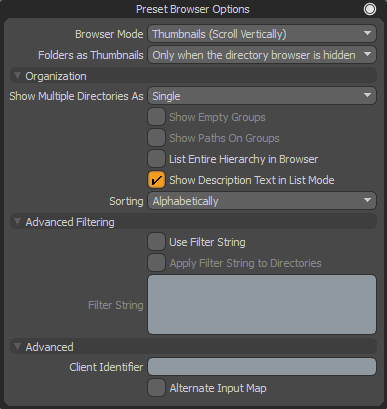
Organization Options
|
Show Multiple Directories As |
Controls how multiple folder selections are displayed (hold down Shift or Ctrl to select more than one folder in the Directories tree at a time): • Single - Displays the contents of single folders only (no multiple folder selections allowed). • Multiple (Merged) - Displays the contents of all selected folders simultaneously, as if they were a single folder. • Multiple (Grouped) - Same as above, but separates the contents of each folder with a named divider. |
|
Show Empty Groups |
Empty folders are displayed in the browser. Files can be dropped into empty groups when they are visible. Note: This option is only available when the Show Multiple Directories is set to Multiple (Grouped). |
|
Show Paths on Groups |
Displays the full directory hierarchy in the group name in the preset list. This only applies if you are viewing multiple directories using the Multiple (Grouped) option. |
|
List Entire Hierarchy In Browser |
When this option is enabled, all child folders in the hierarchy are also displayed in the browser without being explicitly selected. |
|
Controls the display order of the presets in the browser. • Alphabetically - Displays in alphanumerical order. • Manually - Allows you to define the order by dragging-and-dropping within the browser (not available for multiple directories as merged). • Star Rating - Ordered by the number of stars assigned to a preset. • File Extension - Ordered by the preset's file extension, organized alphabetically. • Modification Time - Defines the order based on the last time the file was saved (or modified), starting with the most-recent file or directory. • File Size - Defines the order based on the actual size of the file as saved on the disc. |
Advanced Filtering Options
The Preset Browser adds markup information to presets. Filtering procedurally refines what is visible in the browser, based on a scripting-like annotation
The filter options take into account both the user-defined markup, as well as metadata (information associated with the file, such as name and format).
For more information, see Filtering a Directory.
|
Use Filter String |
Toggles the filtering on or off for the browser. |
|
Apply Filter String to Directories |
When this option is enabled, the filtering is applied to the directory folders as well, otherwise all directories are shown. |
|
Filter String |
Enter the data string to filter the elements within the Preset Browser. Note: The Use Filter String and/or Apply Filter String to Directory option must be set before typing a filter string. |
Advanced Options
Client Identifier | Allows a Preset Browser to have its own unique selection. This is most useful when configuring a Preset Browser to be used with a specific tool. For example, this is how the Polygon Bevel tool knows which of many possible Preset Browser viewports to use (in the case of Polygon Bevel, the browser viewport is embedded in the Tool Properties viewport). Note: Each tool must be specially coded to look for a specific client identifier, so this feature is only really useful to tool developers. For more information, see our SDK documentation. |
Alternate Input Map | An advanced setting for developers that controls the number of mouse clicks used to assign a preset to a tool. When enabled, they assign with a single click, and when disabled they assign with a double-click (the default behavior). For more information, see our SDK documentation. |
Sorry you didn't find this helpful
Why wasn't this helpful? (check all that apply)
Thanks for your feedback.
If you can't find what you're looking for or you have a workflow question, please try Foundry Support.
If you have any thoughts on how we can improve our learning content, please email the Documentation team using the button below.
Thanks for taking time to give us feedback.