Search is based on keyword.
Ex: "Procedures"
Do not search with natural language
Ex: "How do I write a new procedure?"
Particle Paint Tool
Similar to the Painting tool, you use the Particle Paint tool to spray particles onto a surface in a controllable manner. Particles are single vertices that can control a number of other functions in Modo, such as point sources for geometry Replicators and the Texture Replicator, as well as point clouds for Blobs, Volumes, and Sprites.
Once you create the particles, you can continue editing them by using the other particle tools. When you use these tools with the Particle Constraint option, you have control over the placement of individual particles. Also, you can take advantage of the additional controls available with Particle Vertex Maps (such as the transform map), which provide extensive controls for generated particles.
Using the Tool
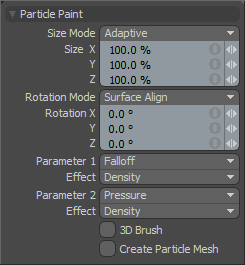
The Particle Paint tool is in the Paint interface tab under the Particle Tools sub-tab of the toolbox. Particles only spray onto polygon surfaces, so you need to select the appropriate target layer to spray onto before activating the tool. Upon selecting the tool, its attributes appear in the Properties viewport. When first selected, the tool defaults to Smooth Brush as the brush tip. You can select an alternate brush tip before proceeding, or you can right-click in the 3D viewport to scale the brush size. After specifying the brush tip, drag in the viewport to create particles. You can add more control by setting the Parameter 1 and Parameter 2 options.

|
Particle Paint |
|
|---|---|
|
Size Mode |
Determines the scaling for the associated particle size Vertex Map. When creating particles, Modo generates a particle size Vertex Map automatically to store additional information for controlling any scaling of eventual clones or volume elements.
• Uniform - Results in identically-sized elements that are determined by the Size X, Y, Z values.
• Adaptive - Scales elements larger or smaller based on the size of the brush tip used.
• Random - Scales the elements randomly up to the maximum scaling amount that is specified by the Scale X, Y, Z values.
• Adaptive+Random - Scales the elements randomly in relation to the size of the brush tip with the maximum scaling amount specified by the Scale X, Y, Z values. |
|
Rotation Mode |
Determines the rotation for the associated particle size Vertex Map. When creating particles, Modo generates a particle size Vertex Map automatically to store additional information for controlling any rotation of eventual clones or volume elements. • Uniform - Orients elements identically by the Rotation X, Y, Z values.
• Surface Align - Orient elements to align with the surface polygon's normal direction.
• Random - Rotates each element randomly up to the maximum rotation amount specified by the Rotation X, Y, Z values.
• Surface Align+Random - Orients each element to the surface's normal direction first, and then offsets the orientation with an additional random rotation up to the maximum amount specified by the Rotation X, Y, Z values.
• Surface Align+Tablet - Orients each element to the surface's normal direction first, and then offsets the rotation based on the angle of the stylus on the tablet.
• Surface Align+Tablet (No Pitch) - Orients each element to the surface's normal direction first (ignoring the sloping angle, or pitch), and then offsets the rotation based on the angle of the stylus on the tablet.
• Screen Align+Tablet - • Screen Align+Tablet (No Pitch) - |
|
Parameter 1 / Parameter 2 |
Provide two additional controls for creating particles. First, select the controlling input from the Parameter list, and then select the result from the Effect list. Usually, these options combine with the brush tip settings, but some options use a stylus-and-tablet input combination to control elements. • Falloff - Allows you to specify one of Modo falloffs to determine the effect. Because the brush size supersedes the falloff, define the falloff before activating the tool.
• Pressure - Uses the pressure of the stylus against the tablet's surface to control the effect.
• Slope - Uses the downward slope of the target polygon's surface to control the effect.
• Altitude - • 1.0 Slope - • 1.0 Altitude - |
|
Effect |
Specifies the results that are controlled by the selected Parameter. • (none) - Disables the Parameter and Effect options.
• Density - Controls the number of sprayed particles as determined by the specified Parameter.
• Size - Controls the scale of sprayed particles as determined by the specified Parameter.
• Rotation- Controls the orientation of sprayed particles as determined by the specified Parameter.
• Size+Density- Controls the number and scale of sprayed particles as determined by the specified Parameter. |
|
3D Brush |
When enabled, creates particles within the 3D volume of the brush tip. This adds depth to the particles, so they aren't placed directly against the constraining background surface. |
|
Create Particle Mesh |
When enabled, creates an additional Mesh Item layer as a child item of the target layer. This mesh layer contains all the particles and eliminates the need to copy and paste the vertices into a new mesh layer manually when used as a point source. |
Sorry you didn't find this helpful
Why wasn't this helpful? (check all that apply)
Thanks for your feedback.
If you can't find what you're looking for or you have a workflow question, please try Foundry Support.
If you have any thoughts on how we can improve our learning content, please email the Documentation team using the button below.
Thanks for taking time to give us feedback.