Swirl


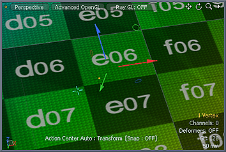
Found in the Deform sub-tab of the modeling toolbox, the Swirl tool combines the Axis Rotate tool with a Radial falloff. When you first click in the viewport, Modo automatically fits the Radial falloff to the current geometry. Dragging in the 3D view applies a rotation modulated by this falloff. For more control over the region of influence, use the right mouse button to quickly define the falloff region, then use the left mouse button to apply the rotation. To precisely place the falloff, either use the handles to manipulate the falloff after it has been auto-sized or right-click and drag away from the handles to reset the falloff and drag it out interactively.
|
Swirl |
|||||
|---|---|---|---|---|---|
|
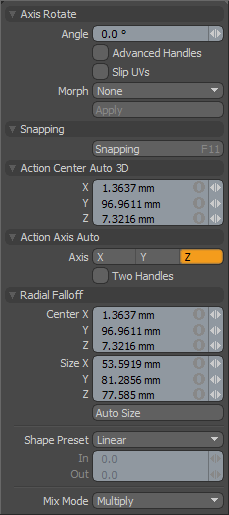
Axis Rotate |
|||||
|
Angle |
Displays specific rotational values applied to the geometry (calculated in degrees). When adjusting an object interactively in the viewport, the Angle input values indicate the current rotational amount applied. |
||||
|
Advanced Handles |
When enabled, displays additional information and controls in the viewport. |
||||
|
Slip UVs |
(Only available in Component modes) When enabled, edits applied to the geometry do not change the existing UV map. UV values are generally fixed to specific vertices; therefore, further edits to the geometry may warp, deform, or otherwise distort the UV values in undesirable ways. When this happens, you may need to adjust the map or to redo it altogether. To avoid this undesirable result, you enable Slip UVs so as to not disturb any existing UV mapping applied to the geometry.
|
||||
|
Morph |
(Only available in Component modes) Determines how Modo treats stored morphing information when applying transforms (such as the Move, Rotate, or Scale transforms) to geometry. There are three options for controlling how Modo deals with the morph map vertex data when applying any transforms.
• None - Transforms selected (visible) morphs independent of their source, but does not affect unselected morph data.
• Transform - Transforms morph data along with the base mesh.
• Keep Positions - Converts morph data into an absolute morph map. All vertices retain their pre-transformed positions. Note: In previous versions of Modo, to transform a morph along with its base, you needed to select it in the Vertex Map list. If you didn't, when Modo recalled the relative morph map data, it would produce distorted, undesirable results; therefore, it was easy to accidentally spoil a model. To remedy this problem, current versions of Modo have three options to deal with the morph map vertex data. |
||||
|
Snapping |
See the Applying Snapping topic for details about this feature. |
||||
|
Radial Falloff |
|||||
|
Center X/Y/Z |
Defines the center of influence, which is where the strength of the falloff is the greatest (100%). The strength of the falloff attenuates toward the outer bounds of the spherical volume. The area outside the volume receives no tool influence (0%). |
||||
|
Size X/Y/Z |
Defines the radius of a perfect circle from the Center position and determines the outer area of the falloff where there is no effect. |
||||
|
Auto Size |
Adjusts the falloff's Center and Size values automatically to match the bounding box of the current selection. |
||||
|
Shape |
Controls the strength of the falloff's influence along the extent by using a shape preset. • Linear - Attenuates the falloff evenly across its range.
• Ease-In - Strengthens the falloff toward the start position.
• Ease-Out - Strengthens the falloff toward the end position.
• Smooth - Strengthens the falloff toward the center of the falloff.
• Custom - Fine tunes the strength of the falloff based on the In and Out values. |
||||
|
In/Out |
Determines the strength of the falloff nearer to the start or end position. |
||||
|
Mix Mode |
Defines how each falloff interacts with the other(s) in instances where there are multiple falloffs applied to a transform (by using Add in the Falloff menu). |
||||


