Animation Layers
Animation Layers stack animations on top of one another, which allows you to non-destructively add or change elements of your animation sequence without editing one continuous, complicated sequence. Artists with experience in image editing applications are familiar with the principle of using multiple image layers and masks; this is the same principle, only using animations instead of still images.
Before creating animation layers, Modo needs an Actor and Action for that Actor to be enabled. For more information, see Creating Actors, Actions, and Poses.
You also need a base keyframe in the Action. For example, if you want to use an additive layer for moving an object along the Y axis, the Position Y channel needs a keyframe within the Action. Additive layers need a starting reference point for the channel.
There are two types of Animation Layers you can create: Additive Layers and Override layers.
Additive Layers
An Additive Layer takes any animation that you put within a layer and adds it to an existing animation. For example, an animation of a moving ball might be your base animation.
The video below demonstrates how two additive layers are used to animate the ball bouncing and then rotating during its motion path.
To create an additive layer:
| 1. | Open the Modo layout. |
| 2. | Click on the Time  Viewport and Graph Editor Viewport and Graph Editor  Viewport buttons. These are located at the bottom of the Modo layout and control animation playback and edit keyframes respectively. Viewport buttons. These are located at the bottom of the Modo layout and control animation playback and edit keyframes respectively. |
| 3. | Click the Animation |
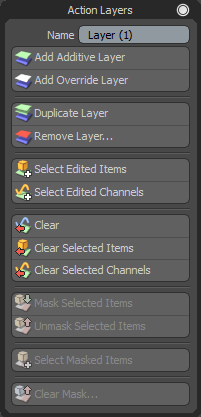
The Action Layers panel opens.
Tip: If you prefer to work in the Animate layout, you can access the Action Layers tools by clicking the Action Layers ![]() button on the Graph Editor.
button on the Graph Editor.
| 4. | Click Add Additive Layer. |
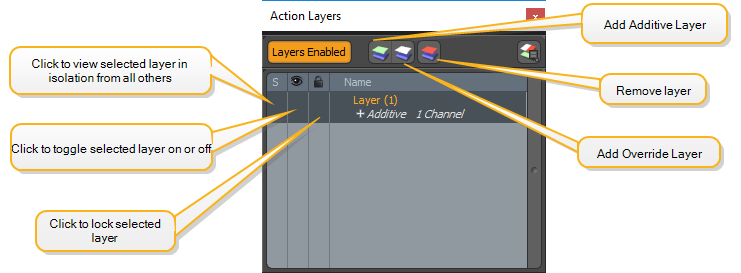
Your new additive layer appears in the Action Layers palette, to the right of the Graph Editor. To remove a layer, click on the Remove Layer ![]() button or click on the
button or click on the ![]() button on a selected layer in the palette. To duplicate a layer, right-click on the layer and select Duplicate.
button on a selected layer in the palette. To duplicate a layer, right-click on the layer and select Duplicate.
| 5. | As a test, make a keyframe animation change, such as a change in an object's position over time. |
| 6. | Click the Play button  below the graph editor to play through your animation. below the graph editor to play through your animation. |
You can add as many additive layers as you like.
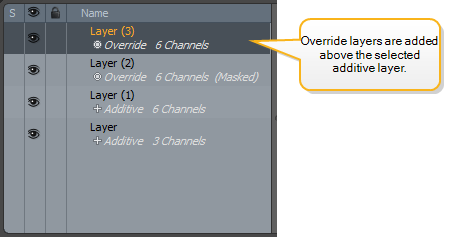
Note: The layer stack hierarchy is rigid, meaning once layers are added they cannot be rearranged in the list.
Override layers
An override layer replaces the channel values in the active Action with the channel's setup value. In other words, an override layer resets an animation to its rest state without destroying the original animation. Override layers sit on top of any existing layers so you can create whole new animations within them.
Override layers are designed so you can add masks to individual sections of an actor, which allows you to create alternative animations of that actor. Because the new animation is held in an override layer, your original animation remains unaffected.
To create an override layer:
| 1. | Select Action Layers in the left panel. |
The Action Layers panel opens.
Tip: If you prefer to work in the Animate layout, you can access the Action Layers tools by clicking the Action Layers ![]() button on the Graph Editor.
button on the Graph Editor.
| 2. | Click Add Override Layer. |
Your new override layer is added directly above whichever layer is selected in the Action Layers palette.
Using Masks with Override Layers
Let's imagine you have a character model of a space marine. In your original animation, he is running with his rifle aimed. Perhaps you want to change his motion so instead of running he is advancing slowly. You can use an override layer to effect this change while retaining the underlying animation.
| 1. | Create an override layer. |
Your character model resets to its setup position.
| 2. | Select the parts of your character model you want to animate separately. For this example, it would be the legs and lower body. |
| 3. | Click on the Masks |
| 4. | Select Mask Selected Items. |
| 5. | As a test, click the Play button below the graph editor to play through your animation. Notice that the original animation is retained except the selected items are now static. |
| 6. | Create new keyframes to animate the selected items. In this example, you would change the motion of the legs. |
Any changes you make now only affect the selected item and your original animation remains underneath. However, you can select parts of the masked items and expose the original animation underneath by clicking on the Masks ![]() button and selecting Unmask Selected Items. You may do this if you want to see your original foot animation along with the new animation you've created for the legs.
button and selecting Unmask Selected Items. You may do this if you want to see your original foot animation along with the new animation you've created for the legs.

Selecting Edited Items and Channels
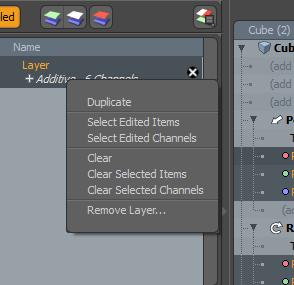
Items that have edited channels in a layer can be selected by right-clicking on the layer and choosing Select Edited Items. This automatically selects any channels within that item that have been edited. To select edited channels along with the items they belong to, right-click on the layer and choose Select Edited Channels.
Clearing Edited Channels from Layers
To remove edits within a layer:
| 1. | Select the item for which you want clear channels. |
| 2. | In the Channels panel, select the channels you want to clear. Hold Ctrl/Cmd and click to select multiple channels. |
| 3. | Right-click on the layer in the layers palette and select Clear Selected Channels from the contextual menu. To remove all channels belonging to particular items, select the items and choose Clear Selected Items. |
Channels can also be cleared from a layer from the Channel List viewport. Right click on the channels and select Remove Current Values.
Baking Actions with Layers
Animation Layers can be baked down into the base Action by selecting the item and clicking Animate > Bake. Channels belonging to the items that have been baked are removed from all non-muted layers.
Exporting Actions with Layers
Animation Layers can be exported with an Action without the prerequisite that the layers have been baked. Only non-muted layers are taken into account during export. This makes it easy to export multiple variations of an Action by muting and unmuting layers before each export. See FBX Export for more information.
Note: When an Action is duplicated, any layers on the Action are also be duplicated.