Color Management
Color management is a process that controls the conversion of colors when moving between different formats, systems, and devices. The primary goal of color management is to maintain accurate colors across the span of inputs and outputs. It is built using the academy award-winning OpenColorIO technology that is geared toward film and video production with an emphasis on visual effects and computer animation.
Color Management Overview
Color management in Modo works by applying a profile to a color input. A profile is a set of instructions that describe colors relative to a known standard, and the color input specifically would be color bitmap images imported into Modo (textures, backdrops, environments, and so on). Based on the assigned profile, the colors in the image are transformed to a linear colorspace format or to a numeric value colorspace format for internal processing and rendering.
A colorspace is a mathematical model that describes how colors are represented for a given format. Converting the bitmap image colors to a linear colorspace or to a numeric value colorspace ensures that image color fidelity is fully preserved during the rendering process.
The next part of the color management process is the output, where rendered frames (still or animated) are then displayed in the Render Display, where a destination transform is applied. The rendered image is stored in memory unaffected in the linear format, with the transform applied non-destructively by the viewport using a LUT (Look Up Table) which is a pre-defined set of translation operations from one colorspace to another. This allows you to properly preview how the final image should look, without adversely affecting the actual rendered frame. This also allows the image to be saved linearly using a high dynamic range format for additional processing in another application further down the pipeline, ensuring continued color fidelity. Colorspace transforms can be applied to the image when saving to a low dynamic range format for direct use or processing in a non-color managed application, retaining the look of the image from the Render Display window.
Note: Modo ships with default color management settings that should work perfectly fine for most artists without further adjustment. The following controls are likely to be only edited by advanced artists with specific needs.
Note: When using color management, it is no longer necessary to de-gamma an image for rendering, this is handled automatically by the color management system. Defaults for all Gamma settings are now set to 1.0.
Modo Workflow
A color profile is assigned automatically to any RGB bitmap image imported into Modo, single channel grayscale images are always treated linearly. Determining which profile is assigned to which image type starts with the color management settings found in the Preference Settings. These values specify the initial, default settings assigned to a new scene. Changing them doesn't directly affect older scene definitions or any scenes that are currently open. It simply determines the default values for newly created scenes.
When a new scene is created, you can access the scene-specific color management settings by selecting the scene item (topmost item in the Items list with the movie clapperboard icon). When selected, options are available in the Properties panel.
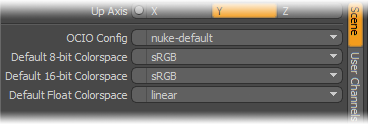
With these settings, you can globally modify the profiles for all images within the same scene using a single setting, instead of having to manually change each and every image. Of course, it's also possible to override this setting on individual images. This is done by changing the colorspace control on the image map item from default, which means it references the scene item setting, to a specific colorspace. The setting is found under the Image Still Properties sub-tab when the image map item layer is selected. Once defined this way, the image map retains the setting regardless of changes to the scene item colorspace settings.
Once the proper colorspaces have been defined, processing for color management is all done in the background, and requires no further input. The proper colorspace definitions allow Modo to accurately convert from the source colors to a linear colorspace for internal processing and rendering. For image display, you may need to adjust the LUT settings in the Preview and Render Display windows, depending on monitor type. In most cases, the default option is fine as most monitors use the sRGB colorspace to display the output from the video card.
Saving images assigns color profiles using the same scene-based preference settings that are initially defined as the default value. When images are saved from the Render Display or from the Preview window, the Colorspace option from the bottom of the Image Processing tab controls which profile is assigned and embedded, should it ever be necessary to override the default value. Overrides can also be applied when saving rendered animations directly from a render output with the setting of the render output itself. Both the Render Display control and the render output setting are normally set to Default. The profile chosen depends on the bit depth of the target format.
Note: To ensure consistent rendering, Modo opens older scene files (pre-801) with color management disabled. If color management is desired, you need to manually enable it for all items in the scene.
The following section explains the controls specific for color management and where they are located in the interface.
Preference Settings
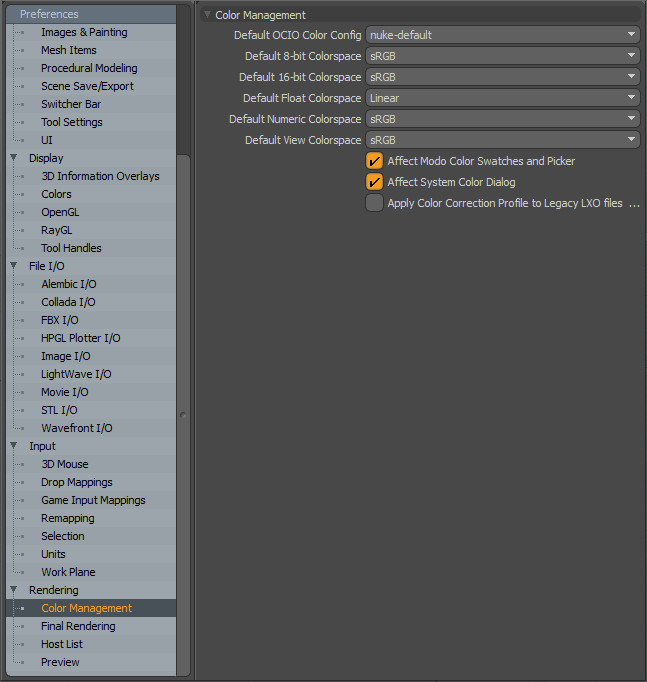
On Windows, found in the menu bar under System > Preferences.... On Mac OS, found in the menu bar under Menu > Preferences. Open Rendering > Color Management section toward the bottom of the window. The Color Management preference settings defines the default values that are inherited by any new scene that is created. Adjusting these settings don't affect older saved scenes, or any open ones.
Color Management
Default OCIO Color Config: This option controls which configuration is the default for new scenes. Each separate config controls which color spaces are available for use by items in the scene. Each different config contains a different set of profiles. You can also designate a config for individual scenes manually, as an override in the scene item. See Custom OCIO profiles for more information.
Default 8-bit/16-bit/Float Colorspace: Designate the scene's default profile assigned when reading and writing the associated bit depth of image for any items that have their colorspace control set to Default. You can also designate colorspace profiles individually on the Image Map item under the Image Still sub-tab.
Default View Colorspace: This option defines the colormapping assigned to UI elements, including the Color Picker Viewport, Color Swatches, the Render Display window and the interactive Preview Viewport. The Perform Color Correction on OpenGL Object must be enabled in order to see the results of this setting on the 3D Viewports.
Default Numeric Colorspace: Numeric control color correction applies color correction to the numeric values displayed in color fields. This allows you to, for example, copy and paste the hex code for a color from Photoshop into Modo and have the colors match. Previously, Modo supported color correction for the drawn representation of a color in the UI but the numeric values were always drawn in linear space.
Affect Modo Color Swatches and Picker: When this option is enabled, the Default View Colorspace option adjusts the display of individual color input fields in the Properties form to match the colors of the Render Display.
Affect System Color Dialog: When this option is enabled, the Default View Colorspace option adjusts the display of the Color Picker Viewport pop-ups and windows to match the colors of the Render Display.
Apply Color Correction Profile to Legacy LXO files: Enable this to apply the default color correction profile to pre-Modo 801 .lxo files. These files pre-date the use of OCIO. Consequently, it may be desirable not to use Modo's default color correction on loading the files as they may already have been corrected using an alternative method. For this reason it is off by default.
Note: Modo normally initializes scene files if OCIO color configurations are not stored correctly in the file.
Colorspace on Image Maps/Sequences
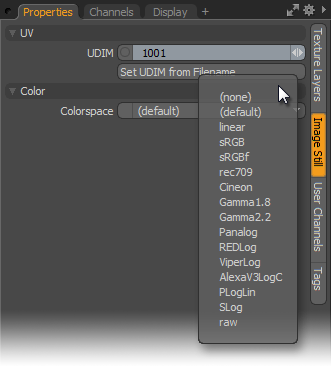
Image maps and image sequences that are loaded into the Shader Tree are assigned default color management profiles based on the scene item settings. You can override the settings per image, based on the Colorspace control in the Image Still sub-tab of the Properties panel when the target image map item is selected. The options illustrated here are located in the Nuke-Default color management config.
Render Outputs
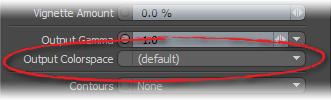
The Output Colorspace control in the Render Output determines the particular color transform (if any) applied to images when saved from Modo, either automatically by the render output when rendering an animation, or when saving from the Render Display window. The Output Colorspace basically has three different ways it can be set, the None option disables color management from affecting images when saved, 'Default automatically applies the color profiles defined by those set in the scene item, based on the bit depth being saved out from Modo. The third and last option is dependent on the color profile config defined in the Scene, but allows you to override the default colorspace value to a specific color profiles by defining one of the select color profiles available in the drop-down.
Working independently from the render output, there is the identical control available in the Render Display window, at the bottom of the Image Processing tab, that provides the same functionality as the render output control.
Monitor Color Management

At the top of the Render Display there is a LUT setting (for Look Up Table) where you can specify your monitor's color profile (not to be confused with the render output's Output Colorspace profile). When working in a managed workspace, this control allows you to easily swap color table configurations, for instance if the Render Display is positioned on different monitors in a multi-monitor setup. In most cases, the default sRGB setting is fine, as most computer monitors default to working within this colorspace.
Tip: Color management can be completely disabled, where Modo works as in the previous version. This is done by setting the color management preference setting to None and returning the default Gamma value in Preferences to 2.2 before creating any new scenes. When this is done, you need to manually de-gamma imported images for proper results (as in previous version of Modo.
Custom OCIO profiles
From Modo 15.1v2 custom OCIO profiles can be added as kits.
For example, to add the ACES 1.0.3 color profile:
| 1. | Create a folder in your configs directory and name it. In this example, the folder is named "myociocfgs". Any additional custom color profiles can be stored in this folder. |
Note: You can navigate to the configs folder through Modo by going to System > Open User Configs Folder.
| 2. | If you already have the ACES 1.0.3 color profile, copy it inside the myociocfgs folder. Any color profile folder should contain a folder of LUTs and a config.ocio file. |
Tip: Public color profiles, including ACES 1.0.3, are readily available from online repositories, such as https://opencolorio.org/configurations/.
| 3. | Copy the following snippet into a text editor. |
<configuration><atom type="ocio">
<hash type="ociopath" key="aces_1.0.3">user:Configs/myociocfgs/aces_1.0.3</hash>
</atom>
<configuration>
Note: If you copy and paste example code from this user guide into a text editor, line indentations and spacing may not be preserved. If this is the case, correct the indentations manually.
Note: You can embed multiple configs in a group within this text file if you want to add other color profiles.
| 4. | Save the text file as plain text and store it in the configs directory. Config files need to be plain text for Modo to read them. You can give the text file any name but it's good practice to name it the same as the folder containing your custom color profiles. |
| 5. | Change your text file's extension to .cfg. |
The text file is now a config file, which Modo uses to reference your custom profiles.
Note: Ensure the name of the color profile folder matches the path specified in your .cfg file. In this example, the color profile is named aces_1.0.3 so the path is user:Configs/myociocfgs/aces_1.0.3. This is also the name that appears in the Default OCIO Color Config options in Modo.
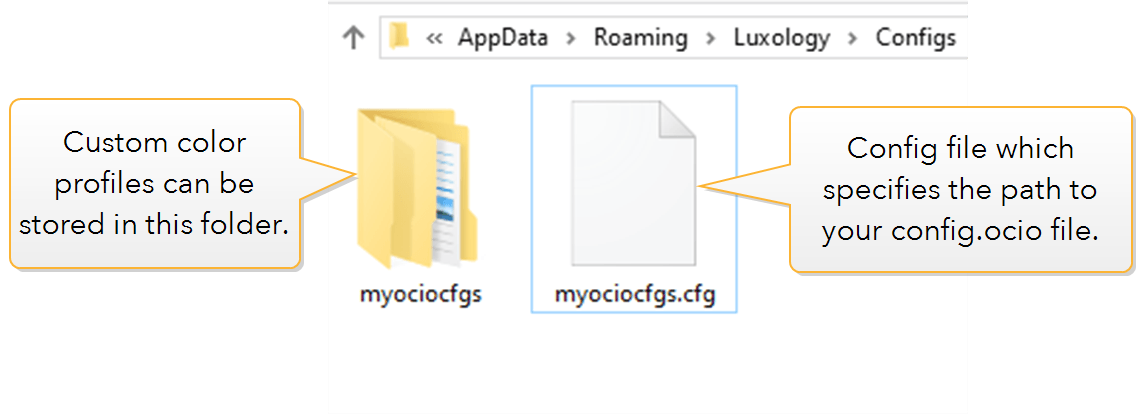
Your configs folder should look like this.
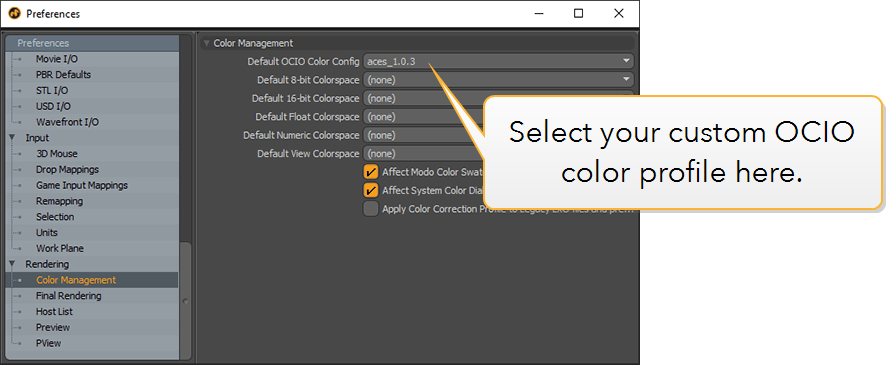
| 6. | Restart Modo, and navigate to System > Preferences> Rendering >Color Management. |
| 7. | Click the Default OCIO Color Config dropdown menu. |
You should now see the option to select aces_1.0.3.