Network Rendering
Network rendering in Modo is designed to enable simple access to multiple machines across a home network or company-wide intranet for rendering single images or sequences. Using cross-platform Bonjour technology (developed by Apple and installed when you installed Modo), the number of steps have been greatly reduced, eliminating the overhead usually associated with setting up network rendering. Once activated, any render tasks on the host system are automatically spread out across all available slaves.
Network Rendering Step-by-Step
Note: As of Modo 11.1, Modo's installer for Windows no longer installs Bonjour, which is used for automatic slave discovery in Modo's native network rendering. You can either install Bonjour on each Windows system you intend to use with network rendering, or use the Host List feature to specify the network IPs of the specific systems manually. For more information on how to install Bonjour, see this page.
To set up network rendering with two or more systems, do the following:
| 1. | Install the same version and build number of Modo on each system being used. See Help > About MODO to verify the build number. Slave systems do not need any content installed, but should have any third party plug-ins and/or kits installed, if scenes to be rendered contain those features. |
| 2. | Make sure that all the slave systems can see the master on the network and vice versa. Connected systems are visible in the Network View window, found in the menu bar, under Render > Open Network View. |
Note: Hardware and software firewalls that can often block communications between systems, preventing network rendering.
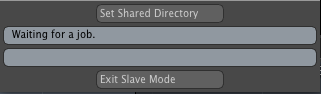
| 3. | Start Modo on the slave system(s) and enter into slave mode by selecting Render > Enter Slave Mode from the menu bar. Unlicensed installs can only enter slave mode. |
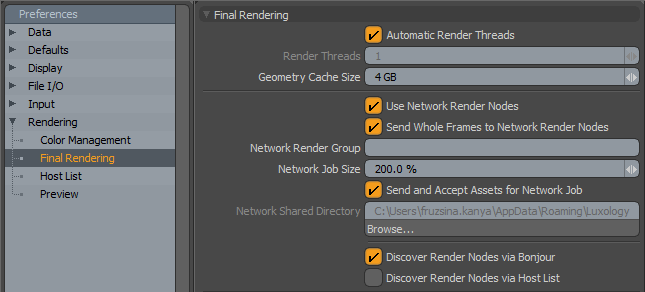
| 4. | Enable network rendering on the master system by enabling the Use Network Render Nodes toggle in Preferences > Rendering > Final Rendering. |
| 5. | If required, enable the Send Whole Frames to Network Render Nodes option to distribute entire frames to slaves rather than buckets. This provides a significant performance improvement for rendering animations. |
Note: For more information on rendering settings, see Rendering Preferences.
| 6. | Open a scene or animation on the host and render with one of the Render Commands. |
Note: Preview does not utilize multiple machines.
Modo has the Send and Accept Assets for Network Jobs option enabled by default. This means that the master system uses network sockets to transfer scenes and asset data to each slave system. The option of using a shared network folder is also available (see below). For simplicity of setup and use, Modo also has Discover Render Nodes via Bonjour enabled by default. This setting should work for most basic network setups. With Use Network Render Nodes enabled on the master and slave system in slave mode, any render started on the master sends scene and asset data to the slaves, then assigns them buckets on each rendered frame (these buckets appear with blue outlines in the Render Window). When the slave systems complete those buckets, they return them to the master.
Using a Shared Network Folder
When the Send and Accept Assets for Network Jobs setting is disabled, the master system deposits the scene and assets to the specified network shared directory for access by all slaves. To use this feature, each slave must be set up to use that same directory. This can be done by starting Modo on each slave and editing the Preferences setting Network Shared Directory, or by setting the directory through the Render Slave dialog (present only when a slave is in slave mode), by clicking the Set Shared Directory button. Make sure that all systems have proper access and permissions to read and write to the specified folder.
Network View
The Network view can be accessed from the menu bar under Render > Open Network View or by dragging the divider handle up at the very bottom of the Render Display window. This allows you to view the connection status of all the systems on the network running Modo.
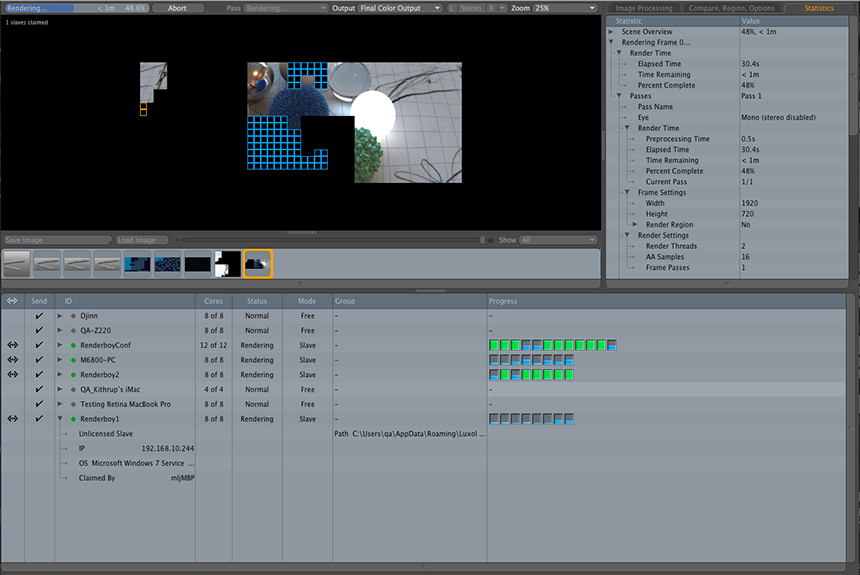
The Network view above shows eight systems on the network. The various columns of the Network view show the following information:
<--->: This is the communication column, it indicates if there is communication happening between the master and the slave with the back and forth arrow icon.
Send: This column shows if the connected system has the Send and Accept Assets option enabled. If it does, a checkmark appears, if not, the value is left blank.
ID: This column shows the info of any connected systems. The colored dots preceding the system names denote their present state.
• Red: The node is unreachable or not compatible.
• Green: The node is compatible and available for rendering.
• Black: The node is compatible but not available for rendering.
• Gray: The node's status is unidentified.
Clicking the triangle preceding each system name expands or collapses the system's information. When collapsed, each system takes up one row. When expanded, additional information can be seen, such as network folder path, IP address, OS, and whether or not it has been claimed by a master system for rendering.
Note: During the render, you can see how many slaves have been claimed by the master for rendering. The count appears in the top left of the render window: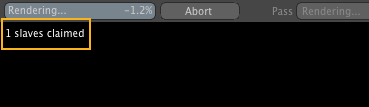
Cores: This column displays the number of cores available for rendering on each system. This setting can be changed on each system individually, by editing the option under Preferences > Final Rendering > Render Threads.
Status: This column displays the current status of each system on the network.
• Normal: For systems that are not running in Slave mode.
• Idle: The system is in Slave mode and waiting for a job.
• Rendering: The system is in Slave mode and is rendering.
Mode: This column displays the current mode of the system:
• Master: This system is a master in an active network render.
• Slave: This system is in Slave mode and ready to render.
• Free: This system is neither a slave or master, and is not currently rendering.
Group: This column displays which group the system is currently participating in. When expanded, the Group column also shows the network shared folder path set on each system.
Progress: This column is used to display the progress of each system that is rendering, showing vertical progress bars for each of its cores. As the bucket data is completed, a cyan bar rises from the bottom to the top and turns green upon completion. If the Network Job Size is set to a value greater than 100%, the progress bars cycle through one time for each bucket rendered (for the default 200%, the bar fills twice for each job). D
Note: Due to the modal nature of Modo's Render window, when it is open, only the Network view updates regularly during a render.
Advanced Options
The Network Render Group option in the Preferences > Final Rendering allows systems on a large network to be grouped. This allows you to specify which systems can actively participate in a network render. Any master and slave system with the same network render group name set in their preferences only participates with other systems that specify the same group name.
Host List
If the Discover Render Nodes via Host List option is enabled in Preferences > Rendering > Final Rendering, then slave systems can be manually added to a network render configuration by using the Host List preference option under Preferences > Rendering > Host List.
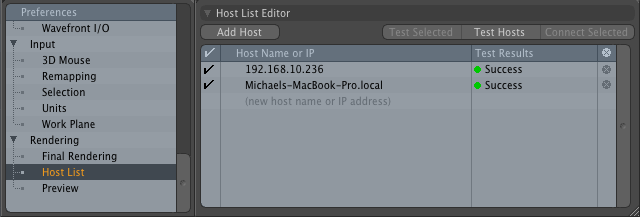
Hosts can be added by hostname or IP, by clicking the Add Host button. Once a host has been added to the list and is running Modo in slave mode, you can test the connection to it by selecting it in the Host List and clicking Test Selected. All systems in the Host List can be tested at once by clicking Test Hosts.
When adding Mac hosts, system names usually need to have .local added to the computer name.
Modo command line
Modo_cl can now be set to run in slave mode. The slave command line flag starts Modo_cl in slave mode and it then operates like any normal slave on the network, but no progress data is displayed in the terminal/console when running in slave mode.
Tip: When using a network firewall, make sure that Modo has access to the necessary ports for network rendering. Blocked ports is a common cause of network rendering issues, such as idle slaves.
Best Practices
Here are a few best practices to help ensure that network rendering is a smooth process:
-
When rendering scenes with slow irradiance pass calculations (the part of an irradiance cache enabled global illumination render that takes place before the actual buckets are rendered), the most powerful system (fastest at rendering) in your network should be used as the master, as it is doing all of the IC pre-pass calculations.
-
In general, using the most powerful system as the master (that is, the fastest at rendering) yields the best results.
-
Network speed has a direct effect on network rendering performance. We recommend having at least 100Base-T wired Ethernet; 1000Base-T Gigabit Ethernet is even better.
-
Hosting the assets via a shared network drive as opposed to using send and receive assets option helps to speed up transfer times when rendering big scenes (file size-wise) with many assets.
Known Issues
There are a few considerations you should note when using network rendering.
• The use of the CAD item from the CAD loader plug-in is not supported; convert the CAD item to a mesh prior to network rendering.
• Rendering with Write Buckets to Disc is not supported for network rendering.
If you are having difficulties with network rendering, see the Network Rendering Troubleshooting topic.