Render the Mug
This is a continuation of the Model the Mug tutorial. The information presented here builds on the lessons learned in that tutorial. Learn how to render the mug to produce a final image. You can start this tutorial by downloading the coffee mug model from here. You'll need CoffeeMugTutorialModel.lxo.
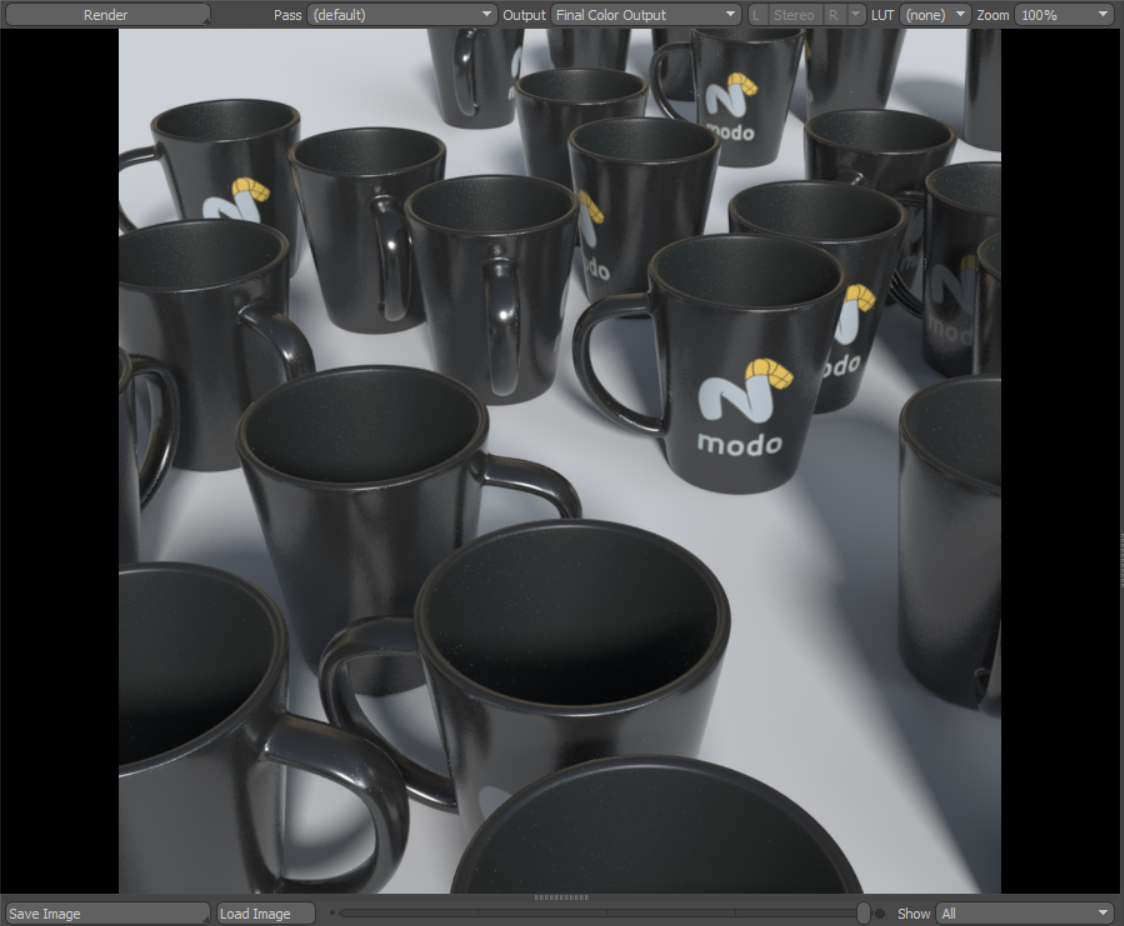
Here's a picture of the a final image we'll render.
It would be simple enough to just press Render and have an image of the coffee mug at this point, but it wouldn't be that interesting of an image, especially with the default settings. While rendering a single object has its place, in most cases you render a scene in Modo, with multiple objects, a background, and some distinct lighting. We'll assign a UV map, adjust the surface of the mug and clone it, using a preset to make a basic scene, and then adjust camera and render item settings to produce a final rendering.
Making a UV Map
Applying UV maps is used for assigning how a flat texture gets applied to a 3D surface at render time. To make things a little easier, let's hide the handle first.
| 1. | With the mug model open, click the Model tab to ensure that you are working in the Model layout. |
| 2. | Using the lasso selection method, covered in the previous tutorial, from a side view, right-click and drag out a shape, selecting just the handle. |
Tip: To avoid selecting some of the body polygons, select the main part of the handle, then press Shift+Up to add the adjoining polygons where the handle meets the body.
| 3. | Once the entire handle is selected, press H to hide the geometry. |
Hiding geometry is a great way to concentrate on just a group of polygons in an object layer, and to ensure that geometry remains unmodified, as hidden geometry cannot be selected or edited.
In the bottom panel of the toolbox there are some UV tools, not as many as in the UVEdit layout, but enough to do what we need to do here.
| 4. | In the toolbox, in the left pane, click the UV sub-tab. |
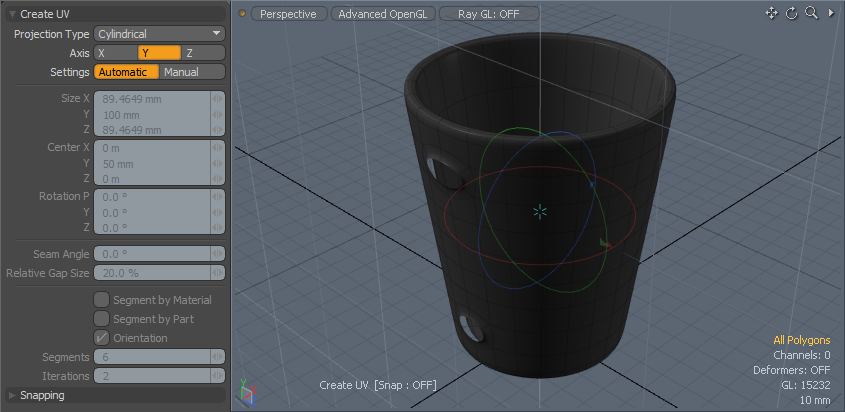
| 5. | Select the UV Projection Tool and click in the 3D viewport to activate the tool. |
| 6. | In the Tool Properties panel, set the Projection Type to Cylindrical, making sure the axis is set to Y so the map wraps around the mug's height. Leave the Settings on Automatic. |
This sizes the cylinder volume to match that of the selected, or in this case visible, the polygons' outer bounding box volume. A bounding box is simply a rectangular volume of space that represents an object's total height, width, and depth.
The map is made.
| 7. | Press the spacebar to drop the tool accepting the UV map values. |
Working in Items Mode
We now need to assign an image map that matches the logo on the original reference image.
Before we continue, there is a rather important concept you must understand to use the tools to your best benefit. So far you've used the Polygons and Edges selection modes to modify the geometry. For laying out the scene work in the Items selection mode. In this selection mode you can only modify an item's position, rotation, and scale, collectively known as its transform values. The previous modes, Vertices, Edges, and Polygons are collectively known as the component editing modes and are strictly for editing the geometry itself. Two distinct operations take place in either the component or Items modes, though their results are identical. Each item layer in the Item List is a container for geometry. While in Items mode, you transform the container, but while in any of the component modes, only the contents of that container can be edited.
| 1. | Press U to make the handle visible again. |
| 2. | Click on the layer name, called 'Mesh' by default or 'Mug' if you grabbed the included file, to highlight the layer. |
Now any operations applied to the scene only affects that selected layer.
| 3. | Click and hold on the Scatter Clone button, available under the Duplicate tab, to reveal the alternate options. Click Instance Scatter, then click in the 3D viewport to activate interactive mode. |
You might not see anything in the viewport right away, aside from a tool handle.
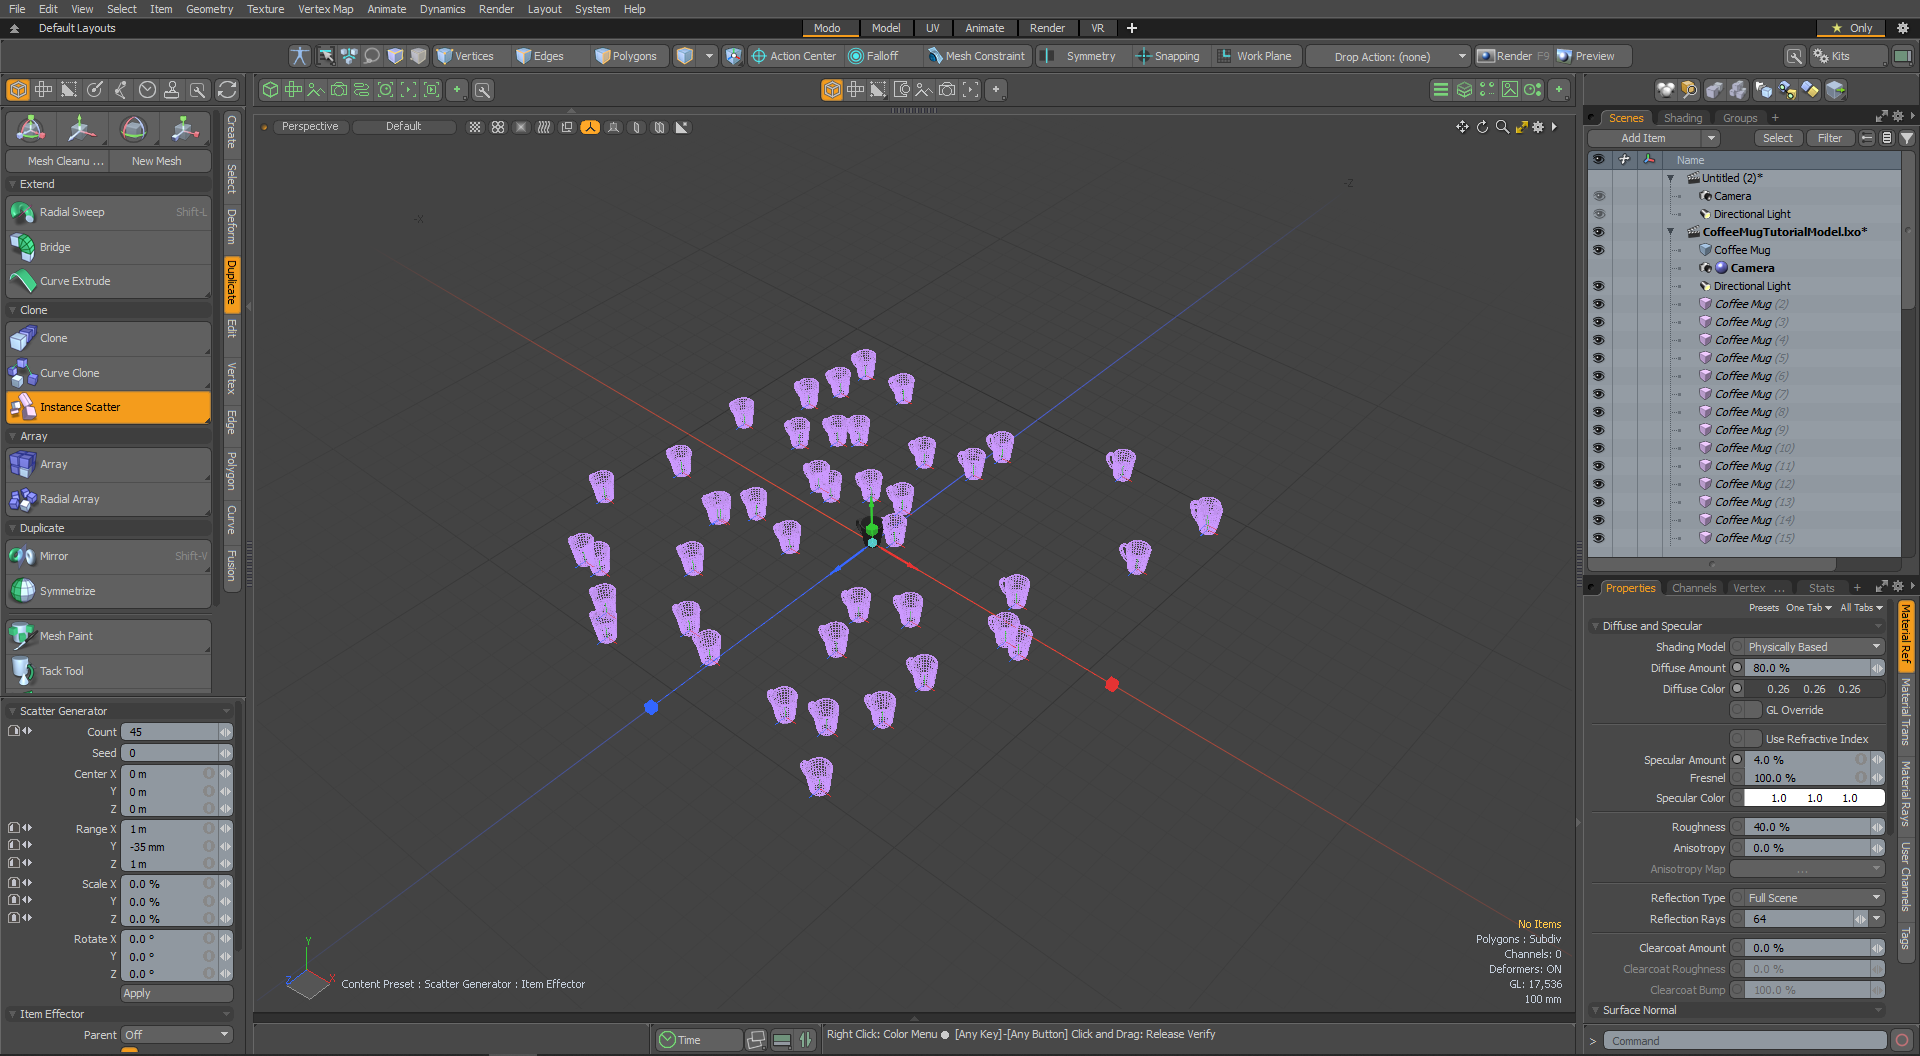
| 4. | Hover your cursor over the 3D viewport and press A to view all items in the scene. |
Eight mugs appear, the default clone number, scattered all around. In the Tools Property panel, you can adjust the Count value to any number you like.
| 5. | Set the Range for the vertical axis Y at 0 m to set all coffee mugs on the ground plane. |
| 6. | To randomly rotate the clones, set the Rotate Yvalue to 360° and then adjust the Range on the X and Z axes to bring the mugs closer together. |
Some mugs may overlap. If you're not happy with the placement of the clones , you can adjust the Seed value until you receive a result you are happy with.
| 7. | Once finished, drop the tool by pressing the spacebar. |
Propagating updates to Clones
In addition to the original mug, you now have a number of pink wireframe clones. The pink color denotes that the duplicates are Instances, virtual copies that reference the original Mesh Item. They contain no real geometry, just a reference to their source, so they keep the scene file size small. Any modifications made to the source item propagate to the clones automatically, making it easy to modify them later on.
| 1. | Unlike other types of duplicated objects, such as Replicator Item, you have individual control over each mug instance, so while still in Items mode, click on any mug to select it, then press W to move the mug's position. |
| 2. | Click on the green circle handle to constrain the movement parallel to the ground plane, making it easy to modify each item's position. |
| 3. | While the Move tool is active, click over another mug instance to select it, and then use the tool handles to move it around. Keep doing this until all mugs are positioned so they are no longer intersecting. |
Tip: Tumbling the viewport helps you get a better view of the scene when making adjustments. Press Shift+A to zoom the currently-selected items to fill the entire viewport, making it a little easier to navigate around them.
Grouping Layers
The Item List now displays individual duplicated mug layers. Lets group these layers to organize the Item List.
| 1. | Click on the topmost Instance layer, scroll to the bottom and hold Shift, and click on the lowest layer, selecting all the duplicate mug layers. |
| 2. | Press Ctrl+G to group all the layers together into a Group Locator. Double-click the Group Locator name, type 'Duplicate Mugs' and press Enter. Toggling the |
Using a Preset Mesh
Now we need only one additional piece of geometry to fill out the scene and for that we use a Preset mesh.
| 1. | In the Preset Browser across the bottom of the screen, select the Meshes tab. |
| 2. | Click on the Preset Mesh named Ground Plane. |
This serves as the ground in our scene. It catches cast shadows, so the rendered mugs do not look like they are floating in space.
| 3. | Save your scene. |
Setting Up the Render
For the rendering portion of this tutorial, switch to the Render layout. In the upper right viewport, expose the Shader Tree panel. All the surfacing and render settings are set through the items in this list.
First, let's position the camera. This can be done in the main viewport area. There are three 3D viewports to work with in the Render layout:
• the RenderPreview in the top pane that gives a quick reduced quality sample of the final image,

• the Camera > Render Camera view in the bottom pane that shows exactly how the camera sees the geometry,

• and the Advanced Perspective view in the bottom pane that is similar to the one in the Model layout.

By clicking in the upper right corner of the viewport, you can navigate around, using the standard viewport controls.
| 1. | Use Alt+click and drag to rotate the view and Ctrl+Alt+left-click and drag to zoom in and out. With these actions you actually move the Camera item, there is no need to select the Camera item and then activate a transform tool. |
As you change the view, you can see the preview update in real time.
| 2. | To set a wider angle of view than the default settings provide, hold the Ctrl+Alt keys and drag in the viewport. |
| 3. | Feel free to move any of the mug items once the camera is set, using the Perspective viewport. |
| 4. | Once the Camera position is set, save your scene. |
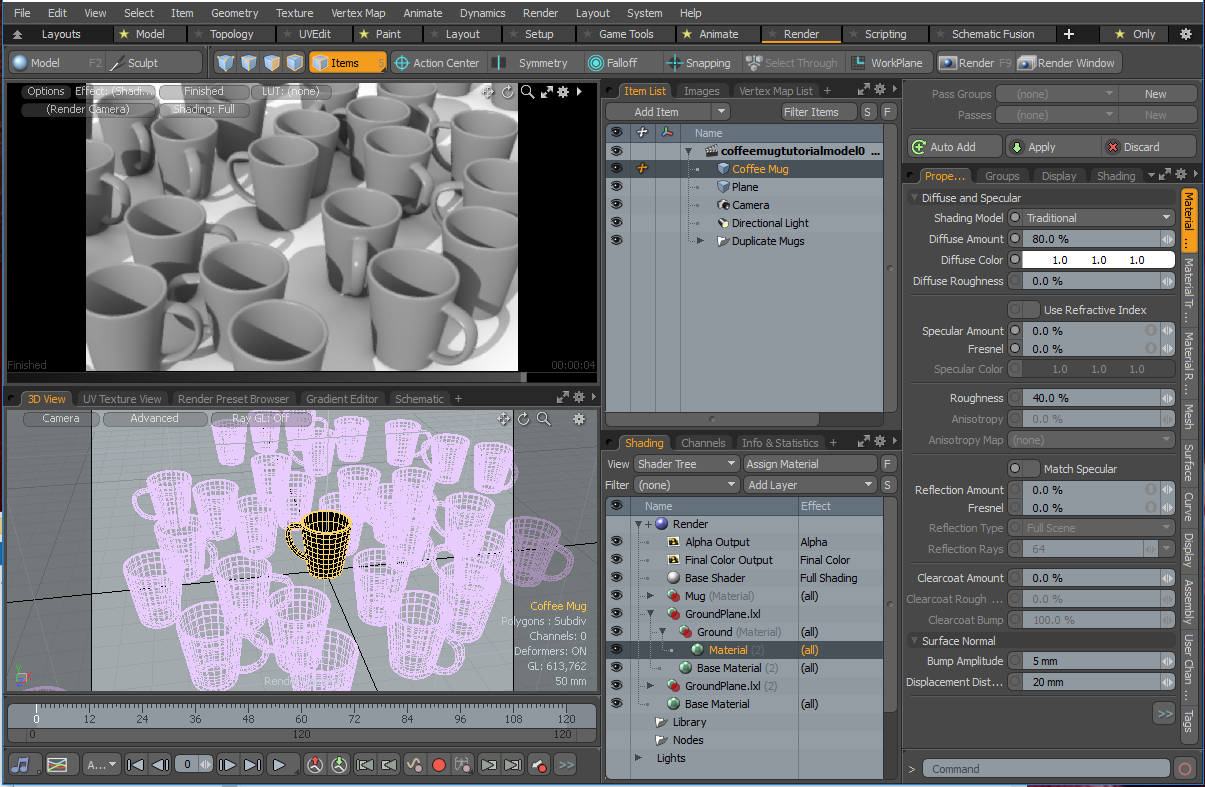
Surfacing the Mugs
Before we start surfacing the mug, we need to adjust the lighting, as it plays such an important role in the rendered scene. We work in a facsimile of the lighting used for the final render when adjusting surfaces. The Shader Tree, which is the panel labeled Shading, contains the various layers that represent the shading and rendering of our scene. Selecting one of the layers displays its attributes in the Properties panel. If it is not visible, click the Shading tab, exposing the viewport. The very top item in the Shader Tree is called the Render item. Right-click it and select Properties. This item holds the settings related to rendering the scene, such as frame size, anti-aliasing and other quality-related settings, and also Global Illumination.
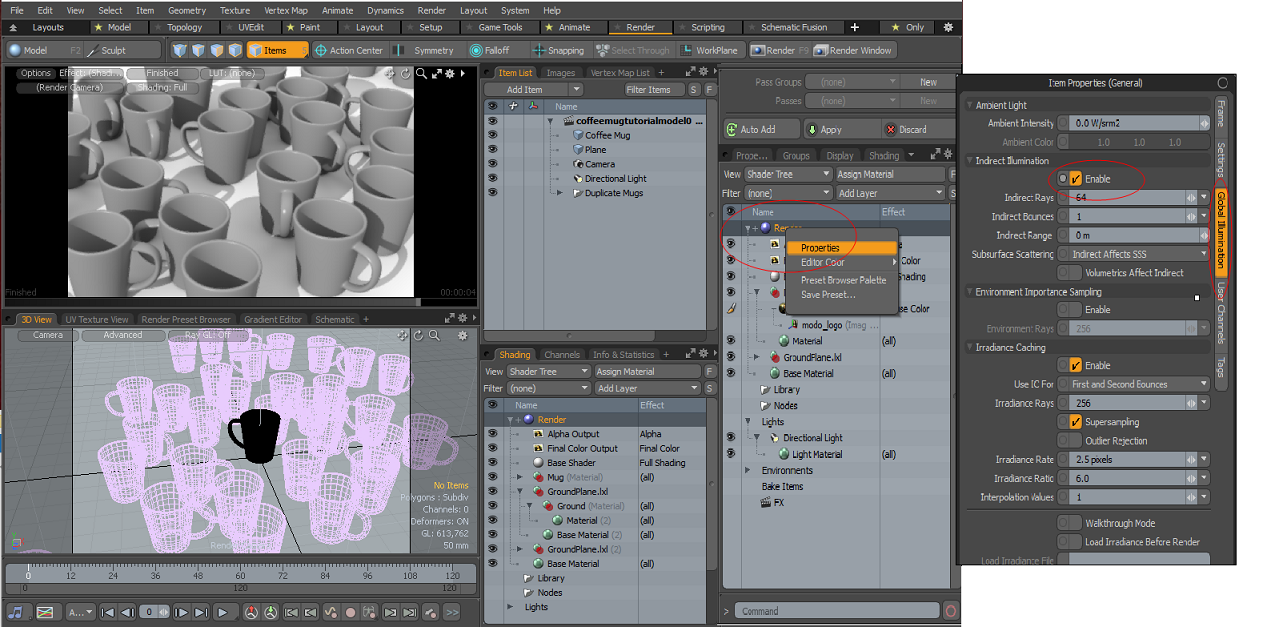
Global Illumination is a technique used in 3D graphics to mimic the effects of real world light bouncing around in a scene, producing extremely realistic results. It is turned on by default in a new scene.
| 1. | To toggle this setting, select the Render item in the Shader Tree, under the Properties tab, and then select the Global Illumination tab. |
| 2. | Check the box next to Indirect Illumination to enable it. |
Note: When enabling Global Illumination, Modo lights the scene using the settings of the Environment Item. By default, this comes from a gradient applied to the Environment Material.
If you prefer the look of Image Based Lighting, add an HDRI environment. This can be done using the presets Modo provides.
| 1. | In the bottom left pane, click the Render Preset Browser tab. |
| 2. | Using the controls, click to twirl open the small arrows, locate the Environments > Outdoor folder. |
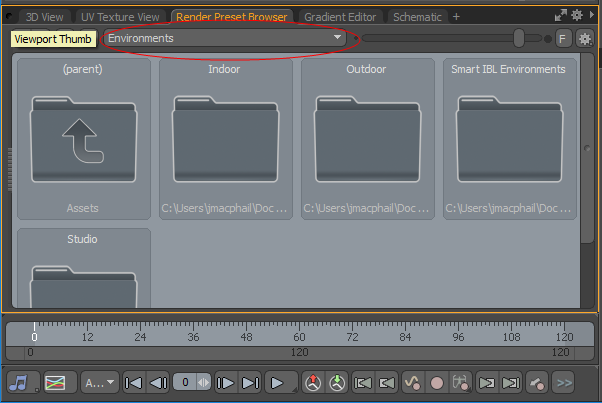
| 3. | Double-click the Beverly Hills Probe 01 preset to add the image to the Environment item. |
| 4. | Click the 3D View tab to view your model in a perspective view. |
The lighting dramatically changes for the scene in the Render Preview, producing a nice outdoor look to the rendered image.
The lighting in the Beverly Hills image is coming from the left-hand side for our image (-X), so let's rotate the Directional Light to match that. This can be best accomplished in the Perspective view.
| 1. | Hold Ctrl+Alt and drag in the viewport to zoom out and then select the Directional Light item in the viewport by clicking over it when it highlights. |

| 2. | With the item selected, in the menu bar, click Edit > Action Center and set it to Origin. |
This allows you to easily rotate the light from the world's center.
| 3. | Press E to activate the Rotate tool and then grab the Y axis handle (the green circle), and rotate the light about 45° to the right. |
| 4. | Press the spacebar to drop the tool. |
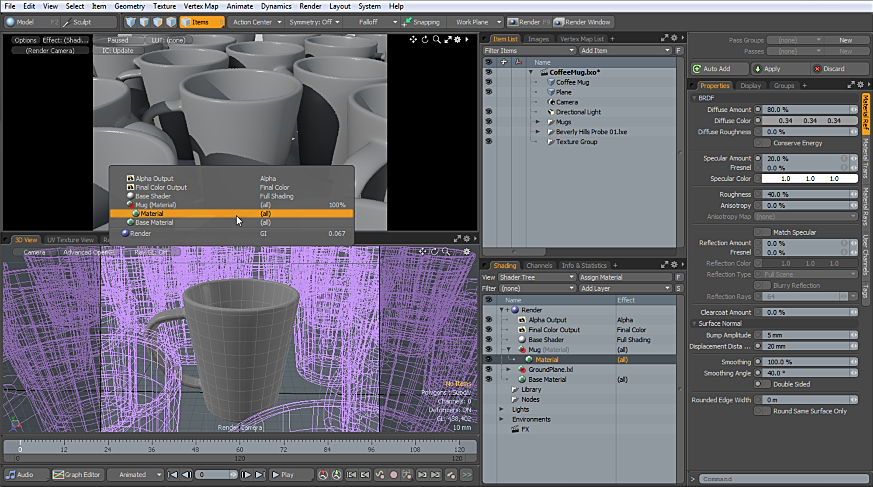
The next part is surfacing. Earlier in the modeling tutorial, a Material tag was applied to the model, named 'Mug'. This action also created a Material Group. This particular item creates a procedural mask that limits any surfacing contained under that group in the Shader Tree to just surfaces tagged with that name. For more details about this, see Shader Tree.
Each Material Group mask contains a Material item that controls most of the attributes of any surface, such as color and luminosity. We need to select this item to edit it in the Properties panel. While it's easy to select the proper Material item in the Shader Tree in this case, Modo allows you to quickly see what layers are attributed to any part of the scene, by using a shortcut in the Preview viewport.
| 1. | Right-click over one of the coffee mugs in the Preview panel to open a context menu with a list of all the layers that apply to the mug. |
| 2. | In the menu, click on the Shaders > Mug Material > Material item. The item is selected in the Shader Tree. |
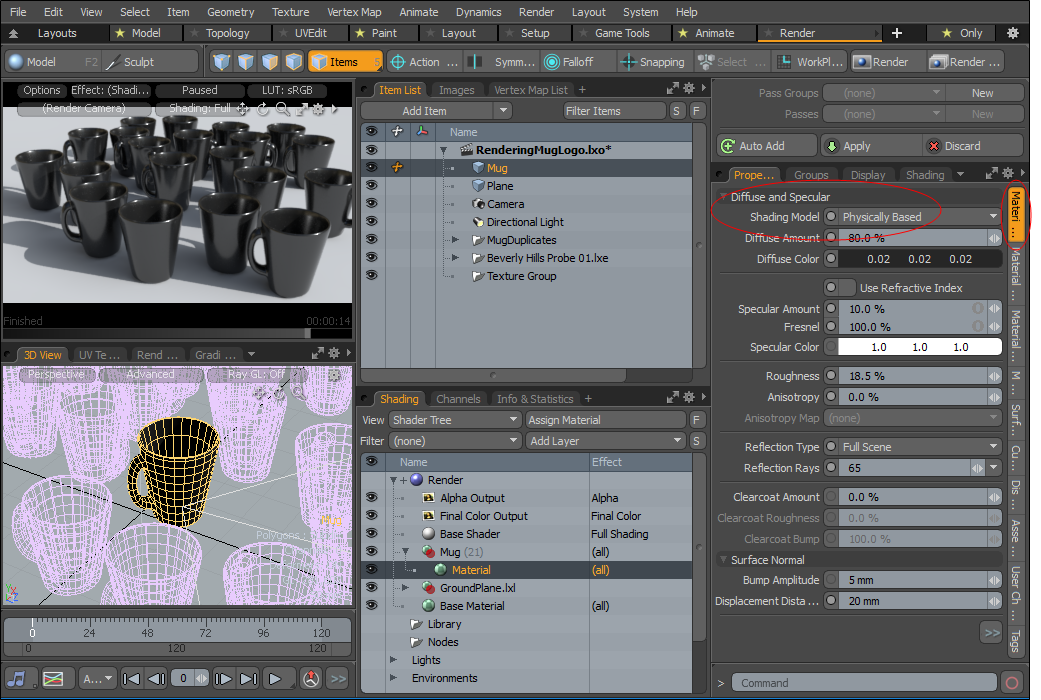
Looking over the attributes in the Properties viewport, we need to adjust the color, as it is much lighter than the mug in the original image.
| 1. | In the Shading > Shader Tree pane on the right, right-click and select Properties. |
| 2. | Click anywhere on the Diffuse Color swatch to open the Modo Color Picker, and adjust the value to a much darker gray color without going completely black. In this example the values are set to 0.02 respectively. |
| 3. | To make your surface more realistic, set Shading Model to Physically Based and set the following settings: |
• Change the Diffuse Amount to 80% .
• Change the Specular Amount and Fresnel settings to 10% and 100%, respectively.
• Change the Roughness setting to 18.5%.
You can see now its color is much closer to the original mug.
Note: These attributes are render intensive, so if your system specifications are modest, keep them at the default disabled state. For more information, see Material.
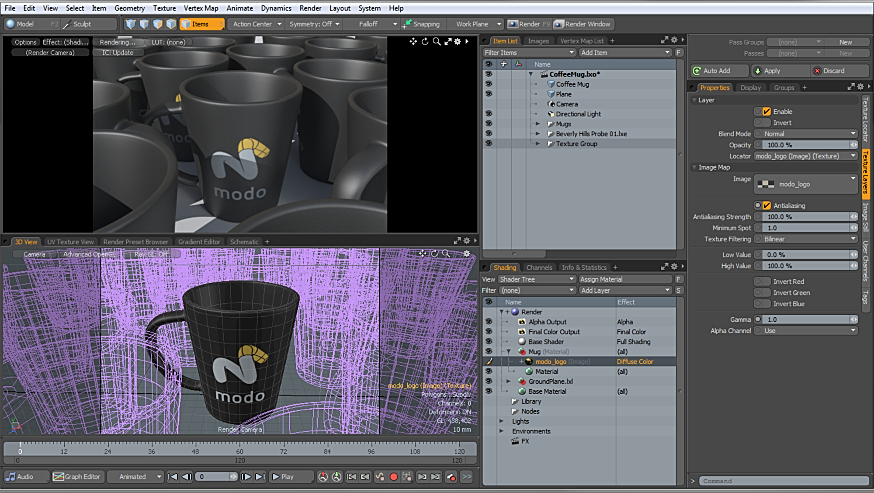
Applying an Image on the Mug
Next, we use the UV map we made earlier to apply an image to the mug. Grab this image of a Modo logo and save it, so you can apply it to the model.
| 1. | Press the down arrow in the Add Layer option at the top of the Shader Tree, select the Image Map > Load image option from the pop-up menu. |
| 2. | Navigate to where you saved the image and select Open. |
The image appears right away on the surface.
If the image does not show up correctly, it may not assigned to the UV map properly.
| 3. | Right-click on the small + icon on the left of the layer name and select Properties to open the Texture Locator. |
This controls how the image maps onto the mug surface.
| 4. | Make sure the Projection Type is set to UV Map, and if there is more than one map listed under the UV Map option, select the alternate map. |
The image we just applied is a transparent .png. Because of the layered approach of the Shader Tree, the transparent edges show the regular material color underneath our image instead of making the surface transparent. This makes it easy to add labels, markings, and other non-rectangular images to a surface.
Next, we are going to position the logo to center on the side view of the mug.
| 1. | Press the spacebar to drop any tools and then Esc to drop any selections. |
2. In the Shader Tree view, click the down arrow beside the mug and select the modo_logo. A cylinder is displayed and selected in your scene.
Tip: To turn on the Texture Locator, type the letter O to display your viewport properties, open the Visibility tab, and enable Show Texture Locators.
3. In the Properties panel, open the Texture Locator tab.
4. Under Transform, change the Rotation Y axis to -69 degrees.
Note: For more information about shading model types and other shading options, see Material.
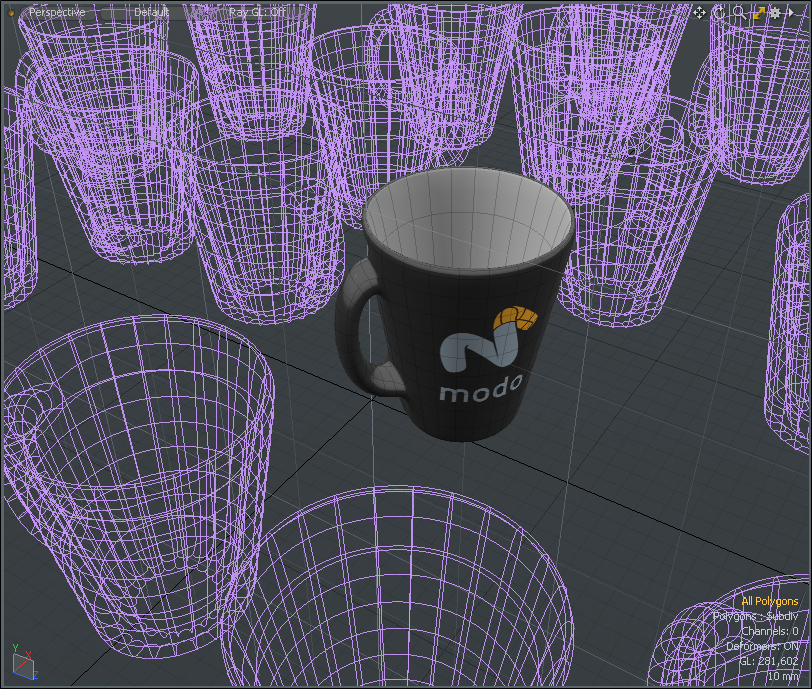
Now, you can see that the inside of the mug has a logo as well. Since the mug is one continuous surface, the logo projects all the way into it. The easiest way to remove the unwanted logo is to apply a different surface to the interior of the mug. Because we've used Instances, you only need to modify the source mug, and the changes you make propagate to all the clones.
| 1. | Press the spacebar to drop any tools and then Esc to drop any selections. |
Tip: To turn off the Texture Locator displayed in your viewport, press O, open the Visibility tab and remove the check mark for Show Texture Locator.
| 2. | Make sure to switch to Polygons selection mode, since we're now editing the model itself. |
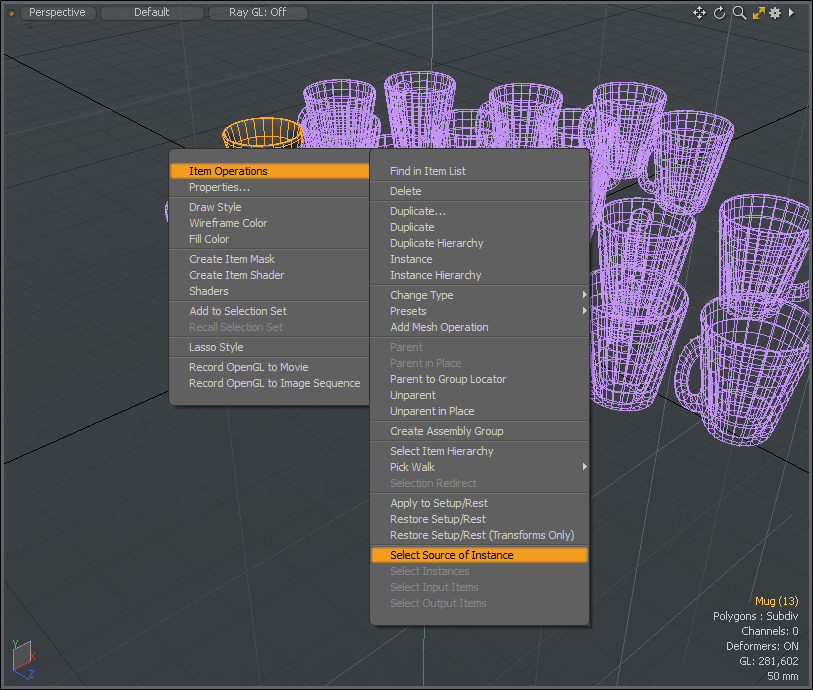
| 3. | In the Perspective viewport, right-click on any of the pink mugs and from the pop-up context menu that opens, select the Item Operations > Select Source of Instance option and press Shift+A to zoom to that model. |
| 4. | Rotate the view to see the inside of the mug and click to select the base of the interior. |
| 5. | Press Shift+Up to grow the selection until it encompasses the entire inside of the mug. |
| 6. | Assign a new material tag, overwriting the previous, by pressing M to open the Assign Material dialog and name the surface 'Inside Mug'. |
| 7. | Press OK to accept the rest of the default settings. |
You can see in the Preview that the insides of all the mugs are now back to the default values, but the logo is gone.
The inside material has to match that of the exterior. It is useful to instance the material, so that changes to it also change the instance later on if you need to edit them:
| 1. | In the Shader Tree, select the mug exterior Material, right-click on it and select the Create Instance option from the dropdown menu. |
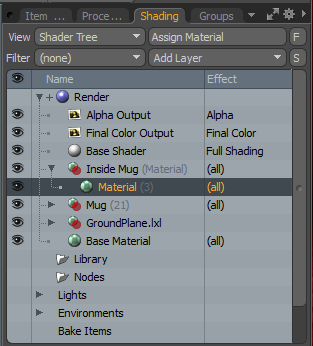
There are now two Material items in the group, one of them has its name in italic.
| 2. | Click on the italicized item and drag and drop it above the material inside the Inside Mug group. |
| 3. | Click to select the material that was already in there and press Delete to remove it from the tree as it is no longer necessary. |
Now the insides have no logo, the inside surface matches the exterior and since the interior mask contains an instance, any changes made to the original propagate to the instances, so subsequent edits effectively change all surfaces.
Review the Rendering
You can see your progress in the menu bar: select Render > Render Current View to render the scene. Feel free to make adjustments to the Shader Tree to get a feel for what does what. Once you have the scene the way you like it, make sure to save it.
You can add more effects to make your scene even more realistic.
Note: Some of these settings may take a long time to render, so if your machine specifications are modest or you don't like waiting for renders to complete, skip these steps.
The first settings you can adjust are those of the light. The shadow the mugs cast are a little more render process-heavy.
| 1. | To soften the shadows, select the Render item in the Shader Tree. |
| 2. | Open the Properties > Settings tab, under Directional Light, set Light Sampling to 0 Use Per-Light Sample Values. |
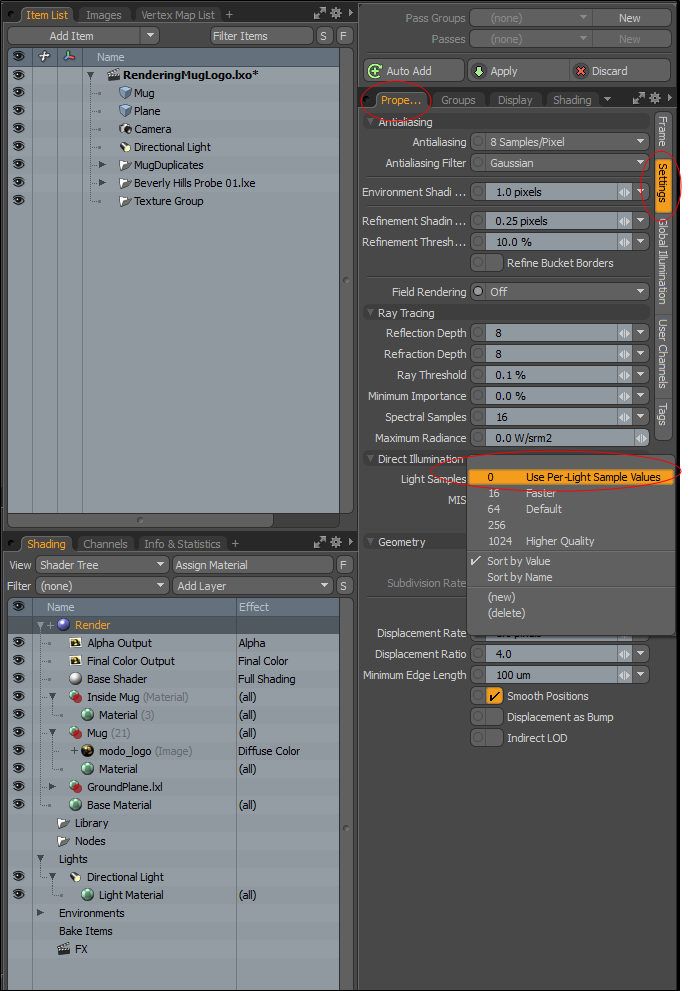
| 3. | Select the Directional Light item in the Shader Tree. |
| 4. | In the Properties panel, change the Spread Angle value to 10° and the Samples setting to '128' to make the light look a lot more realistic. |
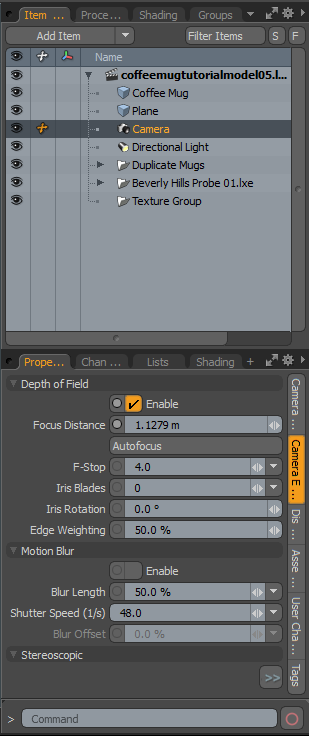
For the Camera, select the Camera item in the Item List. The shallow depth of field look is very popular, so let's enable that feature as well.
| 1. | Go to the Camera Effect sub-tab of the Properties panel and under Depth of Field, check the Enable checkbox. |
You can also select the Autofocus button, this causes Modo to fire a single ray from the center of the camera and set the Focal Distance at the first surface it encounters.
| 2. | Click Render > Render Current view to see the results. |
This tutorial has given you an overview of working from start to finish in Modo and the steps required to complete a project, including setting up the scene, the difference between the component and Items selection modes and how to enable and use Modo's Global Illumination rendering engine. If you'd like to explore further, you can assign some preset surfaces to the Ground Plane, select a material in the Preset Browser, drag and drop it somewhere in the 3D viewport, and drop it onto the Ground Plane.
If the image looks too grainy for you, you can increase the anti-aliasing level in the Render Item under the Settings sub-tab. For the Soft Reflections and Soft Shadow options of the Material and Light items respectively, increasing the Samples values can also help. Keep in mind that as the number of samples increase, image quality increases, but so does the render time.