With the Sketch Extrude tool you can extrude selected polygons by drawing in the viewport.
To use this tool, select a polygon, and then click the Sketch Extrude tool on the Polygon tab of the Modo Tools toolbar. Click in the viewport to activate the tool, and then drag the handle to initiate the sketch. The handle turns to a yellow circle. The polygon extrusion follows the movement of the pointer as you draw in the viewport.
|
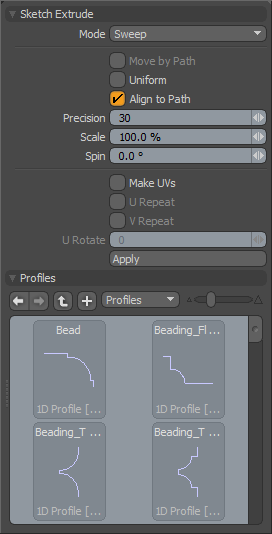
Sketch Extrude |
|
|---|---|
|
Modes |
Provides a number of options for controlling the tool.
• Sweep - Sketches the path for extruding the polygons when you drag any visible handles (cyan dots).
• Edit Path - Reveals the control points on all user-created paths. Dragging these control points adjusts the sketched curves.
• Delete Knot - Removes control points from the curve path when you click them.
• Uniform Spans - Shows handles only at the end of each path. Clicking any handle adjusts the control knots along the path such that they are distributed uniformly along the path.
• Straight - Straightens a path after you click the end handle. |
|
Move by Path |
When enabled, moves the points that are between the selected control point and the end of the path when dragging any control point. This option is only available after selecting Edit Path. |
|
Uniform |
When enabled, constrains all newly generated geometry to be uniformly distributed between the original polygon's position and the end of the path. |
|
Align to Path |
When enabled, rotates the geometry that Modo creates along the path such that it is aligned to the curve. When disabled, all new polygons have the same World Rotation as the original polygon. |
|
Precision |
Determines how often control points should be created when you interactively sketch the path. This number represents a screen pixel count. For example, if you set the value to 30 (default value,) Modo creates a new control span each time the pointer travels 30 pixels on screen during the sketch. |
|
Scale |
Varies the thickness of the generated geometry along the path from the original polygonal location to the control handle at the end of each path. |
|
Spin |
Rotates each generated span along the path to provide a twisting effect along the sketched curve. |
|
Make UVs |
Controls how Modo generates UVs for the new polygons in the mesh. With the default option, Modo attempts to create the UVs inside the existing UV space amongst the corresponding geometry. Selecting U Repeat or V Repeat overlays each new segment over the last along the selected U or V axis. |
|
Profiles |
Provides a list (essentially a mini Preset Browser) for viewing various profiles and selecting one. This works the same as the standard Preset Browser. Selecting any profile modulates the extrusion width with the selected shape over its length. To return to the original polygon selection for the extrusion, press Ctrl as you click the selected profile. |