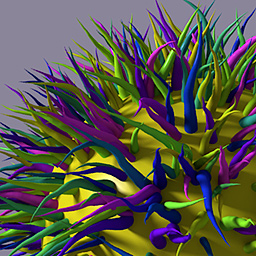
Modo makes working with fur easy. First, select some polygons, and then create a material tag for the surface. Once you've tagged the surface, Modo automatically creates a Material Group Item with its own material layer in the Shader Tree. Select this new material item and choose Add Layer > Special > Fur Material. You now have fur on the surface. Of course, there are many controls to customize the fur to look different.
The Fur Material layer, itself, with its various settings offers a degree of control over the fur. In that layer, you set the size, length, kink, waviness, curls and other attributes of the fibers. This topic includes brief overviews of some additional techniques related to working fur. By using these techniques (such as working with guides, implicit UVs, and gradients) you can customize and control the look of your fluffy (or frazzled) fur.
Guides are useful to control fur in various ways (such as controlling its bending direction or length). In the 3D Viewport representations, guides look like sparse fur fibers over the target surface. These guides, shown specifically for fur, are curves from polylines, which are a special type of curve that is made up from multiple, tiny line segments linked together. These curves are easier to manipulate with the styling tools and offer greater performance over regular spline curves. In all other respects they work and act just like the regular curves do.
Modo sets curves to control the fur fibers with the settings of the Fur Material sub-tab. As long as these polylines share the same material tag as the fur material layer, they work. To tag the polylines, select them in Polygons mode and assign a tag (as you do for regular polygons). You can draw hair guides manually with the Pen tool or create regular spline curves with the Curve, Bezier, or Sketch tools and then convert them to polyline curves with the Freeze function. (In the Freeze Polygons dialog, select Polylines from the Freeze Curves as list.) When drawing curves as fur guides, the root of the curve needs to originate close to the surface from which the fur grows. (Modo draws a small circle around the root vertex for all curves.)
Hair Guide Tool
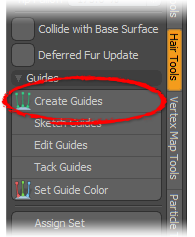
Creating guides manually can be tedious. An easier way to create guides is by using the Hair Guides function in the Painting/Sculpting toolbox under the Hair Tools sub-tab. This tool creates guides that inherit the material tag from the selected surface, so name the fur surface with a proper material before activating the tool. Select the polygons you want your fur to grow from and keep them selected when you activate the tool. The selection controls the growth area to limit the guides to the selected geometry.
To apply the tool to an area based on existing materials, you can recall the polygons selection that defined the area by using the Statistics panel and selecting the material by name under the Material section of the panel. Once you have the polygon selection and have activated the tool, with this Properties panel, click in the 3D Viewport to actually generate the fur guides. With the tool, dragging to the left or right increases or decreases the length of the guides. You can also manually set the length directly in the tool properties. For detailed information about using this tool, see the Hair Guides topic.
Much like the sculpt and painting tools, Modo offers a variety of tools meant specifically for styling fur. Located in the Paint tab of the default workspace, the Hair Tools tab has everything you need for combing and sculpting fur. The double-duty tools style both guides and fur (by painting on image maps that control the styling of regular fur when you select Edit Fur Map). Image maps can control different aspects of fur material (such as length, density, direction, and curling). All aspects are available if you right-click in the Effect column of any procedural or image map texture layer. (Even procedurals can control a fur material layer.)
Hair Styling Tools
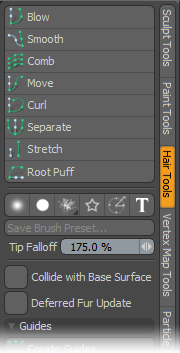
The Hair Tools tab has several brushes for styling fur in a variety of ways. See the Hair Brush Reference topic. These brushes work just like the painting and sculpting brushes, and you can enhance their performance by using a pressure-sensitive tablet to adjust the strength values dynamically. These tools are multi-purpose — in that you can use them to affect the guide curves or control the fur indirectly by using a fur vector map. (The application depends on the Edit Fur Map setting for each tool.)
Editing fur guides is intuitive. To modify fur guides, select a Hair Tools brush and drag it over some guides.(The guides must be visible on a foreground layer.) If you set the Offset amount of the brush high, that brush has a stronger influence over the adjustment; therefore, by adjusting the offset, you can make big changes or subtle adjustments with the same tools.
If you do not use guides (such as when working on short fur styling for a cat or other small animal), then you can use image-based vector maps to simultaneously control the length and bend direction for the fibers. Modo provides some preset scripts (at the bottom of the Hair Tools toolbox) for the most common fur styling tasks: Add Fur Vector Texture, Add Fur Direction Texture, and Add Fur Length Texture. When you activate these scripts, Modo automatically creates a blank image and applies it with the appropriate effect setting in the Shader Tree for the fur material. (A fur material item must be present first.) Once Modo creates the correct image, you can use any of the available brushes to control the fur layer. When adjusting fur this way, you see the GL preview fibers created by the fur material, itself, move and change as you apply the brush strokes.
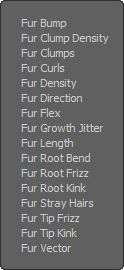
Fur layers take all their color and shading information from the material item in the same layer group. For example, set the material to red and you get red fur; set it to 50% transparent and the fur becomes transparent. Most fur and hair has a great deal of variation to it in length, color, and its growth pattern. The Fur Material sub-tab has jitter setting to control the growth part. Texture layers are a great way to control how the fur looks and add any necessary variation. Texture layers can also add specific, highly accurate control to fur styling and coloration. Modo has several effect channels that you can apply to both procedural and image map texture layers.
By adding a blank image to your material group (Images tab > New Image) and setting the layer to your intended effect, you can use any of the painting tools in Modo to adjust, color, and style fur. (A little paintbrush icon appears in the eye column of the Shader Tree to let you know that's the current layer.) The fur material gets its shading from the material layer, so all the ways you adjust material with texture layers are also available for the fur layer. For example, if you apply an image map as diffuse color, each fiber gets its color from the underlying texture layer's color.
Gradients—
Gradients are also useful for fur layers. Besides all the ways a gradient normally controls a layer's surfacing parameters, you can use gradients to control each fiber along its length by applying the Fur Parametric Length setting as the gradient's Input Parameter. Now, whatever you set as the effect for the gradient to control (such as Diffuse Color or Transparent Amount) applies from a fiber's root at 0% to the tip at 100% regardless of the length. Perhaps you want to mix up the colors of the fibers or simulate a salt-and-pepper effect. Those are possible with gradients as well. As Modo creates each fiber, it assigns a random value between 0 and 1. By setting the gradient's input parameter to Particle ID, you can add some randomization to the individual fibers with ease as it takes that random number and pulls the color from the gradient based on its value.
|
A fur Parametric Length gradient applied along the length of the fur. |
A Particle ID gradient applied varying the individual colors. |
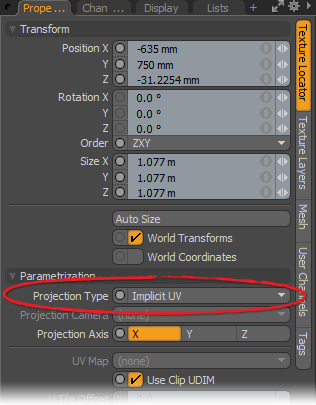
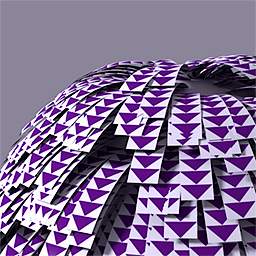
Implicit UVs
UV maps can control how Modo applies images to surfaces. It is possible to apply image maps to individual fibers. When you have your fur type set to Strips, images map to each strip individually. When the fur type is set to Cylinders, images wrap around each fiber cylindrically. You can also map images this way for the Billboard features. Applying images for fur has many uses (such as simulating feathers and making photo-realistic grass). You add a texture to individual fibers by adding an image map layer to the material group. In the Texture Locator item's properties, select Implicit UV as the projection type within the texture locator. Once you do that, Modo applies the image to each and every fiber as it renders the fur.
Each fur layer pulls its shading from the material layer, but you may want the fur material to be different from the underlying surface. That's possible as well. Watch the video to see how to do this.