Falloffs have a multitude of uses. You can use them as Deformers, where their area of influence can be assigned to deform the target mesh (similar to having a magnet that pushes and pulls a surface). You can also use falloffs to attenuate the effects of other Influences upon an item or mesh. (For example, a modeling falloff can control the amount of influence a tool has on a surface.) Finally, You can use falloffs to control the degree to which a Force influences a Dynamic item (such as a Rigid or Soft Body). How the falloff affects other items depends on how you add it to the scene. The influence shape is related to its type. The Capsule Falloff produces an attenuation area shaped as a cylinder with rounded ends. It has options for you to adjust the size, the shape, and the transition of the falloff, itself.
You can add a falloff item to a scene by using the Add Item function of the Items list, but the falloff has no direct effect upon any Items in the scene until you link it to the target Item it is meant to act upon. You can do this manually by using the Schematic view. Modo offers a few ways to create these links automatically. When in Items mode, select the target mesh Item. In the Setup interface tab in the Deformers sub-tab of the toolbox, select the target falloff type in the Add Falloff Deformer list. Doing this adds the falloff and links it to the selected mesh. If you move the falloff now, Modo also moves any points within the influence of the falloff. You can adjust the initial Rest (undeformed) state by clicking the Setup button. (In Setup mode, the viewport frame has a yellow outline.) Position the falloff to where it should be in its undeformed state. After exiting Setup, you can animate or adjust the position of the falloff and deform the target mesh.
![]()
To have a falloff attenuate an Influence, you use the Deformers viewport where you can automatically create and link a falloff to the Influence in a single step. Within the viewport, select the target Influence item, right-click the item, and in the shortcut menu click Add Override > Falloff > Falloff Type to add it to the scene. Once added, you can animate the Position's Size and Range. The Influence only affects the target mesh within the bounds of the falloff. (You can invert this behavior, if desired.)
![]()
You can also automatically link a falloff to a Dynamics Forces item to attenuate the effects of the force on dynamic items. To do this, in Items mode select the Force Item and use the Add Falloff option found in the Dynamics sub-tab of the same toolbox. With the falloff active, dynamic items within the bounds of the falloff are not affected to the full degree of the Force and attenuate to the core of the falloff where Items aren't affected at all.
![]()
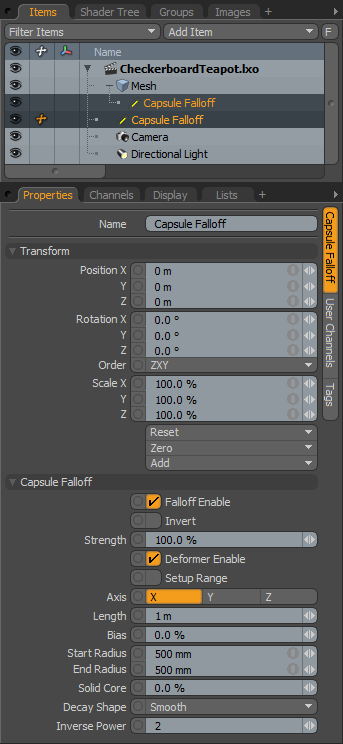
Name: This displays the current item's name. You may change it by left-clicking the current name and typing a new name.
Position: Specify to position the item numerically in XYZ space. Position transforms originate from the Center position.
Rotation: Specify to set the rotation of the item numerically. Rotation transforms originate from the Center position.
Order: Sets the order that Modo applies rotations to the falloff item. By changing the order that Modo applies rotations you can sometimes reduce or eliminate gimbal lock.
Scale: Sets the size of the item numerically. Scale transforms originate from the Center position.
Reset: Resets the selected transform values to (0,0,0) and returns the items back to their default state.
Zero: Resets the selected transform property value to 0 and leaves the Center position and Item position intact.
Add: Use to add the selected set of transforms to the Channel list while keeping the default 0,0,0 values. (Keeping the default values is necessary for Referencing. To be able to override a channel, it must first exist.)
NOTE: Transform items are the channel groups associated with an item that store its transform values. These transform values control an item's position, rotation, or scale. By default, new items do not have any transform items associated with them (although they are visible within the Properties panel). Add only the necessary transforms on an as-needed basis to reduce scene overhead. If you don't use the Add function (as given here), you can transform the target item with one of the various transform tools (or by editing the values). When you do so, Modo automatically adds the transform item to the Channels viewport list.
Falloff Enable: Toggles the influence of the falloff on or off. When clear (disabled), the falloff has no effect on its target. However, Modo saves disabled layers with the scene, and the values persist across Modo sessions.
Invert: When selected, reverses the influence area of the falloff.
Strength: Controls the maximum amount of influence the falloff has on its target. At a value of 50%, even areas that are affected fully by the falloff, would only be influenced half as much.
Deformer Enable: When selected (enabled), you can connect the falloff to a mesh and use it as a mesh deformer. You can specify the initial rest state for the deformer if you select Setup Range as well and position the falloff appropriately.
Setup Range: Determines how the Deformer Enable option affects the target. When using the falloff as a deformer, use the Setup Range to determine the undeformed position for the falloff by using the Setup state. You enter the Setup state and position the falloff where you want the Deformation to originate from. Once you exit Setup, moving the falloff deforms only those vertices within its area of influence from the Setup position. When you disable Setup Range and animate the falloff or mesh, the vertices within its influence are affected, but they slide through the area of influence instead of being affected by it directly.
Axis: Determines the initial axis direction of the Capsule shape.
Length: Determines the extent of the capsule shape from end to end.
Bias: Normally, the Center of influence is directly between the start and end points of the Capsule. Modo uses the Bias value to shift the center toward the Start side of the Capsule with positive values and toward the End side with negative ones.
Start Radius: Specifies the radius of the beginning section of the Capsule from its center line to its outside perimeter.
End Radius: Specifies the radius of the terminating section of the Capsule from its center line to its outside perimeter.
Solid Core: Generally, the falloff's influence attenuates from the Capsule's center line toward its outer edge. The Solid Core value, as a percentage of the total size of the Capsule's shape, defines an inner range where the falloff's influence is at a maximum amount.
Decay Shape: Controls the rate of attenuation across the falloff with three possible choices.
• Smooth - Smoothly fades the strength of the falloff between the Solid Core setting and the Radius of the Capsule Falloff item.
• Inverse Power - Applies a user-controllable curve function to attenuate the value between a linear type falloff to an abrupt, hard-edged one. This decay shape uses the Inverse Power value.
• Gaussian - Smoothly applies the falloff with the greatest influence in the center, which attenuates and terminates outside the falloff's radius.
Inverse Power: If you select Inverse Power as the Decay Shape, this value determines the sharpness of the falloff's attenuation. A low value is similar to an almost linear type of falloff.