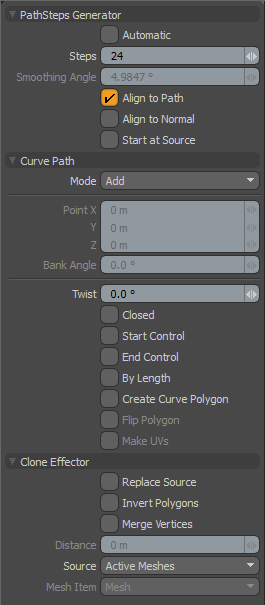
The Curve Clone tool allows you to quickly clone geometry by clicking down control points for a curve. If you wish to begin with a pre-created curve, simply put the curve in a visible but deselected Mesh Item prior to activating the tool. You can find Clone in the Duplicate tab of the Modo toolbar on the left side of the screen, or in the menu bar, by choosing Geometry > Duplicate > Curve Clone. Once the curve has been created with the tool active, the Clone effector creates geometry along it using the various controls.

|
Option |
Description |
|---|---|
|
Path Steps Generator |
|
|
Automatic |
Forces a computed number of clones based on the Smoothing Angle value, so that a particle is placed along the path to maintain a level of smoothness at or above the level set by you. |
|
Steps |
This option is active only when the Automatic option is disabled. The defined Steps value determines the number of particles generated along the curve path that feed into the effector, controlling the number of clones. |
|
Align to Path |
When enabled, the generated particles include rotation data so the newly created mesh components can align to the surrounding geometry. |
|
Start at Source |
Often a curve used for cloning has its initial control knot imperfectly aligned with the geometry to be cloned. When this option is active, the curve is used as a relative guide using the original geometry as the true starting location. Disabling this option may cause the newly created geometry to move away from the intended original location. |
|
Curve Path |
|
|
Mode |
By default the mode is set to Add. In the Add mode, clicking and dragging a curve point edits the curve's position. Clicking anywhere in the 3D Viewport other than the handles creates a new curve control point. To avoid creating new control points when dragging existing points around, you can set this mode to Edit. Delete mode allows quick removal of control points by simply clicking on them. |
|
Closed |
Turns the curve into a closed loop. |
|
Start Control |
When enabled, causes the first knot in the curve to become a control point but not an actual segment of the curve. This provides a simple method for changing the curvature at the start of the curve. |
|
End Control |
When enabled, causes the last knot in the curve to become a control point but not an actual segment of the curve. This provides a simple method for changing the curvature at the end of the curve. |
|
By Length |
Forces the newly created geometry to be evenly distributed across the entire length of the curve rather than spacing based on the control knots. |
|
Create Polygon |
Generates a curve type polygon that remains after the tool has been dropped. This is useful if you want to re-use the curve you create with the current tool with additional curve-based tools later in your project. |
|
Flip Polygon |
Inverts the faces of the generated polygons. |
|
Make UVs |
When enabled, the tool populates the current UV map with data for the generated polygons. |
|
Clone Effector |
|
|
Replace Source |
Replaces the original mesh with a generated mesh that is perfectly aligned with the initial control point. This is very useful when the Start at Source option is off and the initial curve point is located far from the original geometry. |