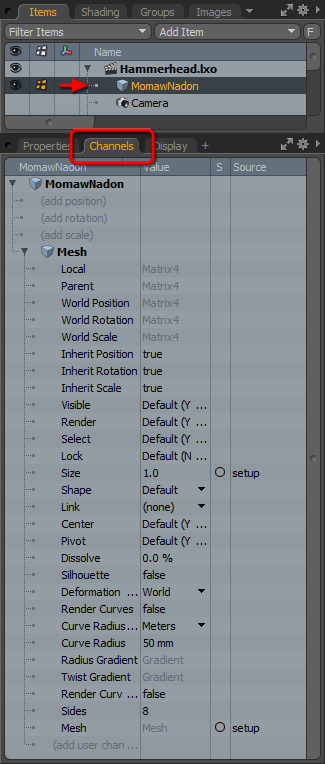
The Channel viewport provides an exhaustive window into the inner workings of Modo's animation system. All channels of any item can be viewed in the Channel viewport. Channels are any of the animateable attributes of an item (the identical attributes found in the Properties Panel). The Channels viewport provides a direct method for selecting channels, as well as creating, navigating, and managing any keyframes on those channels. There are four columns on the Channel viewport: channels, value, status, and source. The Channel column displays the channel names for the currently-selected item. The Value column displays the value of the channel at the current scene time. The status (S) column shows the state of the channel (be it animated, static, or having a keyframe) and this is communicated using the same dot method used on the channel keyframing control. The Source column describes where the current channel value is stored. This is referencing the use of Render Passes and could be the base Setup state in a temporary Edit state, when the value is modified, or the named Pass state, when the value is applied to Pass.
Same as the Properties viewport, the Channels viewport updates to reflect the current item selection. These can be items within the Item List, the Shader Tree, or even the Groups palette. Once selected, all the animateable attributes appear in the Channels viewport. To affect an attribute's value, you simply need to click directly over the current value in the Value column. For (Boolean) values that can be toggled, this changes the value field between true and false, representing their enabled or disabled states. For attributes with various properties, a menu opens presenting all the possible options. For numerical values, you can use the click and hold action to activate the field so that you can enter a new numerical value. Once you have done so, press enter to set it, or simply click away from the field.
You can set animation keyframes in all the usual ways: using the keyframe buttons, the S keyboard shortcut, from within the Properties viewport, or from within the Graph Editor. To set a keyframe for a value directly in the Channels viewport, you can right-click on the target value and select the Add Key option from the context menu. You can also remove keyframes using this method.
When any attribute has a keyframe, colored circles appear next to the value in the S column, referencing the attribute's current state. The possible states are:
•
![]() None - the channel is at the default value.
None - the channel is at the default value.
•
![]() Constant - the channel has a constant value.
Constant - the channel has a constant value.
•
![]() Animated - there is no keyframe at the current time position.
Animated - there is no keyframe at the current time position.
•
![]() Animated - there is a keyframe at the current time position.
Animated - there is a keyframe at the current time position.
•
![]() Mixed - the channels have differing values or states.
Mixed - the channels have differing values or states.
•
![]() Driven - the channel is driven by an external source.
Driven - the channel is driven by an external source.
•
![]() Undefined - the channel is not defined.
Undefined - the channel is not defined.
• An arrow over the dot represents that channel as driving another for a channel link.
•
![]() Driver - the channel is linked to another.
Driver - the channel is linked to another.
• A gear icon represents a channel that is being controlled by another for a channel link.
•
![]() Driven - the channel is linked to another.
Driven - the channel is linked to another.
TIP: You can automatically select input or output items by selecting the appropriate channels and pressing I (to select the input) or O (to select output).
Right-clicking in the Channels viewport opens up the context menu with options for modifying the keyframes of the various channels, as well as some shortcuts to access some often-used viewports.
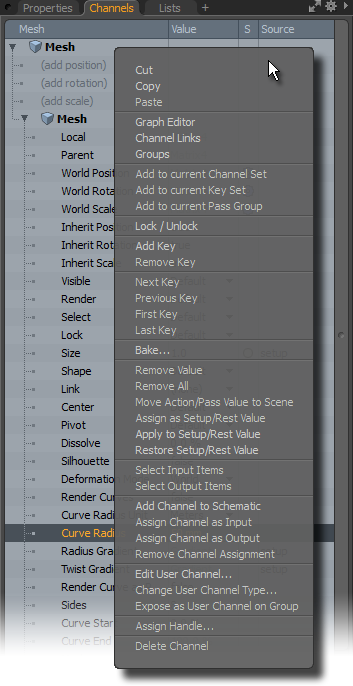
Options from the context menu include:
• Cut: Cuts the channel values and sets them back to their defaults.
• Copy: Copies the channel values.
NOTE: Only channel values are copied, not the properties of the channel itself, such as its lock state or any minimum/maximum range settings.
• Paste: Pastes channel values. When values are pasted, the entire target channel is replaced by the source values.
NOTE: The above operations require the source and target channels to be compatible. Such channels are found by matching the types of the source channels to the types of the destination channels. For a channel to match it must be of the same numerical type, for example, integer or floating point, and also the same data type, such as distance, angle, or percentage. If the channel has integer hints, such as the camera Projection Type channel, then the hints must also match.
• Graph Editor - opens a Graph Editor viewport as a pop-up palette.
• Channel Links - opens a Channel Links viewport as a pop-up palette.
• Groups - opens a Groups Viewport as a pop-up palette.
• Add to current Channel Set - adds the selected channel(s) to the current Channel set.
• Add to current Key Set - adds the selected channel(s) to the current Key Sets.
• Add to current Pass Group - adds the selected channel(s) to the current Pass group.
• Add Key - sets a keyframe at the current time with the current value.
• Remove Key - removes the keyframe at the current time.
• Next/Previous/First/Last Key - moves the Timeline to the appropriate time.
• Bake - for a modifier-driven Channel, this option opens a dialog, allowing you to convert the procedural values to actual keyframes at every frame and disconnect the modifier(s). This is useful when exporting animation.
• Remove Value - removes the current value, resetting the channel to its default state.
• Remove All - removes all keyframes and returns to the default (unmodified) value.
• Move Action/Pass Value to Scene - assigns the current channel value(s) to the scene. This is used to move a value inadvertently-assigned while in a Render Pass or Actor/Action/Pose.
• Assign as Setup/Rest Value -
• Apply to Setup/Rest Value - takes the current channel values associated to the selected item and moves them to the Setup action state.
• Restore Setup/Rest Value - replaces the current value of the selected channel(s) and replaces it with the Setup action state value.
• Select Input Items - for driven channels, this option selects the driver item or channel.
• Select Output Items - for driven channels, this option selects any items or channels being driven by the current channel.
• Add Channel to Schematic - this option adds the currently-selected channel to the Schematic viewport.
• Assign Channel as Input/Output - you can define various User Channels for Assembly nodes, which adds them to the node's channels list. The resulting channels, once created, can be selected and defined as either inputs or outputs of the appropriate Assembly node, allowing you to connect any elements external to the Assembly.
• Remove Channel Assignment - removes any channel assigned as an input or output from the Assembly node.
• Edit User Channel - opens a dialog that allows you to modify the settings of the Users Channel, such as Name, Default Value, and the minimum and maximum values.
• Change User Channel Type - opens a dialog to change the User Channel type. The Type determines the formatting of the resulting value, such as a scalar, float, or Boolean.
• Expose as User Channel on Group - when making presets for surfacing, often times the author only wants to show certain channels for you to edit, instead of giving you everything. This command allows preset creators to control which channels are exposed. By selecting specific Shader Tree item channels, the Expose as User Channel on Group command links the channels to a properly-defined User Channel on the Material Group item where they can be edited directly (under the User Channels sub-tab). The right-click context menu for the Material Group Item allows authors to also lock the preset, making it easier to direct the preset end-user to the appropriate controls. See Preset Browser for more information on creating presets.
• Assign Handle - works in conjunction with the Channel Handles function to assign the selected channel to the appropriately created handle. See the Channel Handles page for more information.
• Delete Channel - removes the selected user channel.
Right-clicking on the Channels tab itself opens the viewport menu as well as selecting the menu under the viewport Widget  . Select the Viewport Settings option to open the channel's viewport settings menu.
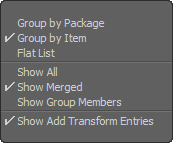
• Grouping - the first three options define how channels are grouped in the channel list.
• Group By Package - organizes channels by package, sub-groupings of related elements by individual item.
• Group By Item - organizes channels strictly by item.
• Flat List - organizes channels as a straight list with no grouping.
• Show All - when enabled, shows all channels on an item; when disabled, certain less-used channels are hidden, such as matrix channels.
• Show Merged - when enabled, combines all the channel values for all selected items, instead of listing each item's channel one after another. This is useful when gang editing multiple items at once.
• Show Group Members - when enabled, show the members of any selected group.
• Show Add Transform Entries - displays the Add Position/Rotation/Scale entries to the channel list. These options provide a shortcut for adding additional transform channels but, for smaller monitors, removing them can save some screen real estate.