The Center Pinch tool pulls geometry in towards the center of the brush. As the components gravitate towards the center, they stay on the original surface to produce a sliding effect. Pressing Ctrl while using the tool inverts the effect to force the center area outward. Pressing Shift while using the tool enables smoothing.
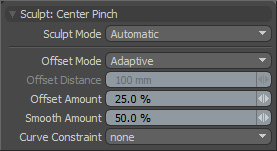
You can find the Center Pinch tool in the Paint tab in the Sculpt submenu. You can also access it from the Texture > Sculpt Tools menu. You can combine this tool with the various Brush Tips as well as the Inks and the Tablet Nozzle to customize the way the brush affects the surface. When activated, Modo displays the following attributes in the Properties panel.
Sculpt: Center Pinch—

Sculpt Mode: Determines which method of sculpting Modo implements. By default, the setting is Automatic, which performs mesh-based sculpting when there are no displacement images and automatically switches to image-based sculpting when an image is available. You may want to force Modo to use mesh-based sculpting even with an image applied for displacement. Doing this can be helpful for blocking out shapes and forms because mesh sculpting only affects the cage vertices of the base geometry.
• Automatic: Switches between mesh and image sculpting depending on availability of a displacement image map texture.
• Mesh: Forces mesh sculpting only.
• Image Map (Details): Forces image sculpting only.
Offset Mode: Specifies the method to calculate how the tool moves the surface when brushing.
• Adaptive: Adapts to the surface that is being brushed on. The adaptation is based on the setting for the Offset Amount and the size of the brush.
• Absolute: Conforms to the Offset Distance amount regardless of brush scale.
Offset Distance: Disabled unless you set Offset Mode to Absolute. When active, the value determines how far to displace the surface.
Offset Amount: Disabled unless you set Offset Mode to Adaptive. This percentage value modulates the extent of the brushstroke. The total sculpting deformation is equal to the brush size times the percentage specified as the Offset Amount.
NOTE: This is an important value for controlling sculpted detail. As such, you can adjust this value by middle-clicking and dragging to the left or right.
Smooth Amount: Controls the amount of smoothing applied when using a specific tool. This is available with almost every sculpting tool in Modo and can be applied by pressing the Shift key while using the sculpting tool. This is a convenience to enhance the sculpting workflow.
Curve Constraint: Determines whether you can use pre-drawn curves (either a Spline or Bezier curve) and then constrain the brush strokes to the curve when painting to produce a very smooth, controlled, and repeatable result. This works by having the curve element in the background layer (visible, but not selected). When you set the Curve Constraint option to either Background 2D or Background 3D, Modo constrains any paint strokes into the canvas near the curve to the nearest curve position. Setting this to none disables the constraining. Background 2D projects the curve from any orientation onto the surface through the viewport. Background 3D constrains the stroke to the curve's position in 3D space and only affects surfaces that are within close proximity (as defined by the brush's size).