The Flatten tool massages the mesh to a common flat plane. By default, Modo applies changes based on the center of the brush (in the default Normal Mode). This creates an ever-adapting plane that changes orientation as the brush moves over the surface of the mesh. In this mode, if you use deliberate brush strokes or multiple strokes over the same area, you can create consistent surfaces.
To create a plateau based on an exact position, set the Normal Mode to Mouse Down. With this setting, Modo reads the orientation of the surface when you click and uses that as a reference when moving the surrounding geometry. Pressing Ctrl while using the tool sends the surface upwards instead of flattening it. Pressing Shift while using the tool enables smoothing.
The Flatten tool is in the Paint tab in the Sculpt submenu. You can also access it from the Texture > Sculpt Tools menu. You can combine this tool with the various Brush Tips as well as the Inks and the Tablet Nozzle to customize the way the brush affects the surface. When activated, Modo displays the following attributes in the Properties panel.
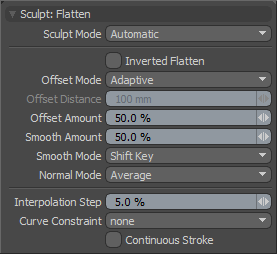
Sculpt: Flatten
Sculpt Mode: Determines which method of sculpting Modo implements. By default, the setting is Automatic, which performs mesh-based sculpting when there are no displacement images and automatically switches to image-based sculpting when an image is available. You may want to force Modo to use mesh-based sculpting even with an image applied for displacement. Doing this can be helpful for blocking out shapes and forms because mesh sculpting only affects the cage vertices of the base geometry.
• Automatic: Switches between mesh and image sculpting depending on availability of a displacement image map texture.
• Mesh: Forces mesh sculpting only.
• Image Map (Details): Forces image sculpting only.
Inverted Flatten: When enabled, somewhat inverts the function of the Flatten tool by raising what is under the brush, instead of lowering what is above it.
Offset Mode: Specifies the method to calculate how the tool moves the surface when brushing.
• Adaptive: Adapts to the surface that is being brushed on. The adaptation is based on the setting for the Offset Amount and the size of the brush.
• Absolute: Conforms to the Offset Distance amount regardless of brush scale.
Offset Distance: Disabled unless you set Offset Mode to Absolute. When active, the value determines how far to displace the surface.
Offset Amount: Disabled unless you set Offset Mode to Adaptive. This percentage value modulates the extent of the brushstroke. The total sculpting deformation is equal to the brush size times the percentage specified as the Offset Amount.
NOTE: This is an important value for controlling sculpted detail. As such, you can adjust this value by middle-clicking and dragging to the left or right.
Smooth Amount: Controls the amount of smoothing applied when using a specific tool. This is available with almost every sculpting tool in Modo and can be applied by pressing Shift while using the sculpting tool. You change the default behavior with the Smooth Mode option. This is a convenience to enhance the sculpting workflow.
Smooth Mode: Provides alternate methods for applying smoothing while sculpting.
• Shift Key: Enables smoothing when pressing the Shift key.
• Low Pressure: Enables smoothing with light sculpting strokes on a pressure-sensitive tablet. Once the pressure threshold is exceeded, the smoothing effect attenuates toward the full pressure effect. At full pressure, the brush works normally as determined by the tool; therefore, this option establishes a dual function for the brush.
• Uniform: Enables smoothing at all times while sculpting; therefore, the tools make softer strokes.
Normal Mode: Controls the method that Modo uses to displace the sculpted vertices. The options include:
• Brush Center: Uses the geometry at the very center of the brush to calculate the direction along which to displace the mesh.
• Vertex: Displaces each vertex along its own normal.
• Average: Calculates an average normal for all the vertices inside the brush.
• Screen: Displaces the vertices directly towards the active viewport.
• Mouse Down: Uses the normal of the mesh surface directly under the pointer when clicked. Modo applies all displacement according to that vector.
• X,Y,Z: Designates a World Axis along which to displace the vertices.
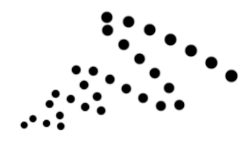
Interpolation Step: Defines the distance between each dot as a percentage of the brush size. Generally, paint strokes are not continuous lines but a series of dots (or dabs) in the image. By default, this value is set to 8%. So, for a 64-pixel brush, Modo places dots approximately every 7 pixels. You can increase or reduce this value for a variety of effects. Increasing it to 100% produces individual dots instead of a stroked line.
Curve Constraint: Determines whether you can use pre-drawn curves (either a Spline or Bezier curve) and then constrain the brush strokes to the curve when painting to produce a very smooth, controlled, and repeatable result. This works by having the curve element in the background layer (visible, but not selected). When you set the Curve Constraint option to either Background 2D or Background 3D, Modo constrains any paint strokes into the canvas near the curve to the nearest curve position. Setting this to none disables the constraining. Background 2D projects the curve from any orientation onto the surface through the viewport. Background 3D constrains the stroke to the curve's position in 3D space and only affects surfaces that are within close proximity (as defined by the brush's size).
Continuous Stroke: When enabled, Modo draws a continuous stroke (such as a line) instead of as individual dots. Modo draws the stroke as linear segments between each interpolation step. Increasing the scale of the interpolation steps reveals the linear nature of the continuous stroke.
|
Default 10% Interpolation Step |
Interpolation Step set to 200% |
200% Interpolation Step |