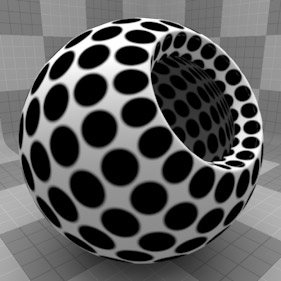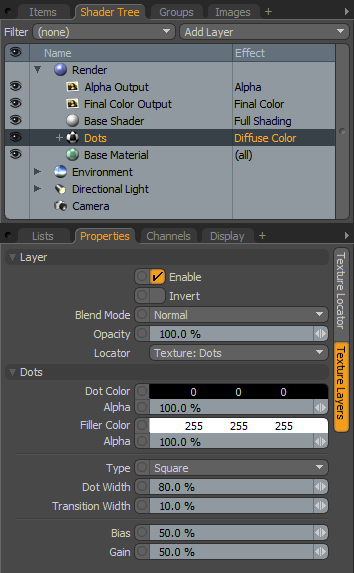

The Dots texture creates a grid-like pattern of dots across the surface of the mesh. These dots default to a fairly uniform position with hard edges, but you can modify the options to have different placements or soft-ramped dots. Procedurally created at render time, the Dots texture has no fixed resolution and can be magnified with no visual loss in detail.
NOTE: For information about adding and working with Shader Tree item layers, see the Shader Tree topic.

|
Option |
Description |
|---|---|
|
Layer |
|
|
Enable |
Toggles the effect of the layer on and off to duplicate the functionality of toggling visibility in the Shader Tree. When disabled, the layer has no effect on the shading of the scene. However, Modo saves disabled layers with the scene, and they are persistent across Modo sessions. |
|
Invert |
Inverts the colors (RGB values) for the layer to produce a photonegative effect. |
|
Blend Mode |
Affects the blending between different layers of the same effect type. With this, you can stack several layers for different effects. For more about blending, see the Layer Blend Modes topic. |
|
Opacity |
Changes the transparency of the current layer. Reducing this value increasingly reveals lower layers in the Shader Tree, if present, or dims the effect of the layer, itself, on the surface. |
|
Locator |
Sets the association for the Texture Locator. Most texture layers have a texture locator that Modo automatically creates in the Item List. This defines the mapping of the texture (how Modo applies the texture) to the surface. You can specify alternate locators, but the need to do so is rare. Still, you may want multiple texture items to share a single locator. |
|
Dots |
|
|
Dot Color |
Determines the color of the dots. This color ramps to the Filler Color based on the Transition Width value. |
|
Alpha |
Determines the opacity of the dot. |
|
Filler Color |
Determines the color of the area between the dots. |
|
Alpha |
Determines the opacity of the filler area. |
|
Type |
Specifies the method for applying the dots to the surface. Click to view examples of the various Type options.
|
|
Dot Width |
Controls the diameter of the dots within the grid. At 100% the dots touch edge to edge. Click to view examples of various Dot Width settings. |
|
Transition Width |
Creates a smooth, ramped blend from the Dot Color (or value) to the Filler Color (or value). This is a percentage of the distance between the dot and the filler. You can use extreme values to create interesting effects. Click to view examples of various Transition Width settings. |
|
Bias |
Determines whether the texture favors the Dot Color or the Filler Color. Increasing this value causes the texture to favor the Dot Color; decreasing the value favors the Filler Color. This value is dependent on the Transition Width value as it works across the gray tones of the image. Click to view examples of various Bias settings. |
|
Gain |
Determines the falloff effect for the texture. This is similar to a gamma control that affects the falloff of the gradient ramp between the Dot Color and the Filler Color values. Setting the Gain to 100% creates a sharp falloff effect; setting the value to 0% creates a plateau around the value (or color mid-point) with a sharp falloff at either gradient extreme. Click to view examples of various Gain settings. |
|
Type Square |
Type Hexagon |
Type Cube |
|
Dot Width 0% |
Dot Width 25% |
Dot Width 50% |
Dot Width 75% |
Dot Width 100% |
|
Transition Width 0% |
Transition Width 25% |
Transition Width 50% |
Transition Width 75% |
Transition Width 100% |
|
Bias 0% |
Bias 25% |
Bias 50% |
Bias 75% |
Bias 100% |
|
Gain 0% |
Gain 25% |
Gain 50% |
Gain 75% |
Gain 100% |