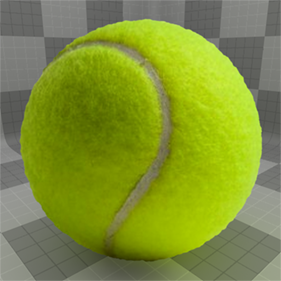
The Projection Shader simplifies the workflow of using projected bitmap images. When applied, it replaces all surface shading with a photographic image. This type of projection is useful when working with digital matte paintings or when you need to simply add a photographic texture to a surface. In the sample below, the example sphere has had a tennis ball image projected onto it so all of the surface shading is now gone, including the interior hollow section. Now, it appears as a solid sphere, represented only by its silhouette.
A small amount of noise has been added to displace the underlying surface, providing for a more convincing effect. This was done literally in a matter of seconds (which is why it doesn’t look all that great), but it is much better than having to model a highly detailed tennis ball using fur and other complex surfacing attributes. Or imagine instead of modeling an entire city block, giant cubes could be used as stand-in geometry, with photos of actual buildings projected onto them, providing a more realistic result in a fraction of the time. These are just a couple examples of how the Projection Shader can save loads of time on a project.
To add a Projection Shader, do the following:
| 1. | In the Shader Tree, click Add Layer > Special > Projection Shader. |
The Projection Shader appears in the Shader Tree.
| 2. | For proper results, add the Projection Shader to the target material Group, then drag the entire group above the Base Shader. |
NOTE: A different approach would be to simply add a new material Group item above the Base Shader and set its Item attribute to the target mesh layer, working as an item mask. Then add the Projection Shader to this new material group and it's applied to the entire target object.
When the Projection Shader is added, the Clip Browser window opens.
| 3. | Select the desired projection image by clicking the target image. If it's not already loaded, click the Add Clip button, and click (load image). |
NOTE: The image is automatically stretched to fill the entire rendered frame, so the projected image needs to be the same aspect ratio as the final render Frame in order to avoid looking stretched.
It should be noted that as a standard Shader Tree layer, the Projection Shader layer can be masked like any other Shader Tree layer. For more information regarding adding and working with Shader Tree item layers, please refer to the Shader Tree topic. When the Projection Shader layer is selected, the following attributes appear in the Properties viewport.
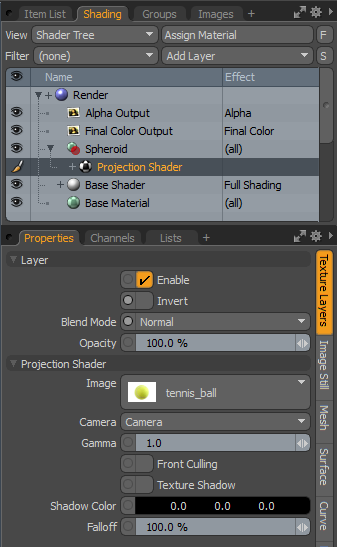
The following Layer options are available for Projection Shader:
• Enable - toggles the effect of the layer on and off, duplicating the functionality of toggling visibility in the Shader Tree. When disabled, the layer has no effect on the shading of the scene. However, disabled layers are saved with the scene and are persistent across Modo sessions.
• Invert - inverts the RGB values for the layer, producing a negative effect.
• Blend Mode - affects blending between different layers of the same effect type, allowing you to stack several layers for different effects. For more on blending, refer to the Layer Blend Modes topic.
• Opacity - changes the transparency of the current layer. Reducing these values increasingly reveals lower layers in the Shader Tree if present, or dims the effect of the layer itself on the surface.
The following Projection Shader options are available for Projection Shader:
• Image - uses the Clip Browser window to define the projected image. Once loaded, a projected image is stretched to fill the full frame, so make sure that the selected image is the same aspect ratio to avoid any distortion or stretching.
• Gamma - allows you to adjust the mid-tone values of the image, should a gamma correction be necessary. For most cases, the default 1.0 value should suffice, where Gamma is handled by the Color Management system.
• Front Culling - creates a texture shadow, that means it only maps the parts of the geometry directly seen by the camera, the parts hidden from the camera POV uses the texturing below.
• Shadow Color - instead of using the texturing of a material in the front-culled areas, you can specify a diffuse color.
• Falloff - sets the amount of falloff from the projection on surfaces not facing the camera.