Lattice Effector
The Lattice Effector, when assigned, creates a structured array of points across the mesh similar to a cage. You can moved each individual vertex of this cage to deform the underlying mesh and smoothly interpolate the deformation between the vertex locations. You can then animate these cage handles to produce very interesting deformation effects.
Applying an Effector
You can add an Effector by using the Items list's Add Items command, but it won't produce the intended result because it only places the Effector in the Items list. For proper results, you must connect the Effector to the mesh layer with a General Influence. The General Influence acts upon the mesh, and the Effector, itself, produces the instructions on how the Influence should modify its target.
You properly apply the Lattice Effector to a mesh in the Setup workspace layout. In the Deformers toolbox sub-tab, left-click the Lattice deformer button to open the Create Lattice Deformer dialog box.
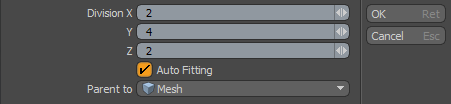
In this dialog box you define the number of lattice handles along each axis. Select the Auto Fitting option to fit the cage to the bounding box volume of the target mesh automatically. In the Parent to list, select the target mesh for deforming. (If you select the target item prior to opening the dialog box, Modo automatically selects the target item.) Once you have assigned everything properly, click OK to actually generate the Lattice.
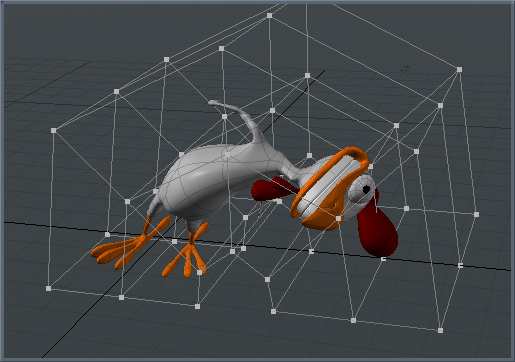
When assigned as such, a wireframe cage appears around the Mesh Item layer with the number of divisions specified. At each division there is a handle (a Locator actually). You can select these handles then in Items mode and position them with the standard Transform tools to deform the underlying Mesh Item. You can modify the handles individually or select them in groups and move them together. You can also select the Lattice Effector item, itself, in the Groups Viewport or Deformers viewport and adjust its attributes in the Properties panel. This viewport also has options for you to reset the Lattice and update the number of divisions.
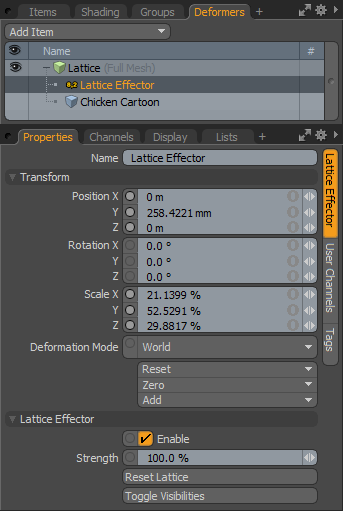
Name: Displays the current item's name. You may change the name by clicking the current name and typing a new name.
Transform
Position XYZ: Indicates the numerical position of the Effector item in XYZ space. The Effector cage's position relative to the geometry has a dramatic effect on how it deforms the target. Normally, center the cage on the target bounding box's volume. (Moving the cage is not the same thing as moving all the handles of the cage.)
Rotation: Indicates the rotation of the Effector item numerically. The Effector cage's rotation relative to the geometry has a dramatic effect on how it deforms the target. (Rotating the cage is not the same thing as moving all the handles of the cage.)
Scale: Sets the size of the item's representation in the 3D viewport numerically. The Effector cage's size relative to the geometry has a dramatic effect on how it deforms the target. (Scaling the cage is not the same thing as moving all the handles of the cage.)
Deformation Mode: Determines how the transforms of the Effector translate into a deformation.
• World- This is the default setting and determines the deformation based on the World Position of the Effector. In most cases, this provides the expected results.
• Local- This applies the deformation relative to the Setup position of the item as if the item were still in the rest state regardless of the position of the Effector. This is useful for the order of operation workflow when rigging.
• Local ** Rotation Modes- This is identical to the Local mode, but Modo only applies the specified rotation. This creates a deformation that is more like a Rotation Effector with Parametric interpolation.
Reset: Resets the selected transform values to (0,0,0) and returns the item to its default state.
Zero: Resets the selected transform property values to 0 but leaves the item's position intact. Modo does this by adding a negative transform item to the item's transform channels.
Add: Adds a Transform item to control an item's position, rotation, or scale. By default, new items do not have any transform items associated with them (although they are visible within the Properties panel). Only add the necessary transforms on an as-needed basis to reduce scene overhead. You can also use this Add function to add a selected set of transforms to the Channel list while keeping the default 0,0,0 values, which is necessary for Referencing. (To override channels, they must exist.)
Lattice Effector
Enable: Toggles the effect of the layer on or off. When clear, the layer has no influence on the scene. However, Modo saves disabled layers with the scene and their values are persistent across Modo sessions.
Strength: Determines the amount of influence the Effector has on the target mesh. You can switch between a deformed version and an undeformed version.
Reset Lattice: Opens the Reset Lattice Deformer dialog box for you to re-define the number of control handles.
Toggle Visibilities: Toggles the visibility (and therefore, the selectability) of the control handles in the 3D viewport.
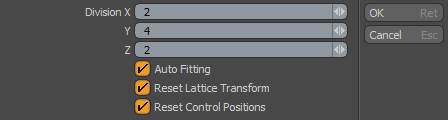
Division X/Y/Z: These options specify the number of control handles given to the Effector. Adjusting the number of divisions after the fact without resetting the Control positions may produce undesirable results.
Auto Fitting: Selecting this option scales the size of the control cage to the bounding box of the target mesh. When disabled, the resulting cage is, by default, 1 meter square.
Reset Lattice Transform: This option resets any transform values applied to the Lattice Effector, itself.
Reset Control Positions: This option removes any transforms applied to the control handles and returns the Effector to its initial, base shape.