Deformers Viewport
The Deformers viewport provides a view of all the deformers in a scene. In this viewport, you can view, select, reorder, rename, and remove effector and influence items.
Each deformation in Modo, to work properly, has both an effector (the deformer, itself) and an influence. The effector describes how something is modified, and the influence defines what gets modified. When combined, these two parts are referred to as a Deformer. When you apply multiple deformers to an item, Modo computes the deformations based on an order of operation that is determined by the item's position within this list. Modo computes and applies items lowest in the list first, then the next item up and so on — moving from the bottom of the list upwards.
The Deformers viewport is in the Setup and Animate interface tabs of the default interface and located in the upper-right side panel. Selecting any item in the list displays its associated attributes in the Properties viewport. You can group together multiple elements into a folder by right-clicking one or more selected elements and choose Place in Folder (you right-click an item layer to open it).
To select any item in the list, click the item's layer name. Modo indicates a selected layer by accentuating the row and changing the text's color in the viewport. You can add to or remove layers from an existing selection by pressing the Ctrl key and clicking the additional layer. You can drag selected layers to reposition them within the list or can delete them by pressing the Delete key. If you click, pause, and then click again, you can edit layer names inline.
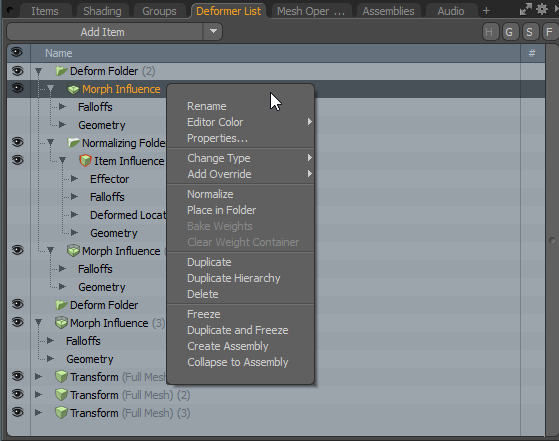
When you right-click any layer within the list, a menu provides additional commands related to the target.
• Rename - Opens a dialog box to assign a new name to the selected item.
• Properties - Opens a popup window with the associated attributes of the target item. You can adjust the values directly. To dismiss the window automatically, move the pointer away from it.
• Change Type - By using this command, you can change similar items from one type to another and retain associations. For example, you can change a Slack deformer to a Lag deformer and keep its association with the original deformer.
• Add Override - By using this command, you can add an additional operator on an existing deformer: either an effector or a falloff.
• Normalize - Creates a Normalizing folder and moves all currently selected items into the folder. See below for more information about the Normalizing folder.
• Place in Folder - Creates a folder and moves all currently selected items into the folder. You can use this to organize multiple items within the Deformers viewport.
• Bake Weights - Pushes computed weight values down to Weight Maps. (This command only applies to a Normalizing folder.) Modo (on the fly) computes the options of the Normalizing folder on the weights during normalization, and these can be changed on the fly, too, with this command. When you invoke this command, Modo disables the Weight Normalization options.
• Clear Weight Container - Removes the weight values associated with the selected item when applied to a Weight Container item.
• Duplicate - Duplicates the currently selected item.
• Duplicate Hierarchy - Creates a duplicate of the current parent item and all child items while retaining the overall relationships of the hierarchy.
• Delete - Deletes the currently selected item(s) layer.
• Freeze - This freezes the effect of the Deformer into the mesh, resulting in an updated mesh. The Deformer is then removed from the Deformer List as it is no longer required. For more information on freezing, see Freezing Geometry.
• Duplicate and Freeze - This creates a new mesh containing a frozen version of the selected mesh. This allows you to produce a new mesh without the Deformers, whilst preserving the original for future editing.
• Create Assembly - Creates a new assembly containing the selected Deformers. For more information, see Assembly Presets
• Collapse to Assembly - Creates a new assembly but hides the contents from the scene.
Order of Operations
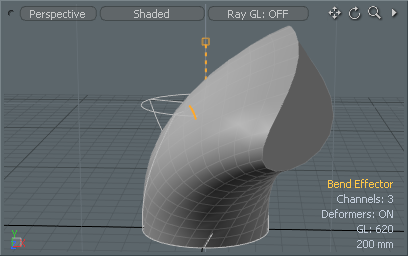
When Modo applies multiple deformers to a single mesh, the order of operations can have a dramatic effect on the final deformed outcome. For example, you may want to apply a twist and a bend to a cylinder. If Modo twists and then bends the cylinder, the results are very different from having Modo bend and then twist the cylinder. In Modo, the order of operations is determined by the layer order starting at the bottom of the list and moving up. Modo calculates lower deformers, and then it passes the values 'up' to the next deformer in the list, and so on.
|
|
|
|
The twist applied first and then the bend |
The bend applied first and then the twist |

Normalization
If you select the Normalizing Folder directly, Modo enables a special weight drawing mode for you to more easily see how overlapping weights affect each other. You must have the Vertex Map display style applied to the viewport to see the weights.
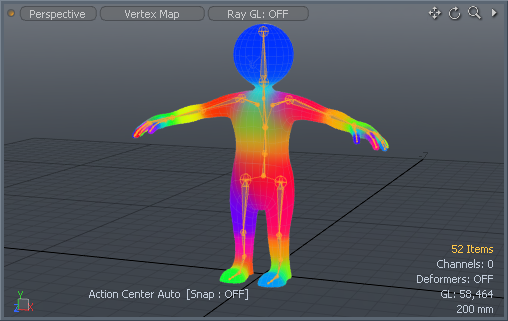
![]()
Sometimes you won't want Modo to apply an order of operation, but you want Modo to calculate everything at once (such as with joints in a character). Mathematically, if a vertex between two bones is weighted at 50% for each one's influence, then one applied right after the other doesn't add together to produce 100% of the deformation. To resolve this, you can add a Normalizing folder and place any deformers and influences into it. Modo normalizes the weight values for any items within the folder. To normalize a weight value, Modo determines whether multiple Weight Map values influence a single vertex and adjusts all the values so that their combined values add up to a 1.0 weight value (100%). By doing this, Modo assures that no vertex gets more than a 100% deformation — no matter how many items influence it. Additionally, by using the Normalizing folder Modo makes sure that it calculates deformers concurrently, so that two 50% weighted influences actually produce a 100% deformation. You typically apply normalization to deformations generated using a skeleton joint, where multiple weight-mapped deformers influence a single vertex.
Note: You may never have to consider this issue because Modo adds the normalization automatically during the Bind operation. For more information, see the topic about the Bind & Setup process.
Normalizing Folder—
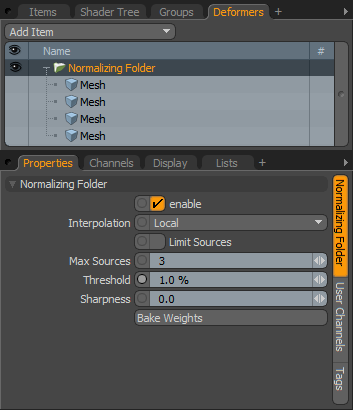
Enable: Toggles the effect that the Normalizing Folder has on its contents. When cleared (disabled), the layer has no effect on the Influences. However, Modo saves disabled layers with the scene, and the values are persistent across Modo sessions.
Interpolation: Determines how Modo interpolates each influence during normalization.
Local- Applies the interpolation setting for each influence — whether it's Parametric or Linear.
Linear- Overrides each influence's setting and does a Linear interpolation for all. This is the same as if the Influences were all individually set for a Linear interpolation.
Quaternion- Implements dual-quaternion skinning as the method of interpolation. This only works if all the deformers are transform effectors. (For example, Modo does not use this for a Bend or Lag effector.)
Limit Sources: Specifies whether Modo sets an upper bound on the number of influences that can affect a single vertex. When selected, Modo determines the X amount of the highest weights and ignores the rest. (This is good for Heat binding, which creates many very small weights, and for Unity, which has a maximum of four joints per vertex.)
Threshold: Ignores any weight values below this defined threshold. This is good for cleaning up Heat binding.
Sharpness: Fine-tunes the strength of the binding. Positive values make vertices bind more strongly to nearby bones, and negative values make them more permissive and bind to weaker bones.
Bake Weights: Pushes the computed weights down to Weight Maps. (Normally, Modo computes the weights on the fly during normalization based on the three previous options and can change the weights on the fly.)