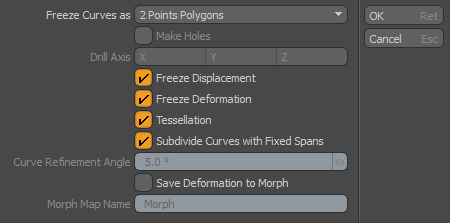
Freezing Geometry
The "freezing" of an object is the act of fixing the geometry into a specific state, such as when a Displacement Map is applied. You can freeze the geometry into a fixed state (as currently-visible in the viewport), allowing for the removal of the Image Maps and/or Deformers. This can be useful when you wish to further edit the model, or export it out of Modo into another application.
Freezing can be applied in a number of situations, to a number of items: Curves, Beziers, Patch Surfaces, subdivided surface geometry, deformed geometry, and Multi-Res sculpted models. The Freeze command can be found in the menu bar under Geometry > Freeze. The command affects any selected geometry when invoked.
|
Option |
Description |
|---|---|
|
Freeze Curves as |
When either of the Modo Curve types are selected for freezing (Adding Curves or Bezier), the Freeze Curves as converts the geometry to the selected type. |
|
2 Point Polygons |
A two point polygon is simply two vertices connected by an edge. Converting a curve to 2 Point Polygons produces a continuous string of straight, two point polygon edge segments that approximate the shape of the source curve. Two Point Polygons are not renderable by themselves but they can be extruded into a shell, or used to create a face polygon (n-gon). |
|
Faces |
Converts the curve to a multi-sided Polygon (n-gon). If the curve is open, then an edge connect the end location with the start, closing the shape. |
|
Polylines |
Polylines are very similar to two-point polygon strings, but also retain some qualities of curves. Polylines have a Start and End point like a curve, but are made of a string of straight edge segments that approximate the shape of the source curve. Unlike Two-Point Polygons, they render when the Render Curves option is enabled, and they are extremely fast to edit and simulate when used as Hair Guides. |
|
Make Holes |
When freezing curves as Faces with overlapping shapes, especially those created by the importing of Encapsulated Postscript curves from a vector drawing program, enabling the Make Holes option tells Modo to attempt to drill the overlapping shapes automatically. |
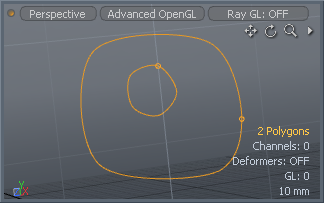
Two overlapping curves example:
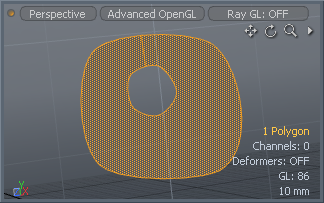
Make Holes enabled example:
|
Option |
Description |
|---|---|
|
Drill Axis |
Depending on the facing direction of the initial curves, the 'Drill Axis' option is used in conjunction with the 'Make Holes' command, determining the axis direction of the automatic Drill operation. |
|
Freeze Displacement |
When the Freeze Displacement option is enabled, Modo recognizes any Image Map layers assigned to the geometries surface defined as Displacement or Vector Displacement when freezing and applies them accordingly, retaining the image-based displacements. Once frozen, you can remove the displacement effects. When disabled, Modo ignores displacement layers and only freezes the raw Subdivision cage (also called the Base Mesh). The number of polygons of the final frozen model is determined by the Subdivision Level option in the Mesh Item properties, or the Current Level when freezing Multi-resolution meshes. |
|
Freeze Deformations |
The Freeze Deformation option, when enabled, considers any type of Deformer applied to the item for the purposes of posing and animating when freezing the object, applying the effect of the deformer(s) directly to the geometry, and then removes its influence on the mesh (it won't delete the deformer itself though). The target is frozen in its current state (based on the current frame for animated deformers). |
|
Tessellation |
The Tessellation option freezes the current subdivision surface level for the target mesh for both regular and Pixar subdivision surfaces geometry (based on the viewport display, not the render level). By disabling the Tessellation option, and enabling the Freeze Deformations option, it is possible to freeze the effects of deformers (such as joints for posing characters) and keep the subdivision surface base geometry intact. (Previously Modo froze the subdivision surface level when freezing deformers. This option separates that function from the application of the deformer, allowing you to pose a model using the various deformers and then freezes the pose and further manipulate the model without creating extra unnecessary geometry). |
|
Subdivide Curves with Fixed Spans |
When this option is enabled, the Freeze command converts curves based on the Mesh Item setting Curve Refinement Angle, generating an identical number of spans between each curve point. Since this value controls how curves are displayed, frozen curves look identical to the source curves viewport display. When this option is disabled, you can then define their own Curve Refinement Angle value in the following input field using a more economical adaptive algorithm that generates more divisions around curved areas and less for the straighter sections. |
|
Curve Refinement Angle |
When the Subdivide Curve with Fixed Spans option is disabled, the Curve Refinement Angle value here can be used to define the spans that make up the resulting geometry, based on the angle of change between spans. Smaller angles generate more spans and larger values produce less, using a adaptive algorithm that generates more divisions around curved areas and less for the straighter sections. |
|
Save Deformation to Morph |
The Save Deformation to Morph Map option allows you to take a deformed mesh and automatically save its current deformed state as a Relative Morph Map. This can then be re-applied as a Morph deformer to produce the same geometric result. To use, set the deformer(s) to the state that is desired for the final result, or if necessary adjust the Timeline to the location of the proper state. With the target mesh selected in Items Mode, choose the Geometry > Freeze command from the menu bar, then disable all options except Freeze Deformations and the Save Deformation to Morph Map option. Define a name under the Morph Map Name input field, if desired, and press OK to generate the morph. When complete, any attached deformers aredisabled (but still connected to the mesh). To easily view the resulting morph map, change the workspace to the modeling view and then select the named Morph Map from the Lists viewport. |
|
Morph Map Name |
When the Save Deformation to Morph Map option is enabled, this input field allows you to name the resulting morph map. In situations where there is a name collision with an existing map, the previous morph map is overwritten. |
Tip: Displacements applied by way of procedural texture layers are not considered when freezing, regardless of the Freeze Displacements option. You need to convert the procedurals to Image Maps by way of baking prior to freezing the mesh.