Modo Bridge
Modo has the ability to communicate with Unreal Engine and Unity in real-time. To improve the workflow for game engine users, you can use a network protocol to share data between applications. The connection can be on the same machines, across multiple machines on the LAN, or even possibly remotely. An entire scene or selected elements from a scene can bi-directionally be pushed and updated between the client and server. Mesh geometry, normals, UVs, textures, materials, as well as scene hierarchy, lights, and cameras can be synchronized between Modo and either game engine.
Modo provides an Unreal Engine and a Unity client, Modo Bridge, as a plug-in for Unreal Engine and Unity respectively. Once downloaded and installed, you can start the communication between both applications. You can then push changes made to the connected application.
The benefits of using this tool:
• Transferring mesh items, vertex maps, materials and textures, from Modo to Unreal Engine/Unity.
• Transferring static mesh actors and vertex maps from Unreal Engine/Unity to Modo.
• Transferring modified selected Polygons, Edges, and Vertices from Modo to Unreal Engine/Unity. For more information, see Selecting Items.
• Transferring data changes made in Unreal Engine/Unity to Modo. For example, repositioning a mesh.
• Transferring data using a separate server and client computers on the same network.
• Transferring items, materials, and textures from multiple Modo scenes to Unreal Engine/Unity.
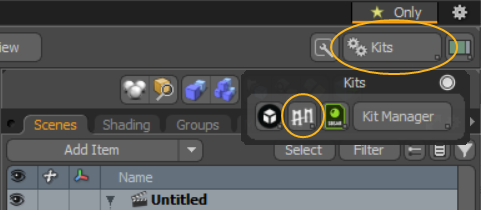
To access Modo Bridge in Modo, in the top right corner of the interface, click Kits, then click the Modo Bridge ![]() button.
button.
For information on how to use Modo Bridge with your chosen game engine, refer to the Modo Bridge for Unreal Engine or the Modo Bridge for Unity topic.
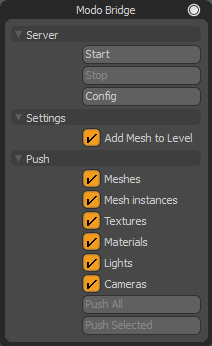
Modo Bridge Options
When you open the Modo Bridge panel, you can find the following options:
|
Server |
|
|
Start |
Starts the communication between Modo and the game engine client using a network protocol. |
|
Stop |
Stops the communication between Modo and the game engine client. |
|
Config |
Allows you to configure the server's listening IP address and port number for incoming client connections. These are the same settings configured in the System > Preferences > Default > Application > Foundry Link Settings category. For more details, see Defaults Preferences. Note: You cannot change the IP address and port information while the Modo Bridge is connected. |
|
Settings |
|
|
Add Mesh to Level |
When enabled, meshes pushed to the game engine are added to the game engine's content browser, as well as the current level. When disabled, meshes are only added to the content browser. |
|
Push |
|
|
Select which scene items are transferred. Click Push All or Push Selected to push to the game engine client. |
|
|
Push All |
After specifying which items to push, Meshes/Mesh instances/Textures/Materials/Lights/Cameras (meshes, cameras, and lights), Modo Bridge, and/or Modo Bridge, all corresponding items in your scene are pushed to the game engine client. All items pushed are converted to actors in the game engine client. Note: If multiple checkboxes are checked, then the order of pushing is always Meshes, Textures, and then Materials. |
|
Push Selected |
After specifying which items to push, items selected in the Shader Tree or the Items list in Modo are pushed to the game engine client. All pushed items are converted to actors in the game engine client. Tip: You can select individual geometry items or selected polygons, edges, or vertices, materials, and textures to transfer them. |