Add Seams to Models With Intersecting Geometry and Seam Decals
Seam Decals allow you to use two pieces of intersecting geometry or a curve to create a seam along a mesh. Once created, a material containing a normal map with a seam texture is applied to a strip of polygons that sits on the surface of your mesh. This strip of polygons conforms to the shape created by the intersecting geometry, or the curve that is projected onto the mesh receiving the decal.
Seam Decals are especially useful when adding panel lines to a hard surface model, or seams to clothing. Custom normal maps that have been baked in Modo or a third party application can be used with Seam Decals, allowing you to add custom seams to your assets.
To create a Seam Decal driven by intersecting meshes:
- Create two meshes on two separate mesh items. Once created, move the mesh that you want to create the decal so that it is intersecting with the mesh that you want the decal to sit on.
- Create a new Mesh Item and leave it empty.
- In the empty Mesh Item, create a Decal Seam MeshOp.
- In the Target Mesh dropdown, select the Mesh Item you want the Seam Decal to be on.
- In the Source Mesh dropdown, select the intersecting Mesh Item. The points where this source mesh and the target mesh meet are used to create the decal seam.
- Adjust the Width and Offset parameters as needed.
- Width allows you to adjust the thickness of your Seam Decal.
- Offset controls how far away from the surface of the mesh the decal sits.
- Leave UV Texture and Material as they are, and leave Add Default Normal Map ticked.
- UV Texture allows you to add a custom name to the UV Map that is generated when the Seam Decal is created.
- Material allows you to add a custom name to the material that is generated and applied to the seam decal when it is created.
- Add Default Normal Map generates a basic normal map and applies it to the Seam Decal material that is created when the Seam Decal is created. If using a custom normal map, this option should be left un-ticked and then the normal map applied in the Decal.
- Click OK.
|
|
|
The larger mesh will drive the seam decal, while |
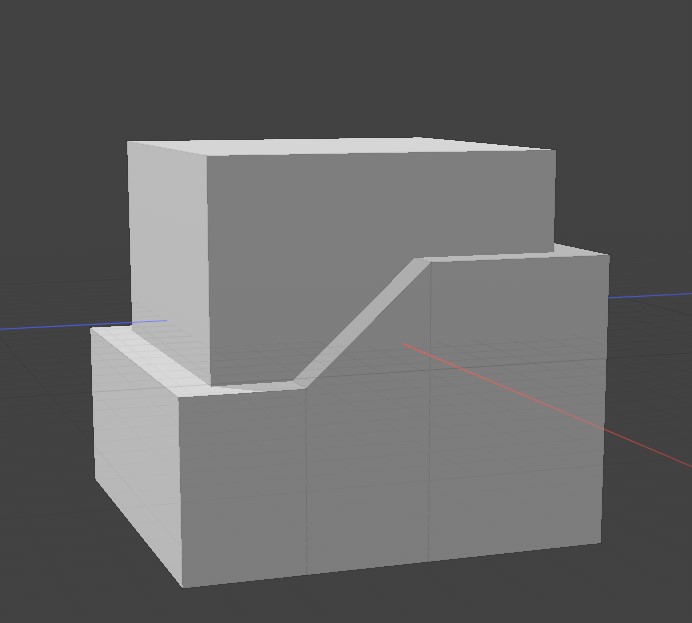
Note: For seam decals to work, both meshes must be separate mesh items. One mesh item is treated as the mesh that the decal is placed on, while the other mesh is treated as the mesh driving the decal. Where the two mesh items intersect is where the decal is placed. For more information on mesh items, see Mesh Item.
This Mesh Item will hold the Mesh Operation driving the Seam Decal. For the MeshOp to be added, the Mesh item it belongs to much be empty.
The following window opens.
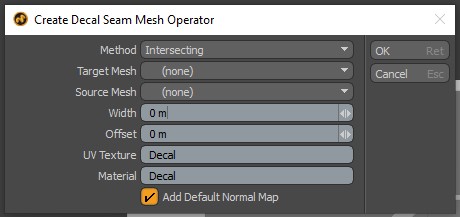
The Decal Seam MeshOp allows you to set the Target and Source meshes for the decal, and then generates the decals based on the information that is input in the window above.
A seam decal is added to the mesh that was assigned in the Target Mesh parameter when the Decal Seam MeshOp was created.
When a seam decal is generated, a new material called Decal is created in the shader tree. This material contains the normal map that is giving the illusion of new surface details being created on the asset. Additional material settings such as Specular, Diffuse and Roughness can also be adjusted as needed without impacting the material's normal map or how the seam decal sits on the mesh.

Seam Decals can also be generated with Curves. The workflow for curves is the same as the one outlined above, however the Method should be changed to Curve Projection in the Create Decal Seam Mesh Operator window.
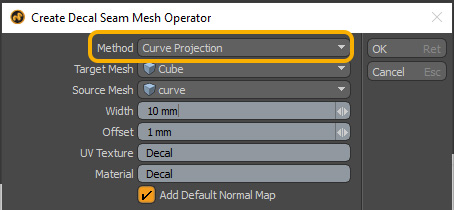
Seam Decals support all linear curve types in Modo, such as Curve, Bezier, B-Spline and Polyline.
Decal Seam Settings
There are a number of settings available in the Properties tab for the Decal Seam MeshOp.
| Control | Type | What it Does | Notes |
|---|---|---|---|
| Enable | checkbox | When checked, it enables the MeshOp. When unchecked, it disables the MeshOp.
The results of Enablebeing turned off or on, only impacts the MeshOp it's been applied to. If there are multiple Mesh Operations in a stack, they will remain active but enabling or disabling a MeshOp may impact the order of operations. |
Enabled by default. |
| Use World Transform | checkbox | Calculates transforms based on the World Position of the Mesh Operation. | Enabled by default. |
| Method | dropdown | The method used to create the decal.
|
|
| Width | text field | Determines how wide the strip of polygons generated by the decal seam MeshOp is. The larger the value in the Width parameter is, the easier it is to see from a distance. | |
| Offset | text field | Determines how far away from the surface of the mesh the decal sits. | |
| UV Texture | text field | The name of the UV Texture Map that the seam decal creates. | Set to Decal by default. |
| Material | text field | The name of the Material that the seam decal creates. | Set to Decal by default. |
| UV Direction | dropdown | Changes the direction of the UV map applied. | Set to V Direction by default. |
| Curve Refinement Angle | text field | Determines the amount of spans needed to create the seam decal.
Smaller angles generate more spans, while larger angles generate less. |
Disabled unless the Method is set to Curve Projection. Spans are the distance between two points along a curve. |
| Curve Interpolation | checkbox | Converts intersecting edges into a curve and smooths them. | Disabled by default. |
| Add Segments | text field | Increases or decreases number of segments in the quad strip. | Disabled unless Curve Interpolation is enabled. |
| Curve Smoothing Iterations | text field | Determines how many times Modo smooths the quad strip. | Disabled unless Curve Interpolation is enabled. |
| Slice Count | text field | Increases or decreases the amount of slices running through a quad strip. | Set to 0 by default. |