Rebuilding Curve Spans
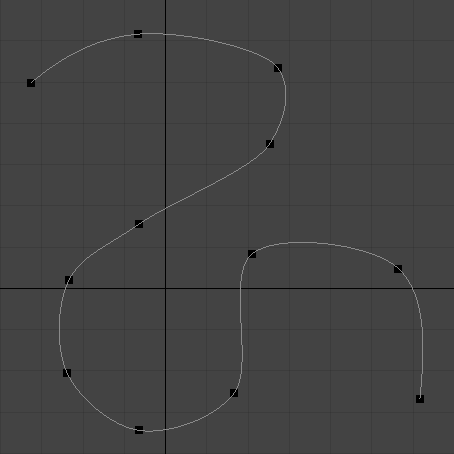
You can procedurally rebuild sections of a curve using the Curve Rebuild Spans mesh operation. This operation allows you to subdivide and offset the existing spans, the sections between control points on a curve.
|
|
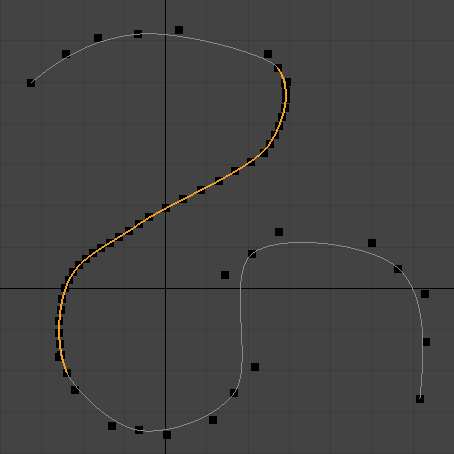
| Before | After |
This way, a curve can be subdivided without altering the existing points. They can remain locked in place while the curve span between them is altered. Curve Rebuild Spans is one of the tools that make up the Lace Item.
Using Curve Rebuild Spans
| 1. | In the Item List, select the mesh containing your curve. If you only want to select certain spans on the curve, use Edges selection mode to select the required sections. |
Tip: To help you see the control points on your curve better, do the following:
Click the Settings ![]() button in the top-right corner of the 3D viewport to open the 3D Viewport Properties, and in the Active Meshes sub-tab, set Show Vertices to Always. You can also enable Independent Point Size and increase the Point Size value to make the vertices bigger.
button in the top-right corner of the 3D viewport to open the 3D Viewport Properties, and in the Active Meshes sub-tab, set Show Vertices to Always. You can also enable Independent Point Size and increase the Point Size value to make the vertices bigger.
| 2. | Open the Mesh Ops tab, and click Add Operator. |
Note: If you're working in a layout where the Mesh Ops tab is not visible by default, click the + button on the right of the tab names, and select Data Lists > Mesh Ops.
| 3. | Under Mesh Operations > Curves, double-click Curve Rebuild Spans. |
This adds the Curve Rebuild Spans mesh operation to the Mesh Operations list and opens its properties on the lower right panel.

| 4. | Adjust the Curve Rebuild Spans Properties as needed. |
Curve Rebuild Spans Inputs
Expanding the mesh operation by clicking the arrow in front of it reveals the operation's inputs.
You can set up the following here:
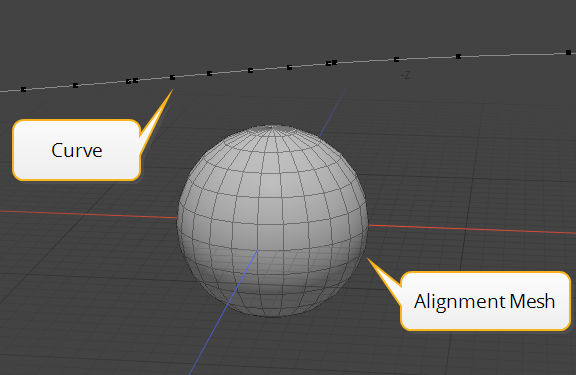
• Alignment Mesh - You can align the newly created curve points to another mesh by specifying one here. The points of the curve then find the nearest positions on the alignment mesh and snap to those. You can adjust the Base Position, Offset, and Mesh Control settings in the Curve Rebuild Spans Properties.
|
|
|
|
The Sphere is specified as Aligment Mesh. |
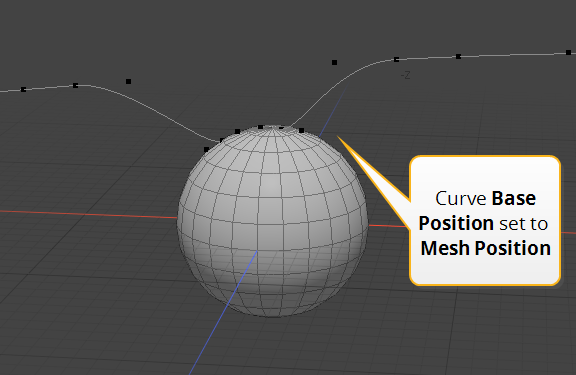
Curve is aligned to the Sphere's surface. |
• Selection - Select edges or modify your existing selection. For more information on procedural selection, see Procedural Selection.
Curve Rebuild Spans in the Schematic
You can work with the Curve Rebuild Spans mesh operation in the Schematic viewport too.
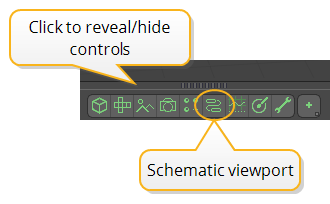
To open the Schematic viewport:
• In the Modo layout, click the thin gray line below the 3D viewport, and click the Schematic viewport ![]() button.
button.
>
MadCap:conditions="Default.NoTranslate">OR
• Switch to the Setup layout from the menu bar by clicking Layout > Layouts > Setup.
To add the Curve Rebuild Spans node:
| 1. | Click Add..., and under Mesh Operations > Curves, double-click Curve Rebuild Spans. |
This adds the node to the viewport and opens its properties on the lower right panel.
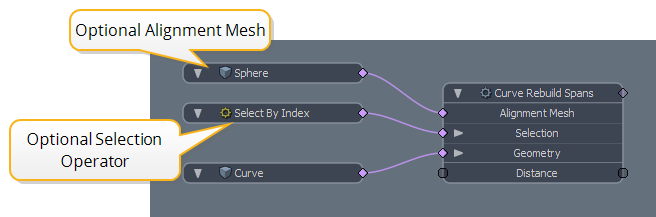
| 2. | Connect the curve mesh to the Curve Rebuild Spans node's Geometry input. |
| 3. | If you're using an Alignment Mesh, or a Selection operator, connect them to the Alignment Mesh and Selection inputs, respectively. |
| 4. | Adjust the Curve Rebuild Spans properties as needed. |
Curve Rebuild Spans Properties

Curve Span Rebuild
|
Apply |
Changing the Base Position to use an attached mesh or altering the offset amount moves the newly created points off the existing curve. The Apply value controls how much that offset is applied. 0% means that any new points will lie on the existing curve span, while 100% means any potential offsets are fully applied to the new point positions. |
|
Base Position |
Determines the non-offset position of the newly created curve points. The options are: • Curve Position - All new points are created along the existing curve. • Mesh Position - If an input mesh is connected to the mesh operation's Alignment Mesh input, the new points can be created on the surface of the connected mesh. The location on the mesh surface is determined by the Mesh Control options. |
Respanning
|
Mode |
Determines how new points are created along the existing spans. The options are: • Count - New spans are created by subdividing each selected span equally a discrete number of times. • Distance - Each span is split until the distance between each new span is less that the specified Distance value. |
|
Count |
The number of new spans to create for each selected span when Mode is set to Count. |
|
Distance |
The maximum length of a span before it is subdivided when Mode is set to Distance. |
Offset
|
Offset Amount |
The distance by which the points are pushed. |
|
Offset Mode |
Specifies the way of determining the direction of the offset. The options are: • Mesh Normal - Pushes spans out in the direction of the mesh normal found through the Mesh Control settings. • Vector - Pushes spans out in a specific X,Y,Z vector direction. • Curve Normal - Finds the orientation of all points on the original curve and pushes the spans in that direction. |
|
Broken Tangents |
Tangent handles on either side of a new point may be offset by different amounts, resulting in broken tangent handles. By default, the offsets are averaged to provide a smooth curve point, but enabling Broken Tangents turns this behavior off. |
Mesh Control
|
Normal Method |
Determines the way the location on the input mesh surface is found. The position/normals from the points on the mesh are then used for the Base Position or Mesh Normal offset modes. The options are: • Closest - Curve points are offset to the closest point on the surface to the new curve point. The new points find their closest matched surface location. • X, Y, Z Axis - Curve points find the nearest surface toward the specified axis. • User Vector - Identical to the X,Y, and Z axis options, but rather than using a standard direction, you can specify a vector. • Curve Normal - Similar to User Vector, but the vector is determined by the normal of the original curve. |
|
Max Search Distance |
When Normal Method is set to Closest, this is the maximum distance away from the new points the mesh can be found. |
|
Flip Search Vector |
When enabled, Modo looks for geometry in the negative direction. For instance, if the Normal Method is set to Y Axis, Modo looks for the first geometry from the positive Y position down through the curve. |
Falloff
|
Falloff By Parameter |
The push amount decreases as the distance of a new point to an original curve point increases. |
|
Falloff Mode |
When Falloff By Parameter is enabled, here you can specify the Falloff type. The available options are: • Linear • Ease In • Ease Out • Smooth |