Radial Sweep
The Radial Sweep tool creates geometry by revolving the selection around a central point. The geometry can be a Modo curve profile or a polygon silhouette shape. You can use this tool to create simple round objects such as bottles, plates, or goblets. The Radial Sweep tool is also useful for creating objects such as springs by using the Offset control to not only spin the selected geometry while sweeping it but also move the new elements along the tool's axis. You may not receive satisfactory results when sweeping closed shapes such as cubes and spheres.
Activate the Radical Sweep tool by clicking Radical Sweep in the Duplicate sub-tab of the modeling toolbox.
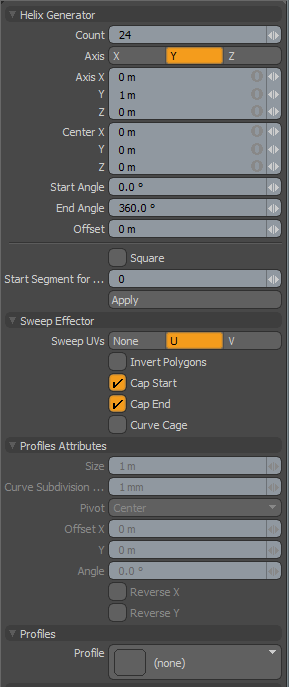
Radial Sweep Properties
|
Helix Generator |
|
|---|---|
|
Count |
Determines the number of new segments generated by the tool. |
|
Axis |
Determines along which axis to sweep the geometry. |
|
Axis X/Y/Z |
Determines the location of the tool's Axis control handles. If you set all the values to 1 m, Modo sets one end at (-1,-1,-1) and the other end at (1,1,1) to create an skewed-off axis plane for the array. |
|
Start Angle |
Determines the rotational placement first lathed geometry. |
|
End Angle |
Determines the rotational placement for the last lathed geometry. Note: By default, the Start Angle and End Angle are 0 to 360 degrees. This creates an array that completes a circle. By changing these two values, you can create an array that revolves many times or one that leaves one side of the circle open. You may want to set the End Angle value greater than 360 degrees when combined with a non-zero Offset value to create a spiral. |
|
Offset |
Moves each successive segment a user-defined distance from the previous segment along the tool's axis. This is useful when combined with an End Angle greater than 360 degrees to create a spiral for items such as a spring or a telephone cord. |
|
Square |
Enables Square mode. The segments to sweep are aligned along a square. |
|
Start Segment for ... |
Specifies the offset of the start segment for Square mode. |
|
Sweep Effector |
|
|
Sweep UVs |
Determines along which UV axis (U or V) to span the newly created geometry. |
|
Invert Polygons |
Flips the polygons created by the tool. In some circumstances lathing geometry turns inside out. In this case, enable Invert Polygons to have the geometry face the correct direction. |
|
Cap Start |
Creates a cap on the start of the lathe to avoid a hole in the mesh. |
|
Cap End |
Creates a cap on the end of the lathe. Note: The Cap options are only useful when the start and end angles do not result in a complete 360 rotation. In this case, the start and end segments are joined together. |
|
Profile Attributes - If you wish, you can have Modo sweep a preset profile as readily as selected geometry. Select a profile in the Profiles section of the tool's Properties panel. |
|
|
Size |
Determines the size of the 1D or 2D profile to sweep. If the size is 0.0, Modo uses the actual size. |
|
Curve Subdivision Tolerance |
Controls the detail tolerance of the conversion from the original curve to the resulting sweep. This is the minimum angle Modo uses when it subdivides the Bezier curve into a string of two-point polygons for extrusion. |
|
Pivot |
Specifies the pivot position of the profile. |
|
Offset X/Offset Y |
Specifies the distance of the profile space. Modo adds this value to the Pivot position. |
|
Reverse X/Reverse Y |
Flips the selected profile in the horizontal or vertical direction. |
Related Videos
Radial Sweep - Square
Radial Sweep in the Procedural
The Radial Sweep tool is also available as a procedural mesh operation. You can find the tool in the Mesh Ops tab. In the Model layout, the tab is on the right side of the interface, next to the Item List.
To add the Radial Sweep mesh operation:
| 1. | Click the Add Operator button, expand Mesh Operations and double-click Circle, or enter its name in the search bar. |
| 2. | Click the Add Operator button, expand Mesh Operations > Duplicate, and double-click Radial Sweep, or enter its name in the search bar. |
| 3. | In the Mesh Operations list, select Circle, open the Circle tab in Properties, and set Position X to 1.171 m. |
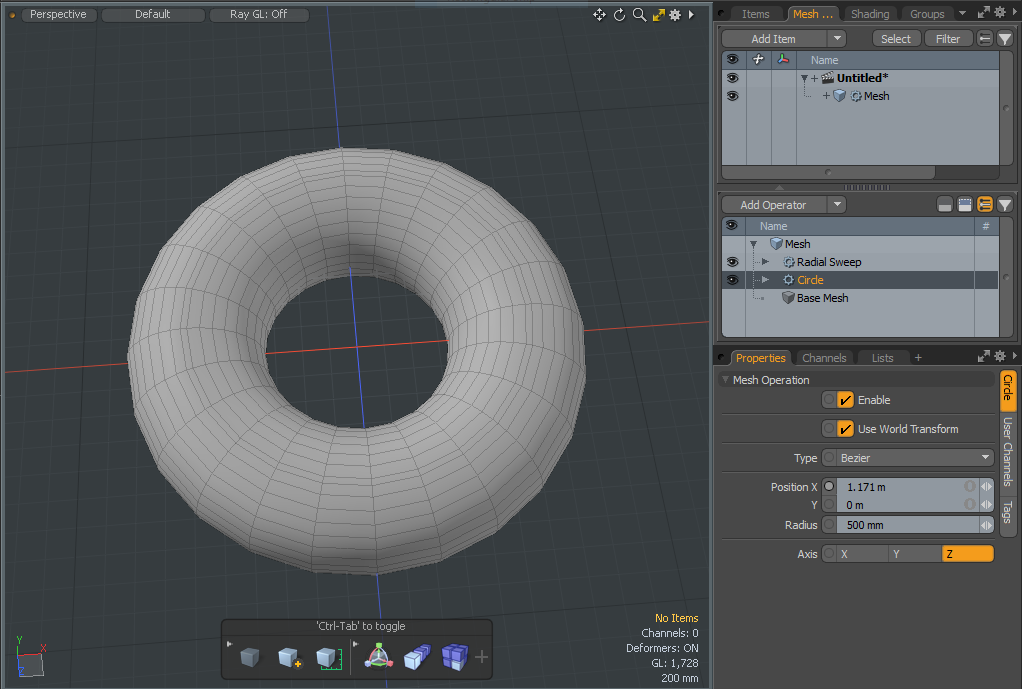
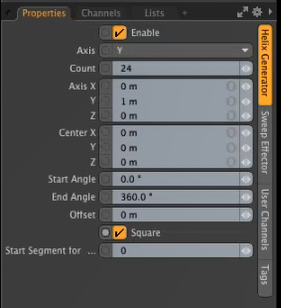
| 4. | In the Mesh Operations list, select the Radial Sweep item, open the Helix Generator tab, and enable Square. |
The circle is converted to a square.
| 5. | Set Start Segment for ... to 3 and then increase the value to 5, and then 7. |
The offset for the start segment is updated in the 3D viewport.
Radial Sweep Input Operations
Radial Sweep can use the following inputs:
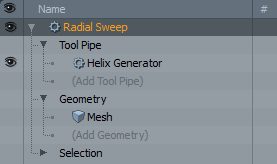
• Tool Pipe - Allows you to add falloffs and sub-tools to the operation. As you can see in the image above, when you add a Radial Sweep, Helix Generator is automatically added to its Tool Pipe. The procedural Helix Generator has the same properties as the traditional tool, described in Radial Sweep.
• Geometry - This lists any geometry that is affected by the tool. Meshes are connected automatically if they are below the tool in the Mesh Operations list. You can connect additional meshes by clicking (Add Geometry) to open the Preset Browser. From there you can select an existing mesh or add a new, empty mesh.
• Selection - Allows you to select the elements to which you want to apply the tool.
Note: The Geometry input is only visible when the list is not in Solo mode. For more information, see Solo Mode.
The Radial Sweep mesh operation has the same properties as the traditional Radial Sweep tool. See Radial Sweep Properties.