Working with Bake Items and Baking Tools
Modo has a set of tools to simplify baking located in the Game layout toolbox on the left panel, under the Baking sub-tab. For more information, see Creating Bake Items using the Toolbox Baking Tools.
In addition, a number of other baking tools are available in the Mesh Operations list from the Bake contextual menu. From this menu, you can bake occlusion, illumination, normals, displacements, texture effects, vertex shadings, vertex curvatures, and bake to an Alembic file. For more information, see Creating Baked Items using the Mesh Operations list Bake Tools.
Note: If you're unfamiliar with baking in Modo, it would help to read Baking to familiarize yourself with the concepts discussed in this section.
Understanding Bake Items
A Bake Item contains all the settings needed for a bake operation. By storing the settings in a single item, you can quickly edit and re-trigger a bake without having to reconstruct the bake from scratch.
The Shader Tree supports multiple bake items, allowing you to perform multiple bakes in sequence.
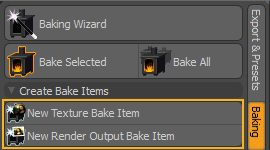
• You can add bake items using the Games Layout Baking tools in the Toolbox, namely the New Texture Bake Item, New Render Output Bake Item options, or by using the Baking Wizard. Each bake item is added to the Shader Tree in the Bake Items List.
For more information, see:
• Creating Bake Items using the Toolbox Baking Tools
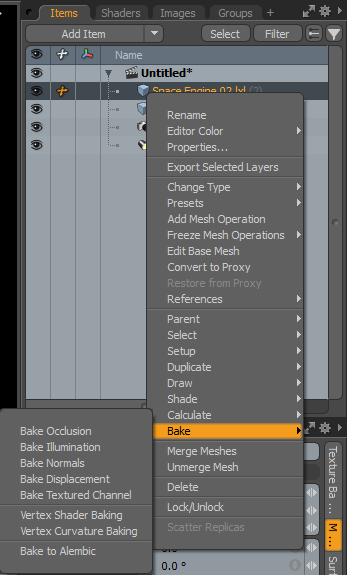
• You can add bake items using the Items List contextual menu by selecting Bake and then specifying the type of bake you want to apply. A variety of bake options are available. For more information on how to create a bake item using this technique, seeCreating Baked Items using the Mesh Operations list Bake Tools.
Applying a Basic Workflow
When using a Bake Item, follow these general steps:
| 1. | Create a bake item of the preferred type. |
| 2. | Edit the Bake Item Properties according to the type of bake required. |
| 3. | Bake your scene, either locally or on a render farm. |
Once baked, you can return to step 2 to modify the bake properties if needed.
Creating Bake Items using the Toolbox Baking Tools
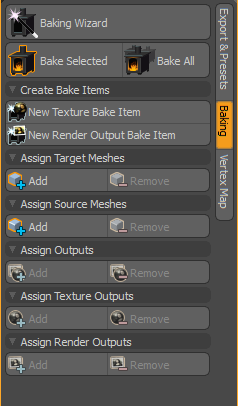
Bake Items can be made using the Game layout and applying the tools located in the toolbox's Baking sub-tab. To create a bake item, select one of the following:
|
Baking Tool |
Description |
|
New Texture Bake Items |
Creates a bitmap texture of one or more Shader Tree texture layers. These are baked to an Image Map in the Shader Tree. |
|
New Render Output Bake Items |
Creates a rendered image that can be saved and applied back to the surface as a texture map. These are baked to one of the Render Outputs. Tip: For more information on the baking output types, see Baking. |
A new Bake Item is added to the Shader Tree, in the Bake Items section.

Note: You can remove a Bake Item from the Shader Tree using the Delete key.
Once added, select what is fired using either the Bake Selected or the Bake All option and configure the Properties as required in the right panel.
|
Property Option |
Description |
|
Item Name |
Depending on the baking option selected in the Game layout Baking Toolbox, the Item Name updates automatically and the appropriate options display. • Texture Baking - By selecting the New Texture Bake Item option, a Texture Baking item is listed in the Texture Bake Items tab of the Properties panel. • Mesh Feature - By selecting the New Render Output Bake Item option, an Output Baking item is listed in the Render Output Bake Item tab of the Properties panel. |
|
Fires bake items that are selected in the Shader Tree. |
|
|
Fires all bake items. |
|
|
Target Meshes |
Specifies the target meshes of the bake item. |
|
Source Meshes |
Specifies the source meshes of the bake item. |
|
Render Outputs |
Specifies the output textures of the bake item. |
|
UV Map |
Specifies the target UV map of the bake item. This option is not available for Texture Bake Items. |
|
Bake from Source |
Selects whether the outputs should be baked from the source meshes to the target meshes (an object-to-object bake). If this is enabled and no source meshes are set, then all meshes without the target UV map are automatically used as the source meshes for this bake. If disabled, then the outputs are baked directly from the target meshes back onto themselves. (for example, for baking procedural items down to textures). |
|
Cage |
Specifies the projection cage the baked item is baked with. |
|
Distance |
Specifies the distance that rays should be cast from the target mesh in order to find a source mesh to bake from. This value is overwritten by the bake cage, if one is selected. |
| Use Normal Map Preset |
Selects whether the current normal map preset should be automatically applied to normal maps before baking (the preset applies tangent basis, sets up Invert Green channel and Tangent Type channels, as well as disabling color creation for the normal map). For more information, see Image Map and Editing Normal Map Presets. Note: Available for Texture Baking items only. |
|
Visibility Overrides |
|
|
Bake Hidden Targets |
When enabled, bakes to all connected target meshes, even if they are hidden. |
| Bake Hidden Sources | When enabled, bakes from all connected source meshes, even if they are hidden. |
| Bake Hidden Outputs | When enabled, bakes to all connected outputs, even if they are hidden. |
| Outputs | |
|
Save Outputs to File |
Selects whether baking results are saved directly to a file after baking. Render Output Bake items are found in the Render window while changes to the output images from Texture Bake items can be saved from the Images/Clips List. If this option is disabled, outputs must be saved manually. |
| Output Filename | Specifies the file name and pattern for outputting bake results. |
| Output Directory | Specifies the root folder for outputting bake results. |
|
Image Format |
Presents a dropdown menu to specify formats for Output Baking items only. |
| Bake to Channels | |
| Render Output Filter |
Specifies the RGBA component(s) value used to filter the render output. The following options are available: RGB, RGBA, Red, Green, Blue, and Alpha. This option is disabled by default. Available for Texture Baking items only. |
| Texture Swizzling Override |
Specifies the RGBA component(s) value to use to filter the texture output. The following options are available: RGB, Red, Green, Blue, and Alpha. This option is disabled by default. Available for Texture Baking items only. |
| Resolution | |
|
Width |
Specifies the width of the output image in pixels. |
|
Height |
Specifies the height of the output image in pixels. |
|
UDIM |
|
|
Use UDIM |
Allows you use UDIM if your UV map uses UDIMs for texture placement, you can bake the UV regions to a set of UV tiles. |
|
Start UDIM |
Allows you to specify the start value for the UDIM. |
|
End UDIM |
Allows you to specify the end value for the UDIM. |
Configuring Bake Items
Bake Items are configured and fired using either the Baking tools panel or the item's Properties panel. The Properties panel provides a complete set of parameters and commands, whereas the toolbox panel provides basic baking commands.
You need to configure the bake item's parameters according to the type of bake that you're performing. For example, when baking Displacement Maps to a single texture, you only need to set the Texture Outputs. Also, when baking items for a Games workflow, use Object Normal Maps for static, non-deforming objects (environment, props, and so on) to render quickly in game engines.
Modo provides shortcut buttons to populate the bake item parameters, including source meshes, target meshes, UV maps, and the different output types. These items are added to the bake item by first selecting the item(s) in the Shader Tree, and then using one of the following buttons:
• Set - Set the value of the parameter to the selected item.
• Add - Add the selected item to the parameter options list.
• Remove - Remove the selected item from the parameter options list.
You can either use the Baking panel or the bake item's Properties panel to assign the parameters.
Using the Baking Panel
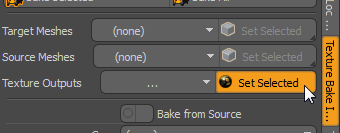
The Baking panel offers a full set of Add and Remove buttons that operate on the selected bake item. Each button becomes active when the corresponding item type is selected in the Items List or Shader Tree. For example, if you add a new bake item and select a mesh (or meshes) in the Items List, the Add buttons become active for adding the mesh(es) as a source or target, as shown below:
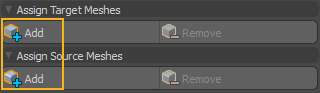
If a selected item has already been added to the bake item, the Remove button becomes active.
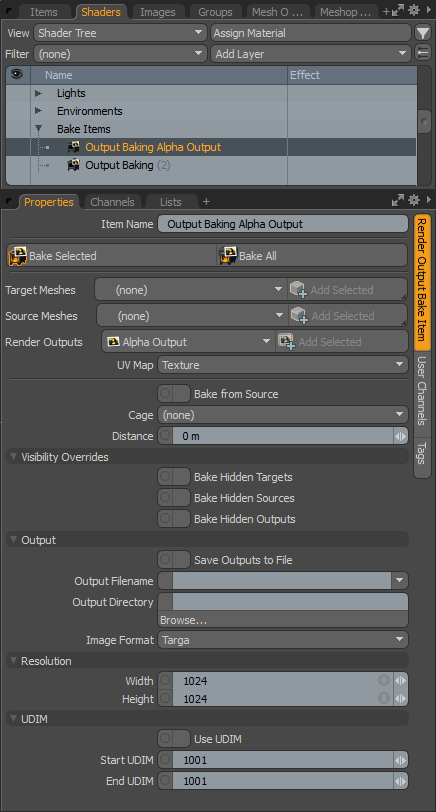
Using the Properties Panel
Unlike the Baking panel, the Texture Bake Item tab in Bake Item Properties panel contains only parameters and commands that are specific to the bake item type.
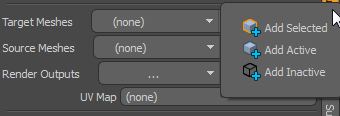
You can add, remove, or set each parameter as required. It's sometimes useful to apply these operations to certain items depending on their state. For this reason, Modo offers three options for add, remove, and set:
• Selected - Apply to only selected items.
• Inactive - Apply to all background items.
• Active - Apply to all foreground items.
Click on the corner of each button to access the three options.
Set and remove values as follows:
• Ctrl+click the buttons to remove items.
• Alt+click the buttons to set the parameter to the selected item(s).
When selecting items from the Shader Tree to use in the bake item, be careful to keep the bake item selected by Ctrl+clicking the Shader Tree items. This way the Texture Bake Item remains available in the Properties panel.
Multiple Selections
If you highlight and add multiple items, such as choosing multiple source/target meshes, or outputs, the items are combined and labeled as (mixed), as shown below.

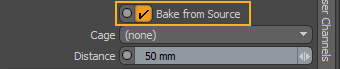
Bake from Source
When baking from Source Meshes, you must check Bake from Source, and specify a bake distance or a Morph Map to be used as a Cage.
Note: You can bake from all meshes that are not identified as a target by checking Bake from Source and leaving Source Meshes set to (none). If you also leave Target Meshes set to (none), Modo automatically identifies the target by checking against the UV map that is associated with the output.
Visibility Overrides
The Bake Item offers three options for including hidden items in the bake. This allows you to configure the Bake Item and get the desired result from the bake, regardless of the visibility state of items in the scene. This eliminates the need to toggle foreground/background mesh visibility, and enable/disable render outputs, every time you want to bake.
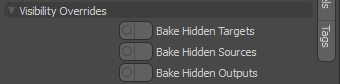
• Bake Hidden Targets - Bake to hidden target meshes.
• Bake Hidden Sources - Bake from hidden source meshes.
• Bake Hidden Outputs - Bake to hidden Render Outputs.
Previewing Bake Items
Both the 3D (OpenGL) Viewport and the Preview Viewport allow you to preview bake results. See Ray GL and Preview Bake Mode
Texture Bake Items
To bake to a texture layer for inclusion in your scene, use a Texture Bake Item. Common uses for Texture Bake Items include Displacement Maps and Normal Maps.
Texture Bake Items use the following items:
• Target Meshes - One or more target meshes for the bake.
• Source Meshes - One or more source meshes to be used in the bake.
• Texture Outputs - A texture layer to receive the bake.
Baking to a Texture
By baking to a selected texture, you can do the following:
• Generate a bitmap texture from one or more Shader Tree texture layers, such as combining several Normal layers.
• Convert procedural texture layers to a single layer for Displacement Map freezing.
• Pre-compute render-intensive effects, such as Ambient Occlusion.
To use a Bake Item to bake to a texture, you must choose one or more image texture layers from the Shader Tree. The baking process then chooses the correct items to bake from, and the UV map to bake to. The results are baked to the Texture Outputs.
Note: For more information on this type of baking, see Bake to Selected Texture.
Let's say you have a mesh with three Displacement Maps. In this case, Wood, Weave, and Dots. The mesh also has a UV map.
Use a Bake Item to merge the three layers.
| 1. | Add a new, blank Image Map to the Shader Tree to receive the bake: |
In the Shader Tree, click Add Layer, and select Image Map > (new image).
In the file browser, select the image format and filename. Click Save.
On the New Still dialog, configure the image details and click OK.
| 2. | Hide the new image by toggling the paintbrush in the left column. |
| 3. | Set the Effect of the new image to be the same as the layers that you're baking, in this case Displacement. |

| 4. | Click New Texture Bake Item. |
The Bake Item is added to the Shader Tree.
| 5. | Select the Bake Item to open its Properties. Ensure the Texture Bake Item tab is selected. |
| 6. | Set the Texture Outputs to the new Image Map. |

| 7. | Click Bake Selected to fire the bake. |
This opens the Render Display and shows the bake process.
| 8. | When the bake is finished you can save the image using the Save Image button in the Render Display. |
| 9. | Now that the image is baked, you can see the results by hiding the original Displacement layers, showing the new baked image in the Shader Tree, and re-rendering the mesh. |
Note: The slight difference in detail is due to the relatively lower resolution of the target image layer.
Tip: Texture Bake Items have an option to use the current normal map preset, which means that the selected tangent basis is automatically applied and any generated normal maps are set up according to the current normal map preset's settings before baking happens. To enable this, in the Texture Bake Item's Properties panel, enable the Use Normal Map Preset checkbox.
Baking from an Object to a Selected Texture
The Texture Bake Item can be used to generate Displacement Maps and Normal Maps, baked from a high-resolution source mesh (or meshes) to a low resolution target mesh (or meshes). You can also bake other map types as required. This is useful for creating assets for real-time environments (such as game engines) and transferring detail from objects to a texture for further modification.
Note: For more information on this type of baking, see Bake from Object to Selected Texture.
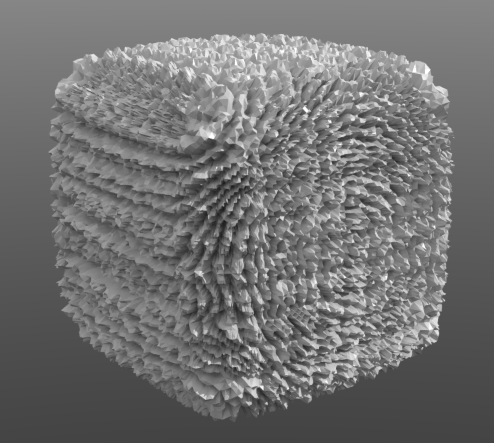
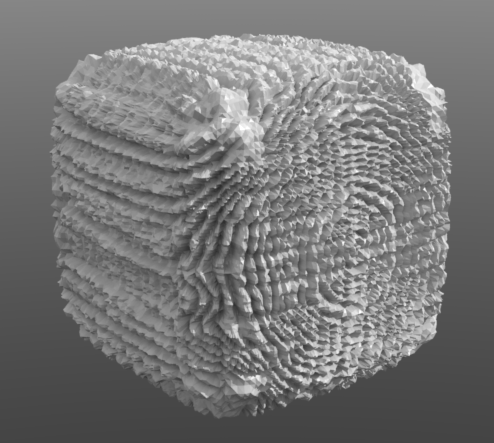
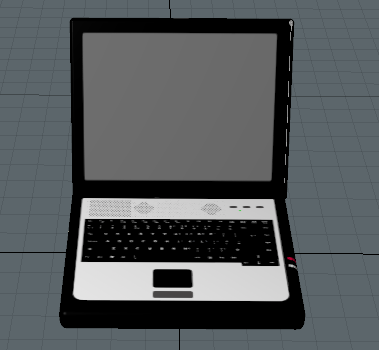
Let's say we have a detailed mesh (pictured left) and we would like to bake a Normal Map and Diffuse Color texture to a low poly model (right). The low poly model has a UV with no overlapping islands.
Note: The order of the meshes in the item list does not affect the bake.
|
|
| A high poly source mesh. | The low poly target mesh. |
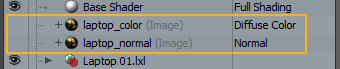
| 1. | Add two new image layers, set the Effect of one to Diffuse Color, and the other to Normal. |
| 2. | Hide both layers. |
| 3. | Click New Texture Bake Item to add a Bake Item to the Shader Tree. |
| 4. | Set Target Meshes to the low-resolution mesh. |
| 5. | Set Source Meshes to the high-resolution mesh. |
| 6. | With the Bake Item selected in the Shader Tree, Ctrl+click the two image layers to select them. |
| 7. | In the Texture Bake Item tab in the bake item's Properties, hold Alt and click Set Selected for the Texture Outputs. |
Texture Outputs is now set to (mixed) to indicate a multiple assignment.
| 8. | Check Bake from Source. |
| 9. | In this case we are not using a Cage, so set the Distance to a suitable length, say 200 mm. |
| 10. | We are now ready to bake. Click Bake Selected in the Properties. |
The Render Display opens and the images are baked in sequence.
You can now save the images and apply them to the low-resolution mesh, as shown below:
|
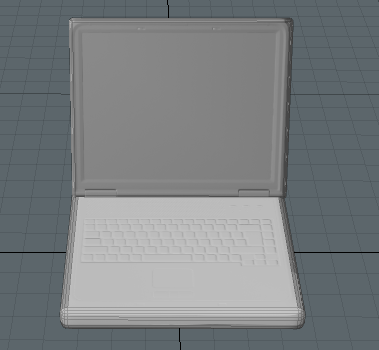
|
| Low poly mesh with baked Diffuse Color texture. | Low poly mesh with baked Normal Map. |
Baking Render Output Bake Items
The second type of Bake Item is the Render Output Bake Item. This operates in a similar way to a Texture Bake Item, but it bakes to Render Outputs, which can be saved and re-applied to the mesh. Common uses include Ambient Occlusion Maps and Final Color Maps
Render Output Bake Items use the following items:
• Target Meshes - One or more target meshes for the bake.
• Source Meshes - One or more source meshes to provide content for the bake.
• Render Outputs - A Render Output layer to receive the bake.
• UV Map - The target UV map.
Note: Unlike Texture Bake Items, Render Output Bake Items are baked in a single pass, and not in sequence. The results can be selected using the Output dropdown in the Render Display.
Output
You can choose an output filename and directory for the baked output. The bake is automatically saved to this directory.
|
Render Output Bake Item: Output |
|
|
Save Output |
Check this to save the output to the given filename and directory. |
|
Output Filename |
Choose a pattern for the filename. |
|
Output Directory |
The destination directory for the bake result. |
|
Image Format |
The image type. |
Resolution

This determines the pixel resolution of the output.
UDIM
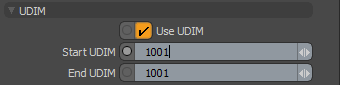
If you're using UDIMs, you can bake multiple tiles by checking Use UDIM, and entering the range as defined by Start UDIM and End UDIM.
Note: For more information on using UDIMs, see UDIM Workflow
Baking to Render Outputs
You can use a Render Output Bake Item to bake surface texturing to one or more of the Render Outputs
You can choose one or more Target Meshes, one or more Render Outputs, and one or more Source Meshes. You must also choose a UV Map from the target(s).
Note: For more information on this type of baking, see Bake to Render Outputs.
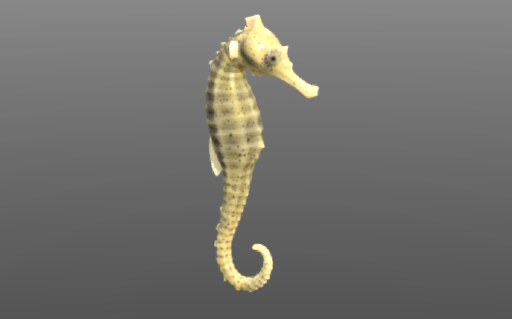
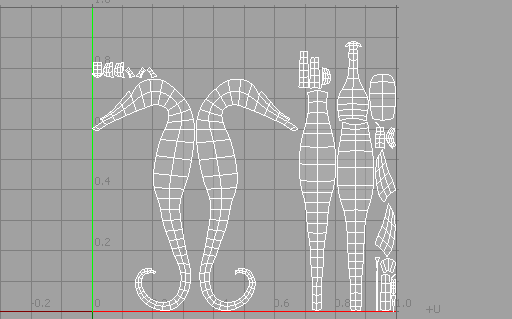
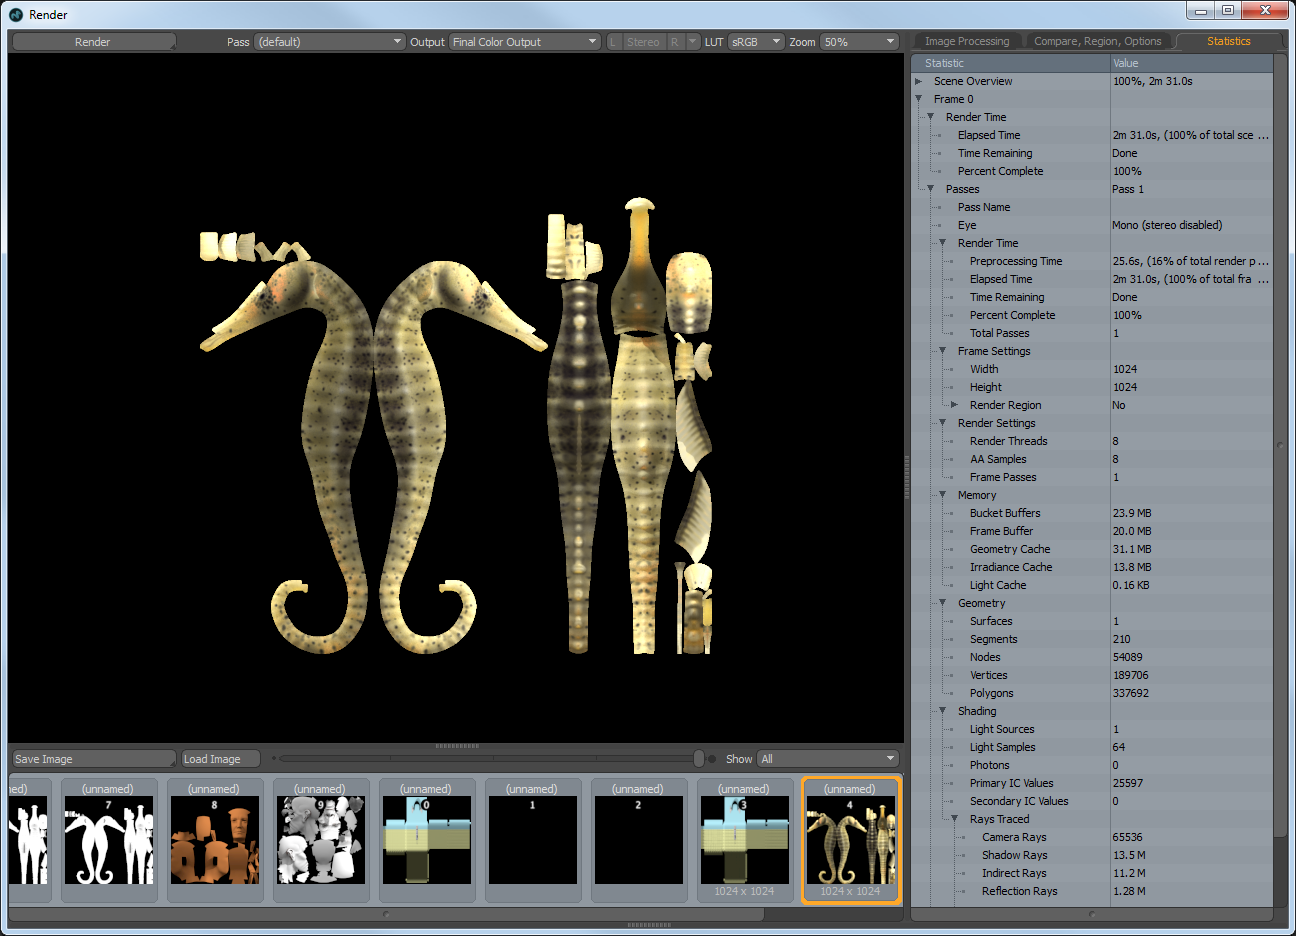
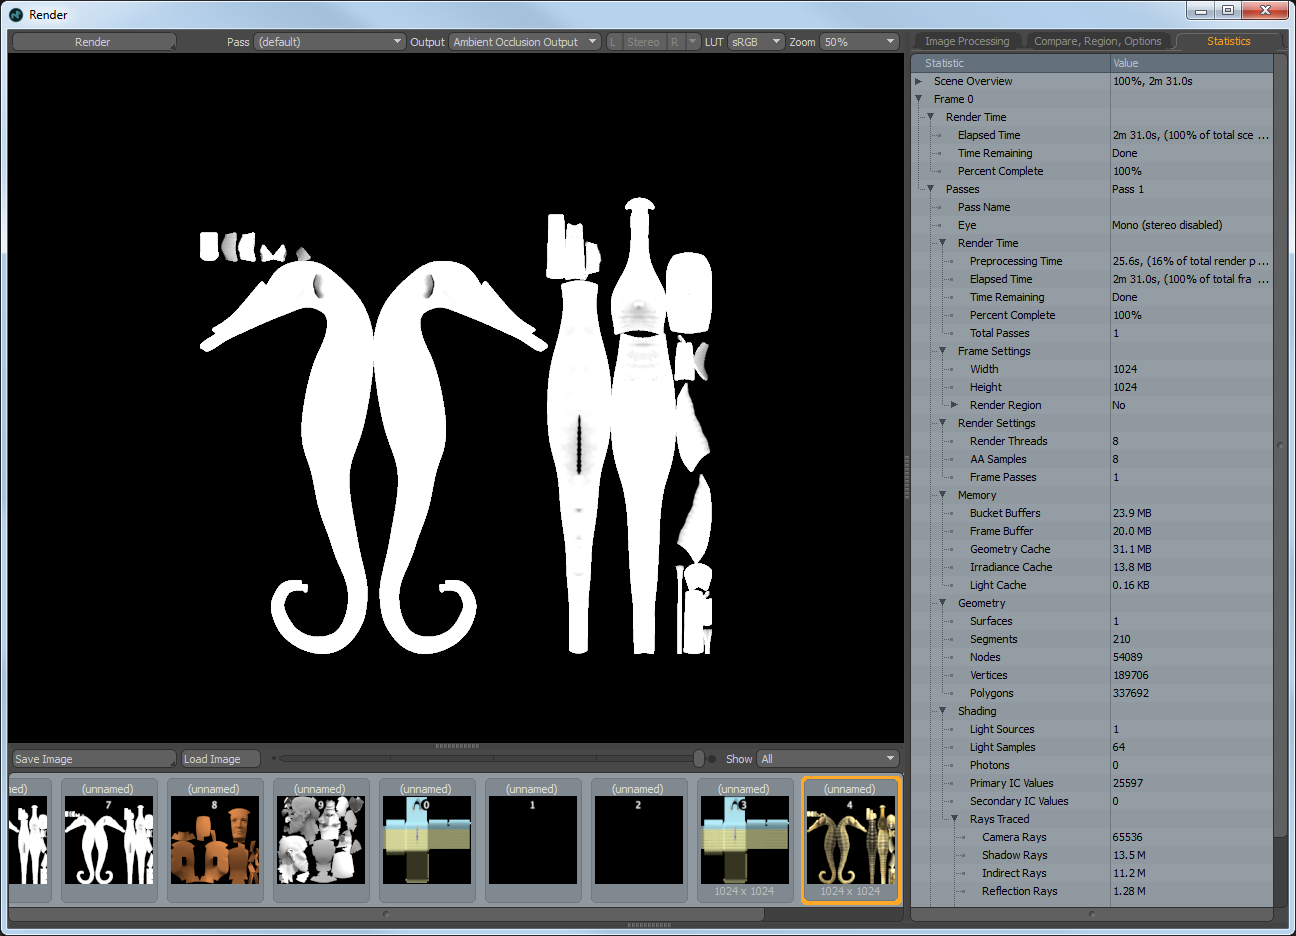
Let's say we have a detailed mesh (the seahorse below) and we want to bake out the Ambient Occlusion and the Final Color Output. Let's also save the files using the Bake Item. The mesh UV map is shown on the right.
|
|
| 1. | There must be a Final Color Output and an Ambient Occlusion Render Output in the Shader Tree. A Final Color Output is present by default. To add an Ambient Occlusion output, click Add Layer and select Render Outputs > Lighting > Ambient Occlusion. |
| 2. | Click New Render Output Bake Item to add a Bake Item to the Shader Tree. |
| 3. | With the Bake Item selected, Ctrl+click the Final Color Output and the Ambient Occlusion Output in Shader Tree. |
| 4. | In the Texture Bake Item tab in the bake item's Properties, hold Alt and click Set Selected for the Render Outputs. |
| 5. | Set the UV Map to use for the bake. This is the UV map pictured above. |
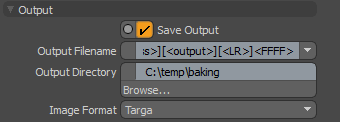
| 6. | Check Save Output. |
| 7. | To save both Render Outputs to separate files, set the Output Filename to [<pass>][<output>][<LR>]<FFFF>]. |
Note: The presence of the [<output>] tag ensures a different file is produced for each Render Output type.
| 8. | Click Browse... and choose the Output Directory. |
| 9. | Click Bake Selected to fire the bake. |
The Render Display opens and the bake begins. When complete, the outputs are saved.
|
|
The image below shows the original mesh, frozen and textured with the output generated by the Final Color Output. This was inserted into the Shader Tree as an Image Map.

Bake from Object to Render Outputs
The Render Output Bake Item can be used to bake from high-resolution source meshes to low-resolution target meshes, transferring the surface from one object to another.
Note: For more information, see Bake to Render Outputs.
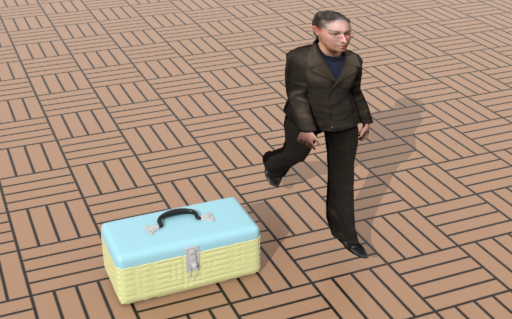
By default, the Render Output Bake Item bakes the entire scene to the target mesh. If you want to bake parts of the scene (such as a single character), you can assign each part to the Source Meshes parameter.
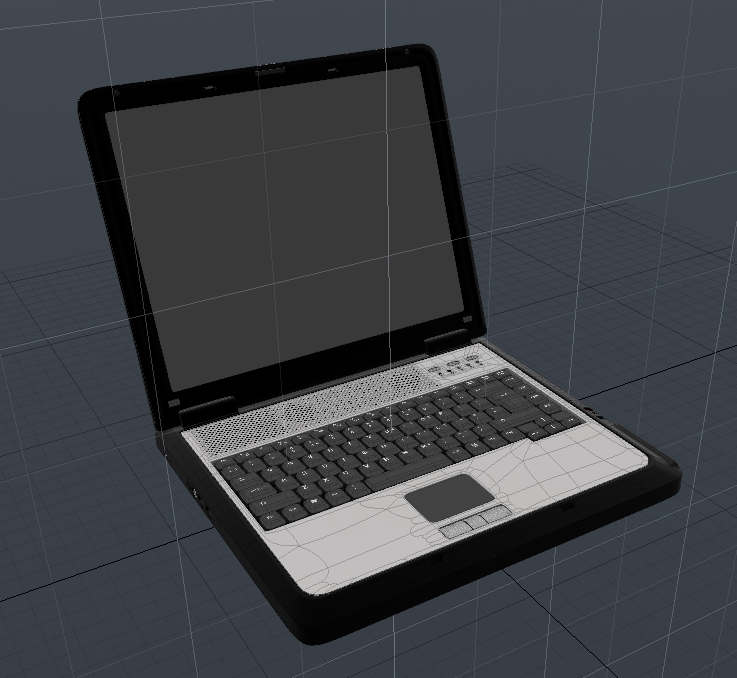
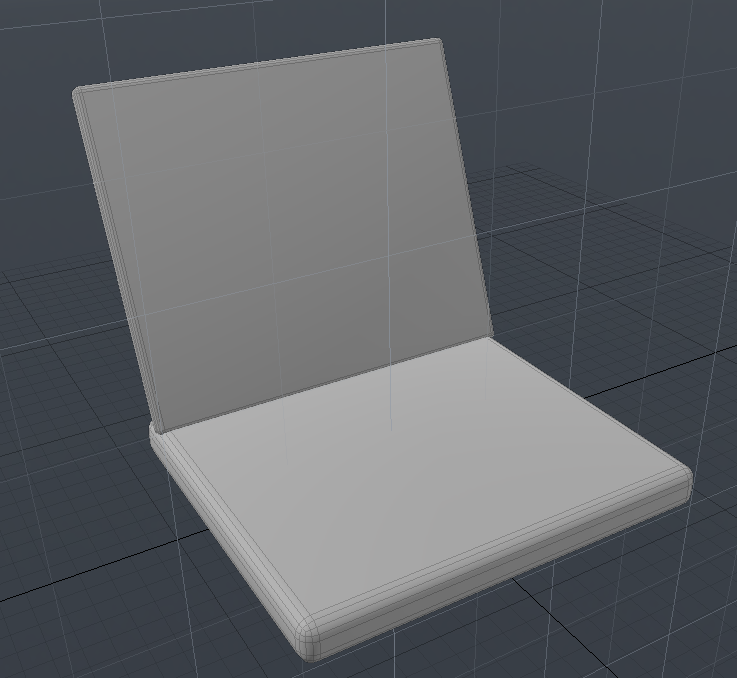
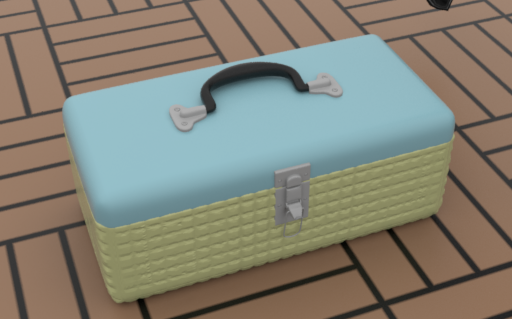
Let's say we have a scene with a human figure and a box, on a parquet floor as shown below. The box details is shown on the right.
|
|
The low poly box has a UV map to receive the bake. Each object is on a separate mesh layer:
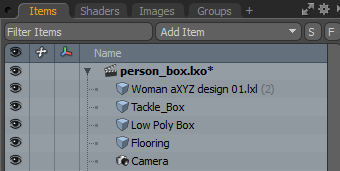
Let's use a Render Output Bake Item to bake the high-resolution box to a low-resolution version, ignoring the other meshes in the scene.
| 1. | Click New Render Output Bake Item to add a Bake Item to the Shader Tree. |
| 2. | In the Bake Item Properties, select the Render Output Bake Item tab. |
| 3. | Select the low-resolution mesh from the Target Meshes dropdown. |
| 4. | Select the high-resolution mesh from the Source Meshes dropdown. |
| 5. | Set Render Outputs to Final Color Output. |
| 6. | Set UV Map to the low-resolution box UV map. |
| 7. | Check Bake from Source. |
| 8. | Set Distance to a suitable value, such as 100 mm. |
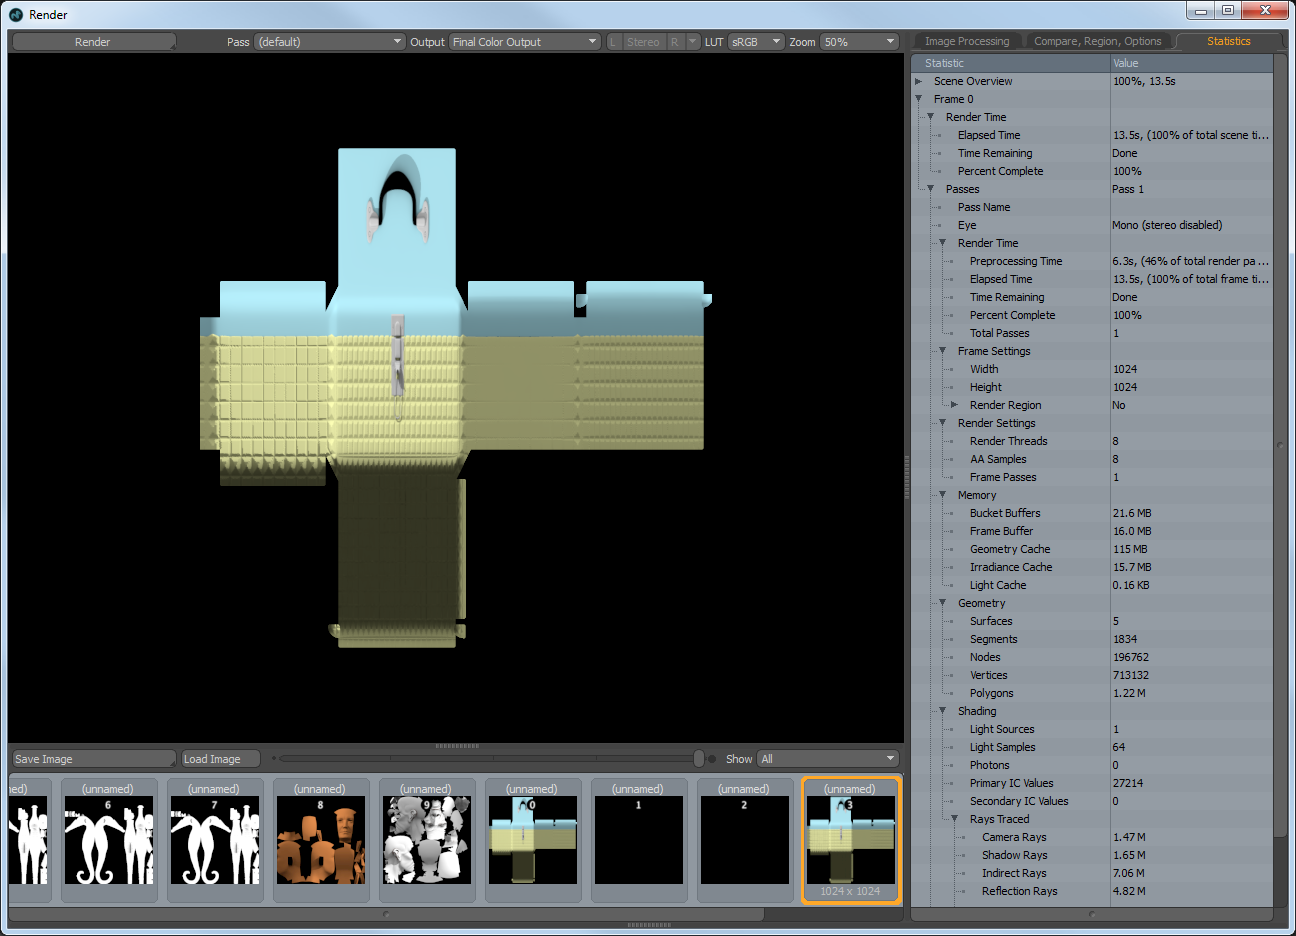
| 9. | Click Bake Selected to fire the bake. |
The Render Display opens and the bake begins.
| 10. | Once the bake is finished, save it by clicking Save Image on the Render Display. |
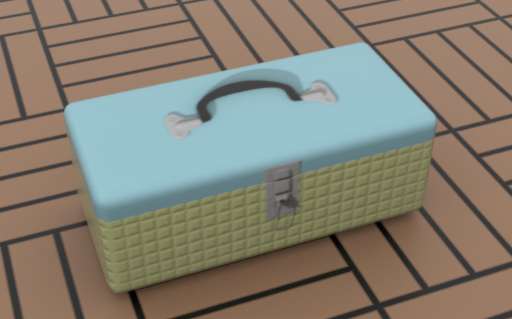
The image below shows the final bake loaded into the scene and applied to the low-resolution mesh.
Using the Bake Wizard
Modo provides a Bake Wizard to guide you through the baking process. You need to have the source meshes, target meshes, and UV maps in place (depending on the bake type) before using the wizard.
In addition to replicating the features offered by the Bake Item, the Bake Wizard lets you auto-generate outputs as required. This means you don't have to add the output to the Shader Tree in advance. If you use this feature, you can assign the output to a target Material, and Modo automatically slots the baked output into the Material.
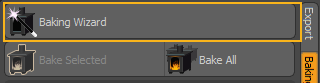
Click Baking Wizard on the Baking tab in the Toolbox to open the wizard.
The Bake Wizard has four pages. Configure each page and step through using the Next Step button. Each page is explained in the following sections. Once configured, click Bake Only to fire the bake.

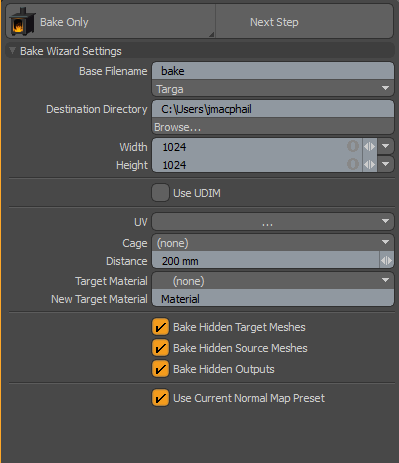
Bake Wizard - Step One - Mode of Operation and Settings
The Bake Wizard dialog has three modes of operation, determined by the selection in the top-center button. Right-click on Bake Only to view the option and select the mod of operation you want to use.
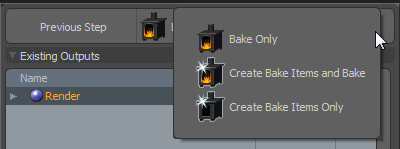
• Bake Only - Just bake, don't generate a Bake Item.
• Create Bake Items and Bake - Bake and add a configured Bake Item to the Shader Tree.
• Create Bake Items Only - Don't bake, but add a configured Bake Item to the Shader Tree. You can then use the Bake Item to perform the bake.
Set Bake Wizard Settings and click Next to move to the next step.
|
Bake Wizard Settings |
|
|
Base Filename |
The filename prefix. You can also choose the preferred image format. |
|
Destination Directory |
Baked image destination directory. By default, it is set to your $HOME directory. |
| Width | Allows you to specify the width. |
| Height | Allows you to specify the height. |
|
Use UDIM |
Check this if you are using UDIMs. If checked, enter the Start and End UDIM tile positions. For more information, see UDIM Workflow. |
|
UV |
The UV Map that is used for the bake. |
|
Cage |
If you are using a Morph Map as a Cage, select this here. |
|
Distance |
If you are not using a Cage, set Distance to the preferred ray offset. |
|
Target Material |
The wizard lets you auto-generate a texture output or Render Output. This setting determines the destination material. |
|
New Target Material |
Set the name a new material group to be created for grouping any new outputs. |
|
Bake Hidden Target Meshes |
Bake to target meshes that are hidden. |
|
Bake Hidden Source Meshes |
Include all hidden source meshes in the bake. |
|
Bake Hidden Outputs |
Bake to hidden outputs. |
|
Use Current Normal Map Preset |
Texture Bake Items have an option to use the current normal map preset, which means that the selected tangent basis is automatically applied and any generated normal maps are set up according to the current normal map preset's settings before baking happens. |
Bake Wizard - Step Two - Source & Target Meshes
This page lets you select source and target meshes. Click in the Source column to toggle the mesh as a source. Click in the Bake column to toggle the mesh as a target.
Once done, click Next to move to the next step.
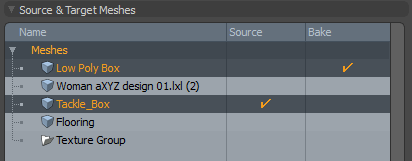
Note: You can select multiple sources and targets.
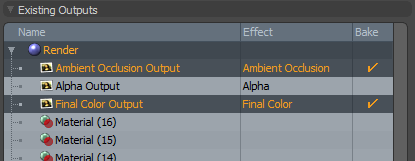
Bake Wizard - Step Three - Existing Outputs
This page lets you select outputs from those already in the Shader Tree. Click in the Bake column to toggle the output selection.
Bake Wizard - Step Four - New Outputs
This page lets you can create new outputs to receive the bake using pre-configured output types. This provides a convenient alternative to adding items in the Shader Tree.
Once selected, each selection is listed in the Bake Wizard dialog.
Once added, the output appears in the page. The following is an example of the texture Fur Bump added.
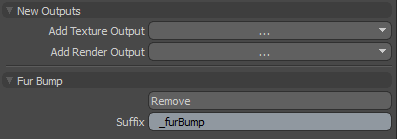
Each output has the following controls:
• Remove - delete the new output.
• Suffix - an identifying string to add to the new output name in the Shader Tree.
Each output may have additional parameters.
Once done, click Bake Only to fire the bake operation.
The Render Display window displays your results.
Schematic Nodes: Bake Items
Texture Bake Items and Render Output Bake Items are also available in the Schematic Viewport under the Bake Items category.
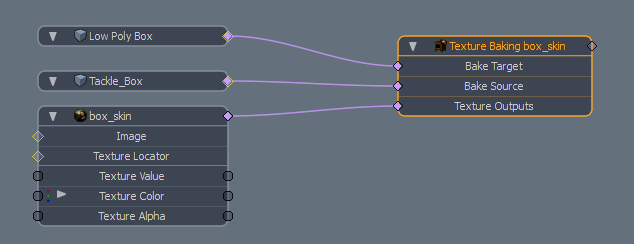
Schematic Node: Texture Bake Item
|
Texture Bake Item Node |
|
|
Bake Target |
Target meshes. |
|
Bake Source |
Source meshes. |
|
Texture Outputs |
Bake Texture Outputs. |
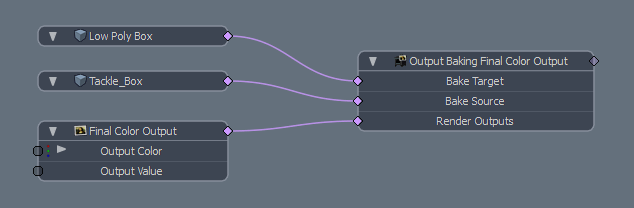
Schematic Node: Render Output Bake Item
|
Render Output Bake Item Node |
|
|
Bake Target |
Target meshes. |
|
Bake Source |
Source meshes. |
|
Render Outputs |
Bake Render Outputs. |
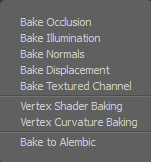
Creating Baked Items using the Mesh Operations list Bake Tools
From the contextual menu in the Items List, you can enable baking of certain mesh features. These bake options start a process of generating UVs, packing them, completing a bake (through a bake item), and a mesh sub-item is added to the Shader Tree automatically. You can then save the resulting bake to an image. Internally, the images are linked to the mesh, which makes them a sub-item of the mesh. The entire bake process happens through the use of a bake item that is added to the scene and it stores among other things the name of the folder where baked textures are saved to. The following options are available.
|
Bake Mesh Operation Option |
Description |
|
Bake Occlusion |
Bakes an occlusion map. Once created, an Ambient Occlusion Output clip file is saved to the Images tab in the Mesh Operations list on the left panel. For information on the available options, see Mesh Operation list Bake Options. |
|
Bake Illumination |
Bakes an illumination map. For more information, see Vertex Shader Baking. |
|
Bake Normal |
Bakes a normal map. Modo can either bake the normal textures applied to the item or do object-to-object baking if the mesh item has set the high-resolution mesh item link. This link is found in the mesh item properties. |
|
Bake Displacements |
Bakes a displacement map. A Displacement Map is a grey scale image that represents the difference in position between a low-resolution foreground mesh and a high-resolution background mesh. Modo can either bake the Displacement Map applied to the item or do object-to-object baking if the mesh item has set the high-resolution mesh item link. This link is found in the mesh item properties. For more information about how to generate Displacement Maps, see Bake from Object to Render Outputs. |
|
Bake Texture Channel |
Bakes textures applied on a selected texture effect. |
|
Vertex Shading Baking |
Bakes lighting and shading data, and applies it to vertex maps. Data is stored for each vertex. For more information about vertex maps, see Working with UV Maps. |
|
Vertex Curvature Baking |
Bakes the generated vertex Weight Maps of the concavity or convexity of a surface. For more information, see Vertex Curvature Baking. |
|
Bake to Alembic |
Bakes selected items to an Alembic file. For more information, see Baking to an Alembic File. |
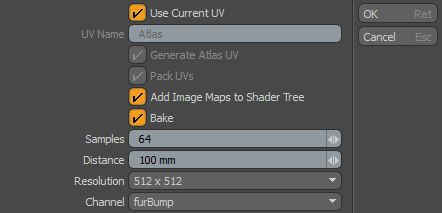
Mesh Operation list Bake Options
After selecting the bake option you want to process from the Mesh Operations list, a number of options are available.
|
Bake Option |
Description |
|
Use Current UV |
Uses the currently selected UV Map or the top most UV Map for the mesh item. |
|
UV Name |
If Use Current UV is not enabled, allows you to enter the name that will be used for the UV map. By default, Atlas is used. |
|
Generate Atlas UV |
Generates an Atlas UV map. |
|
Pack UVs |
Packs the UVs to control whether the UV islands can be moved from their current location. (A UV island is a connected group of polygons in a UV map.) Packing the UVs automates the process of organizing UV island data to fit into the desired UV space. |
|
Add Image Maps to Shader Tree |
Adds the baked textures to the Shader Tree. It creates a Bake group in the Shader Tree and inside it an item mask for each mesh item that was baked. The baked textures are stored in those masks. |
|
Bake |
Starts the bake. If you disable that no baking will happen which can be useful if you only want to generate UV maps |
|
Samples |
Specifies the number of sample for Occlusion baking and for Illumination baking. |
|
Distance |
Bakes the distance for Occlusion, Normal and Displacement Maps. |
|
Resolution |
Specifies the resolution of the baked texture. |
|
Includes All Surfaces |
For Occlusion and Illumination baking, indicates if the bake should take into account other objects in the scene. |
| Channel |
Bakes the texture effect channel. The following options are available: diffColor, envColor. fullColor, shadeAlpha, and shadeColor. Note: This is only available for the Bake Textured Channel option. |
Baking to an Alembic File
You can bake a scene from an imported Alembic item. In the following example, we walk you through the process of importing an Alembic file, setting a load options, and baking the item from the Item List.
To bake an Alembic item:
| 1. | Click File > Open, select your Alembic file, and click Open. |
The Alembic Load Options dialog displays.
| 2. | Set Polymesh streaming options to Alembic Streaming Meshes (polys only, force all) and click OK. |
For more information, see Importing Alembic Files in the Importing and Exporting File Formats topic.
| 3. | Make the appropriate property changes to your mesh. For more information, see Alembic Import Properties. |
| 4. | In the Item List on the right panel, expand the mesh item, right-click on the *_lowShape item, and select Bake > Bake to Alembic from the contextual menu. |
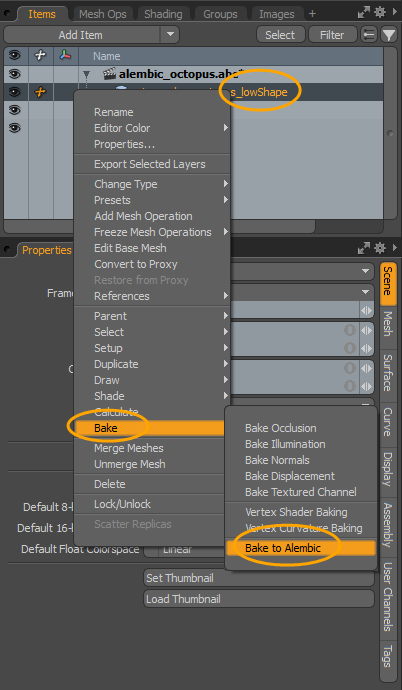
The Bake to Alembic dialog displays.
| 5. | Enter a name for the Alembic file, navigate to the appropriate directory you want to save this file to, and click Save. |
Network Rendering and Baking
Bake Items are designed to work with render bake network rendering, as bake parameters are fully self-contained in bake items. The items are then saved to the scene, and behave the same on all networked render workers. When baking with bake items, a specific bake can be triggered by baking a specific sequence number. This is similar to rendering a particular frame. If a scene is set up in such a way that there are 10 things to bake (let's say five assets with diffuse and normal maps), each of those bakes can be triggered by firing the baking command with a sequence number between 0 and 9. This can be handled by a render farm manager by swapping out the render commands for the relevant bake commands.