Content Preset
The procedural Content Preset sub-tool offers a series of ready made Profiles, which are different 2D curve styles that can be used to generate new geometry. The Content Preset tool is used as an input to the Tool Pipe of tools such as the Bridge tool or Sweep Effector. These can use the Profile like a brush, and draw the Profile along a curve or line.
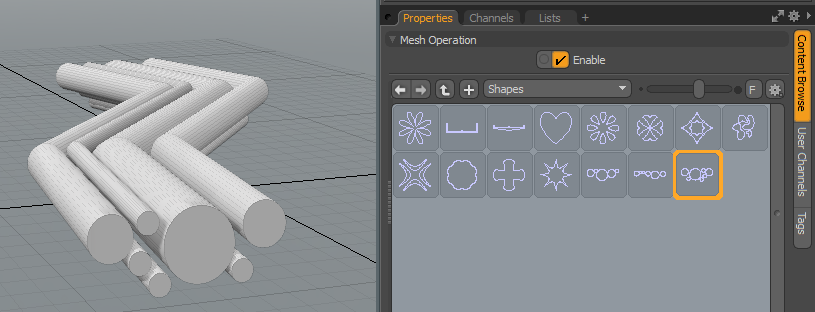
The image below shows the Content Preset tool on the right. In this example, the Content Preset tool has been added to a Sweep Effector that is drawing the output of a Pen Generator. A Profile consisting of a series of circles has been used to draw the tubes on the left.
Note: You may need to widen the Properties panel to see the toolbar above the Profiles. When the panel is narrow, the toolbar can be opened by clicking Browser Toolbar.

The Profiles are presented by category. For example, the screenshot above shows the Profiles in the Shapes category. To select a category, click the category dropdown above the Profiles.
Note: For more information on Profiles, see Preset Browser.
Using the Content Preset
The following steps show how to use the Content Preset sub-tool and a Pen Generator to draw the tube mesh shown in the screenshot above.
| 1. | In the Model layout, click the Procedural tab (upper right), and click Add Item above the lower half of the panel (the Mesh Operations list). This opens the Procedural Preset Browser. |
Note: The Procedural tab has two Add Item buttons, make sure you click the lower button.
| 2. | Click the small circle in the upper right corner of the Preset Browser to keep it open. This avoids having to repeatedly click the Add Item button to add procedural tools. |

| 3. | Add a Sweep Effector: Select Procedural > Duplicate, and double-click Sweep Effector. |
| 4. | Add a Content Preset: Select Procedural > Tool Pipe > Sub-Tools, and double-click Content Preset. A Content Preset is added to the Tool Pipe of the Sweep Effector. |
| 5. | Click the small circle in the upper-right corner of the Preset Browser to close it. |
| 6. | Add a Pen Generator: In the Mesh Operations list, expand the Tool Pipe for the Sweep Effector, and click (Add Tool Pipe). |

Select New and double-click Pen Generator. This is added to the Tool Pipe of the Sweep Effector.
| 7. | You can now add a polyline as a guide along which to sweep the profile that is currently selected in the Content Preset. Expand Polyline under the Pen Generator and click (Add Polyline). |
| 8. | Add a new mesh for the polyline: In the Preset Browser, select New, and double-click Mesh. |
Note: The new geometry is drawn in the original mesh (not the new, selected line mesh), and so may be seen in wireframe if you're using the default display settings.
| 9. | To draw a polyline in the new mesh, select the Pen |
Note: You won't see the swept shape unless one is selected in the Content Preset.
| 10. | You can change the profile that is swept along the line. Select the Content Preset in the Mesh Operations list to see the profiles in the item's Properties panel (lower-right). Click on a profile to select it. In the example above, the last Profile in the Shapes category was used. |
Tip: Try changing the Invert Polygons setting for the Sweep Effector. In some cases, this fills the resulting mesh, creating a solid appearance.
Content Preset Schematic
The Content Preset has a single output that connects to the Tool Pipe of a parent tool.
The example below shows a Content Preset used by a Sweep Effector to draw a Profile along a polyline that is generated by a Pen Generator.

