Explore the Modo User Interface
Using any software requires a basic understanding of its user interface (UI). I have found the more time an artist spends getting to know the UI, the more efficient they are using the software. While this may seem obvious, many artists overlook this aspect of learning a new program and miss out on core features that would not only speed up their workflow, but would make their time using the software more enjoyable.
While Modo’s UI can be fully customized to each user’s needs and aesthetics, this guide will focus on the default layout. In previous versions of Modo, I found myself customizing many aspects of the interface to speed up my workflow. Over the years, the Modo development team has put a focus on enhancing the UI, and I believe the refinements they’ve made recently have produced a workspace that requires little to no user customization.
This video demonstrates the layouts menu, the layout switcher selection popup and the layout switcher pie menu.
This video demonstrates switching between the various toolbars using the Toolbar Menu as well as adding elements to the Workbench Toolbar.
Modo UI at a Glance
We’ll be doing a deep dive into Modo’s UI, but before we do, let’s take a quick bird’s-eye view of the workspace. By default, the UI provides quick access to the core tools and features you might use in a work session without needing to search throughout the menus. If you prefer working with a more streamlined minimalist UI, Modo makes it easy to hide most aspects of the interface.
If you’re new to working in a 3D application, the Modo UI can be intimidating when compared to other content creation tools such as Adobe Photoshop or Illustrator.
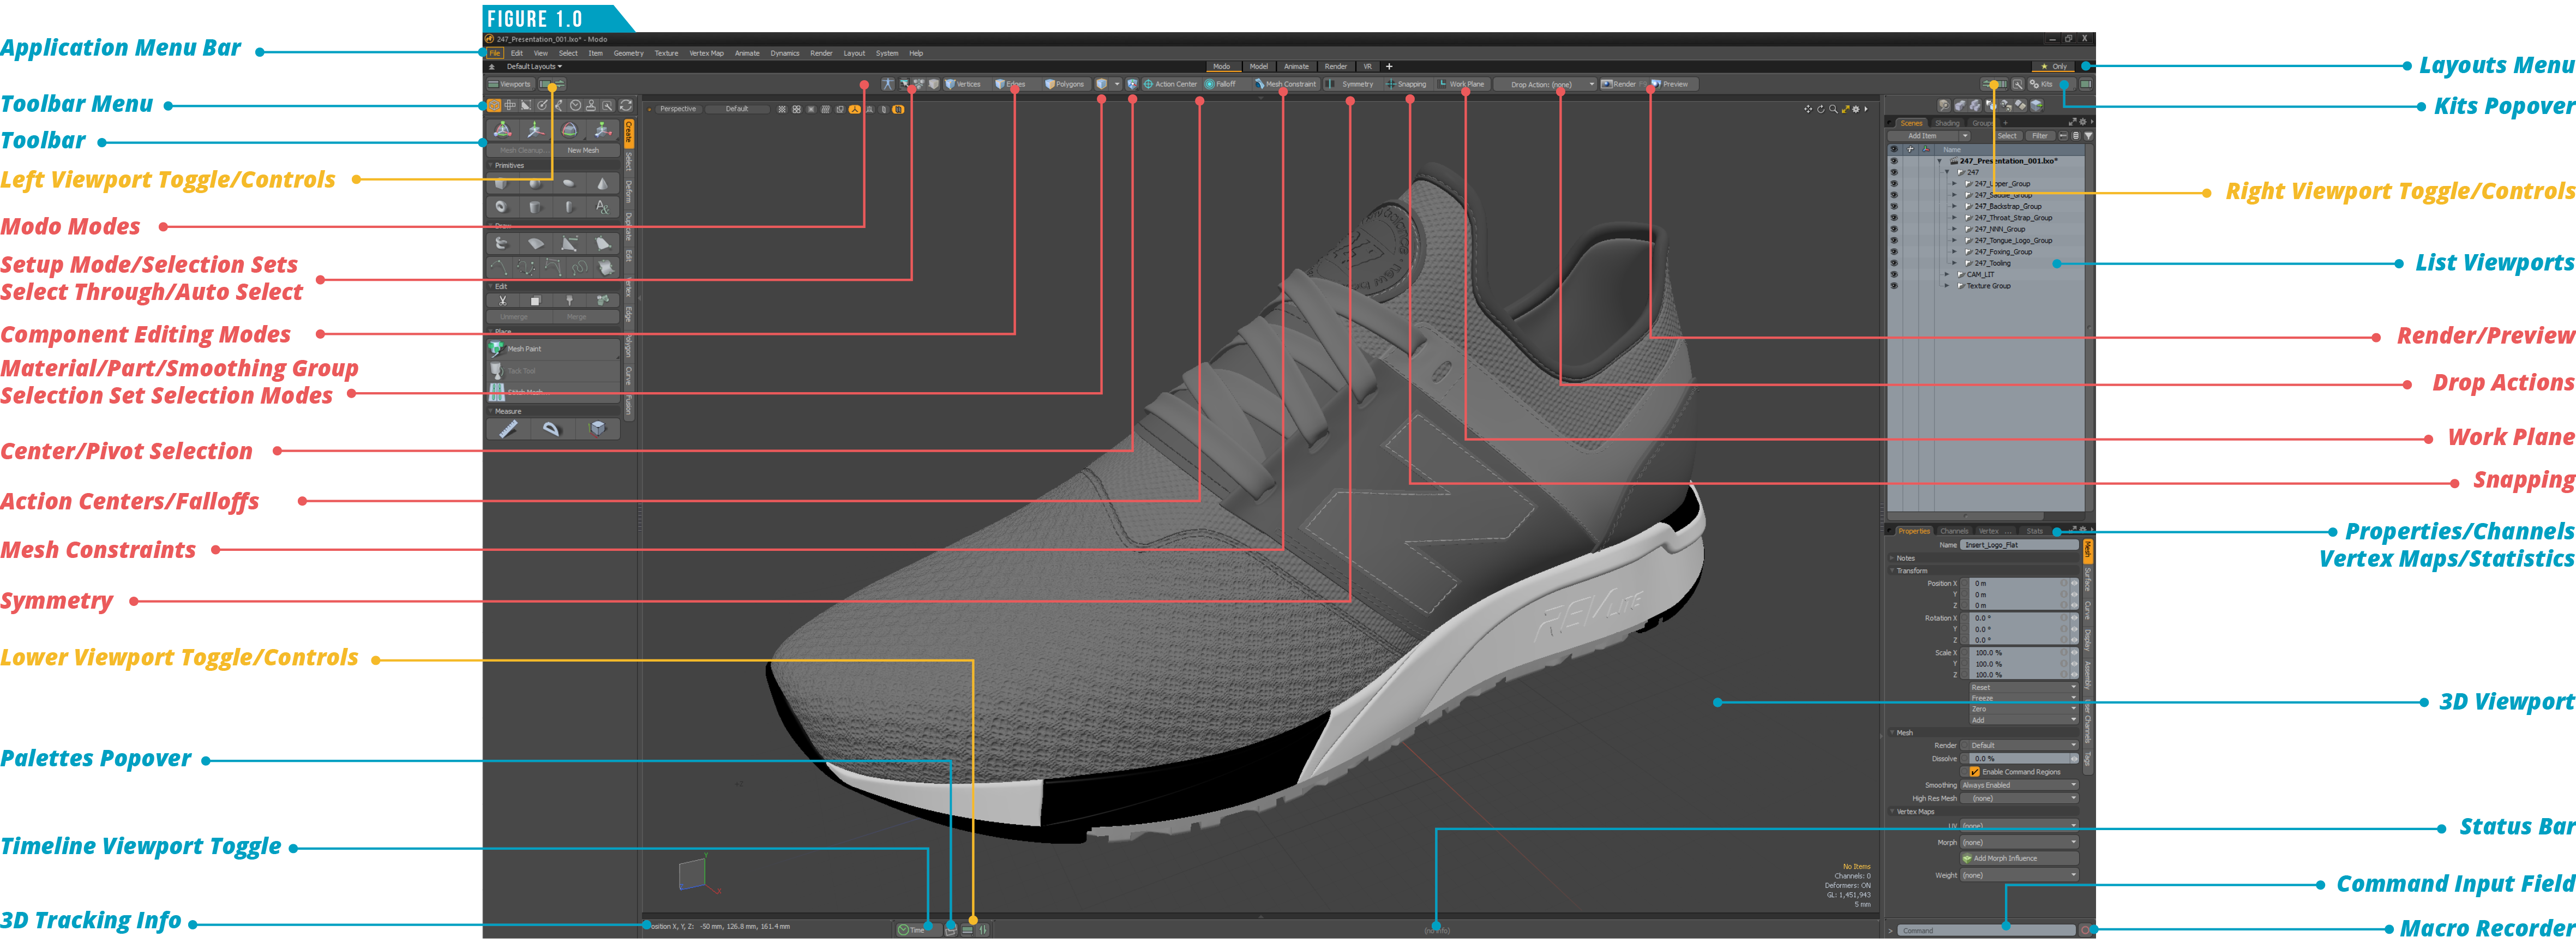
After a brief period of working in Modo, you’ll discover that its UI is more like the average content creation tool than it appears. Remember, just like those other tools, you won’t be using everything that is on display in an average work session. Take a few minutes to study the general layout of Modo’s default UI shown in Figure 1.0.
Note: It can be tempting to customize Modo’s UI to be more like software you’re already familiar with, but using the default layout when you’re just getting started will make it easier to not only follow along with this guide, but additional training material online.
Application Menu Bar

The Application Menu Bar (Figure 1.1) gives you access to all Modo functions. As with most software, clicking any of the menu items activates a dropdown menu with many entries and sub-categories for you to select from.
After we’ve explored the UI, you’ll quickly discover that most of the functions found in these menus are also displayed as buttons throughout the application. When you’ve become more familiar with Modo, you’ll most likely spend little time accessing functions from the Application Menu Bar. With that said, if you have difficulty locating an option in the UI, this menu bar can be a handy alternative.
I’d like to point out a few UI conventions found in these menus. If a menu option name is assigned to a keyboard shortcut (hotkey), you’ll find it displayed to the right of the menu item. This can be a quick way of learning keyboard shortcuts for commonly accessed functions.
• Menu option names that display a dialog are followed by an ellipsis (…).
• Menu option names that open sub-categories are followed by a small right triangle (►).
• Menu option names that function as a toggle will display a checkmark (√) when the toggle is active.
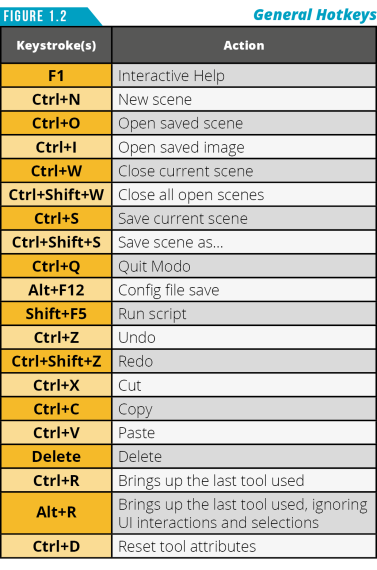
Some common functions found in these menus have default keyboard shortcuts that I suggest getting familiar with to help streamline working in Modo. Any command can have a keyboard shortcut assigned to it using the Input Editor (System/Input Editor), but for now get familiar with the shortcuts shown in Figure 1.2.
Be sure to take advantage of the Help option in the Application Menu Bar. The interactive help option (Help/Activate Help) allows you to click on interface elements to open documentation associated to that element. There are also links to additional resources that can aid in learning Modo.
Another option that you should be aware of is Reset Preferences (System/Reset Preferences). This option returns Modo to its default state, like a factory reset. If you experience unpredictable behavior, installed an update or simply want to return to the default setup, this is a good option to be aware of.
Layouts Menu

Modo has twelve unique workspace layouts that you can access using the Layouts Menu located directly below the Application Menu Bar. (Figure 1.3)
Our focus in this guide will solely be on the Modo layout, as it’s the only layout needed in recent versions of Modo. In previous versions, you would switch between layouts to access focused workspaces. This option is still available for those that prefer using a variety of layouts optimized for specific tasks.
By default, only five layout options are displayed (Modo, Model, Animate, Render and VR). To display all twelve options, use the Star Only button located on the right. The Star Only option enables you to suppress layout options that aren’t starred. You can toggle the star on and off for each layout by clicking on the star icon next to the layout name.
You also can create a custom layout using the plus sign (+) located to the right of the layout options. Once created, an additional button is added to the right-most position of the bar.
The position in which the buttons are displayed can be reordered by left-clicking and dragging a button to a new location. The drop position is indicated by a small orange line. If you make changes to one of the layouts and would like to reset it back to its default state, simply double-click the layout button.
The gear icon located to the far right of the Layouts Menu gives you access to options for the menu. This is a common feature that you will see throughout Modo. It contains all the available customization control options for that portion of the UI.
Since we won’t be accessing any layout other than the Modo layout in this guide, you can minimize it by either clicking on the two upward facing arrows on the far left or clicking any empty space on the Layout Menu bar. To maximize it, click over the remaining small line.
Warning: I’ve seen many users accidentally click on an empty portion of the Layout Menu bar causing it to minimize by accident. No worries, the menu is still there and can easily be maximized by clicking the remaining portion that will display as a small dark line.
If you like the idea of working with focused workspaces, don’t let my preference hold you back. Every artist works differently so use what works best for you. If you do plan on taking advantage of the various layouts, I’d recommend adding the following two shortcut keys to your memory.
The first is (Shift+Ctrl+Tab) which will enable the layout switcher selection popup shown in Figure 1.4.

This handy option allows you to quickly switch between layouts by selecting from large graphical icons.
To use, press Shift+Ctrl and then Tab to open the selection popup. Continue to hold down Shift+Ctrl and then release and press Tab again to cycle to the next workspace highlighted by the orange outline.
The layout options are organized by the layout’s most recent use. Releasing the keys opens the currently highlighted interface. This method eliminates the need to move the cursor from its current location to the top of the UI. The second option for quickly switching between layouts is the layout switcher pie menu.
In Modo, pie menus are quick contextual pop-up menus that appear using keyboard shortcuts. These radial menu items enable you to quickly access options gesturally for a speedier workflow. Throughout this guide I’ll share hotkeys to commonly used pie menus. Using the keyboard shortcut Ctrl+~ (tilde) opens the layout switcher pie menu. (Figure 1.5)
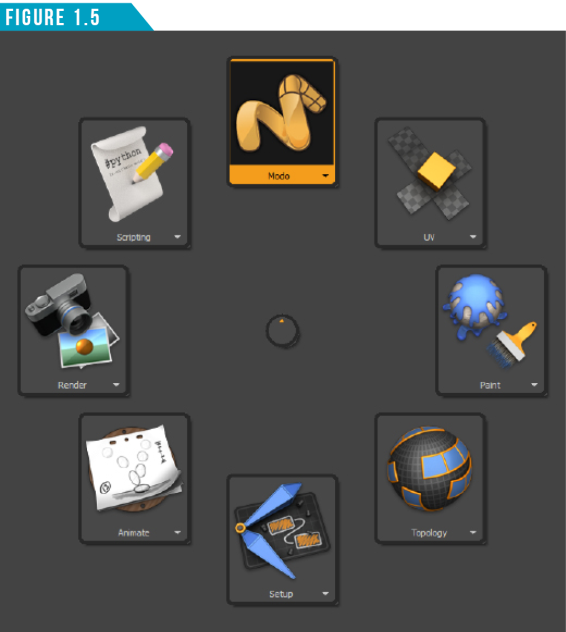
Pie menus are limited to eight options, so four of the twelve layout options won’t be displayed by default. You can specify which layouts you’d like shown and where each layout is placed in the pie menu by using the popup menu located on each of the pie menu’s buttons. Press and hold Ctrl+~, then left-click on the popup option under the layout icon. It’s this level of customization that enables you to setup Modo in a way that works best for your workflow.
All three layout switching options are also available from the Application Menu Bar. Specific layouts are accessible under Layout /Layouts. The layout switcher selection popup can be accessed under Layout/ Recent Layouts, and the layout switcher pie menu can be launched under Layout/ Favorite Layouts.
Spend some time getting familiar with all of the options discussed in this section. It will help you determine what will work best for you if you choose to access the different layouts.
Toolbar Menu and Toolbar
The Toolbar Menu seen in (Figure 1.6) is located on the left side of the Modo UI and enables you to quickly access a wide variety of tools and commands. Left-clicking on any of the icons will display the related options in the Toolbar (also referred to as the Toolbox) located just below the Toolbar Menu.

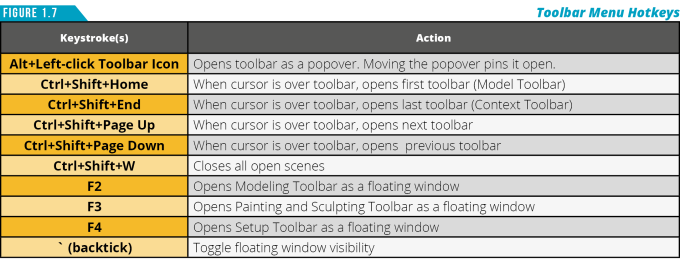
There are several keyboard shortcuts associated with the Toolbar Menu shown in (Figure 1.7) that are good to know. To get a broad overview of each of the toolbars available, let’s look at each one.
The Model Toolbar is displayed by default. This collection of tools and commands enables you to create, select and manipulate geometry. On the right side of the Toolbar, there are a series of Sub-tabs that organize the various tools by their function. Clicking any of the sub-tabs will change the options displayed. For example, clicking on the Select sub-tab will display the selection options available in Modo.
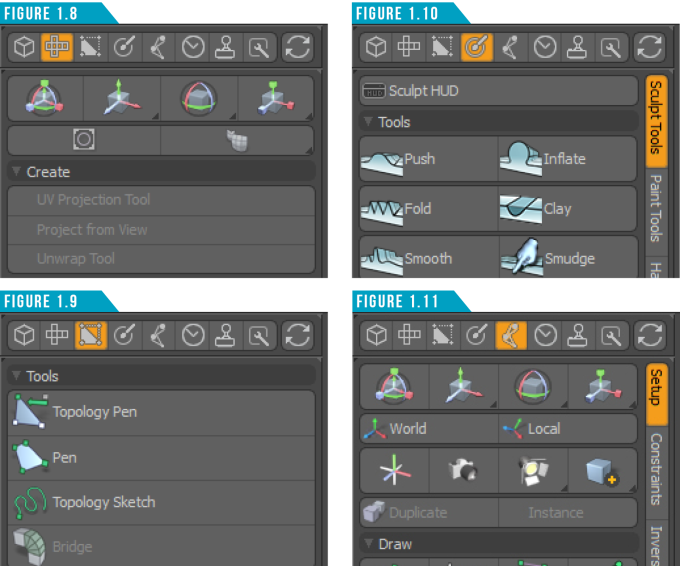
The UV Toolbar (Figure 1.8) consolidates tools and commands related to creating and manipulating UVs into one location. UV mapping is a method used to “wrap” a 2D image texture onto a 3D mesh.
Retopology is the process of recreating an existing mesh surface with more optimal geometry. A common use-case is creating a clean, quad-based mesh for animation from a sculpted mesh. The Topology Toolbar (Figure 1.9) consists of tools and commands designed to aid in this process.
The Painting and Sculpting Toolbar (Figure 1.10) houses the tools and commands associated with sculpting, texture painting, hair guides for use with the fur shader, vertex map painting, particle painting and sculpting as well as a collection of utilities such as image processing options.
The Setup and Rigging Toolbar (Figure 1.11) consolidates the tools and commands related to rigging, dynamics and particles. You can access options for creating joints, constraints, deformers, particle emitters and more.
Once your mesh items are rigged and ready to animate, you’ll find a collection of animation related tools in the Animation Toolbar (Figure 1.12). Using these tools you can create and manage Actors, Actions, Poses and more.
If you’re working with polygonal meshes and want to create smoothing groups or define hard edges using vertex maps, you’ll find the tools you need in the Game Toolbar (Figure 1.13). This is also the toolbar where you’ll find the Baking tools and Game Navigation options.
The Workbench Toolbar (Figure 1.14) doesn’t look like much when you first access it, but it will quickly become one of your most used toolbars. This powerful toolbar enables you to group and organize tools, commands, channels, scripts and macros.
The Context Toolbar (Figure 1.15) changes its content based on the current component selection type and whether a 3D or UV viewport is active. Using the middle-mouse button and clicking in a viewport enables you to switch between a UV and 3D viewport without dropping a selection.
I find that I use this toolbar when I’m modeling more than any other toolbar, since the tools displayed are limited to the element mode I’m currently in. For example, if I’m in edge selection mode, only edge-based tools will be displayed.

To start customizing your workbench, click the Edit Workbench button. This reveals three additional buttons (Figure 1.16). Click the Pick to Add button. This allows you to click on an element in the UI and add it to the workbench. Once you’ve added items to your workbench, click Edit Workbench again to end the editing session.
