Modo Modes
The Modo Modes section of the interface is located directly below the Layouts Menu Bar. (Figure 1.69)

This video takes a quick look at some of the key options found in the Modo Modes.
In early versions of Modo, it was home to a much smaller collection of options, but over time the number of items found on this bar has grown. This is probably due to the fact that this area is prime real-estate. It’s an ideal location for commonly used features, and that’s exactly what you’ll find here. Let’s do a quick run through of what this collection has to offer. The first icon on the left allows you to enter Setup Mode (Figure 1.70).
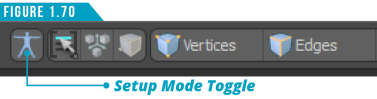
Setup Mode plays an important role in the rigging process. In order to Bind a skeleton to a mesh, set up Inverse Kinematics (IK) or define resting positions, you’ll need to activate Setup Mode. By having a specific Setup Mode, you have an easy way to get an animated or deformed model back into its resting position for further refinement without having to remove or disable any animation already applied to the geometry.
To the right of the Setup Mode Toggle is the Selection Set Popover button (Figure 1.71). Selection sets enable you to save and edit component- and item-based selections to recall at a later time. Use this easy to access popover to create, edit, use and remove selection sets.
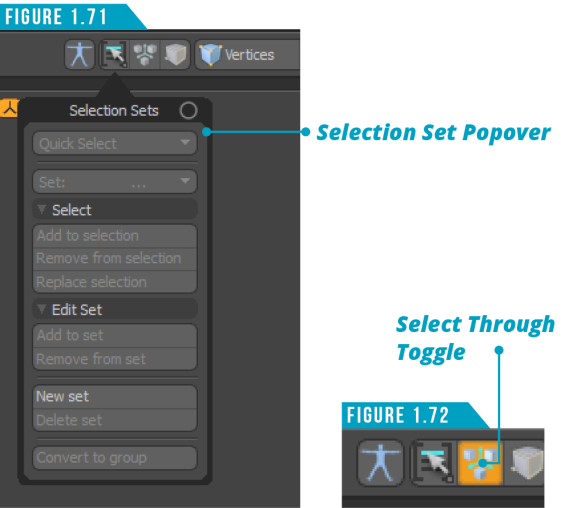
The Select Through Toggle (Figure 1.72) will only become available when a tool is active and works on a tool by tool basis. With this toggle off, Modo uses any click away from a tool’s handle to haul the primary values. If you toggle on Select Through for the currently active tool, you no longer have hauling behavior but get selection events instead. This allows you to make new selections without dropping the active tool. Use the keyboard shortcut (; (semicolon)) to toggle this option on and off.
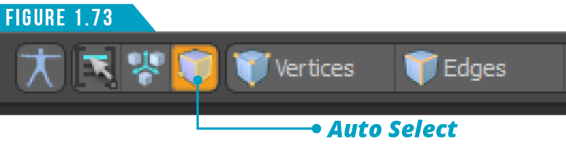
Auto Select mode (Figure 1.73) allows you to quickly change the current component selection mode used in your scene. When enabled, you can select a vertex, an edge, or a polygon to automatically activate the different selection modes. For example, if Vertices selection mode is active and there are no vertices currently selected, clicking on an edge switches to Edges selection mode automatically.
There are ten core selection modes in Modo, and nine of them can be enabled from the Selection Modes portion of the Modo Modes bar as seen in (Figure 1.74).
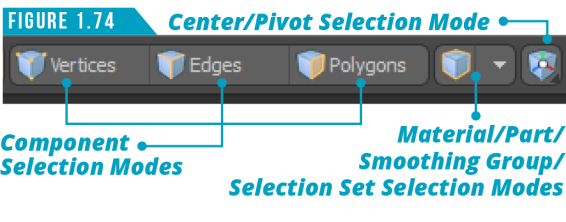
You can only access nine of the selection modes from the UI because by default, Item Selection Mode is enabled. When not in one of the other nine modes, Modo defaults back to Items Selection Mode.
To enable one of the component selection modes (Vertices, Edges or Polygons), simply left-click on its button.
Use the button to the right of the component mode buttons to access a pop up which gives you the option to choose between Material, Part, Smoothing Group or Selection Set Selection Modes. You can switch between Center and Pivot Selection Mode by either left-clicking and holding down on the Center/Pivot Button or right clicking and choosing either Center or Pivot.
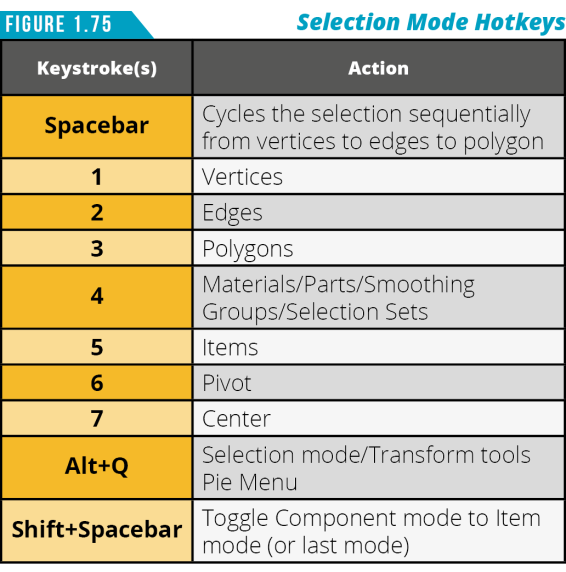
We’ll dive deeper into selection in the next section of this guide, but you’ll want to get familiar with this portion of the Modo Modes bar since selecting plays such a major role in every aspect of production. Use the keyboard shortcuts in (Figure 1.75) to quickly change selection modes.
Action centers are a definable origin position for modeling and transform actions. They allow you to easily change the positions from where the action of any tool originates, such as placing the action at the world’s origin, the average position of a selection or a user definable element on a mesh item. When no action center is selected, the Action center type is set to None and the Action Center Button (Figure 1.76) will be labeled Action Center.

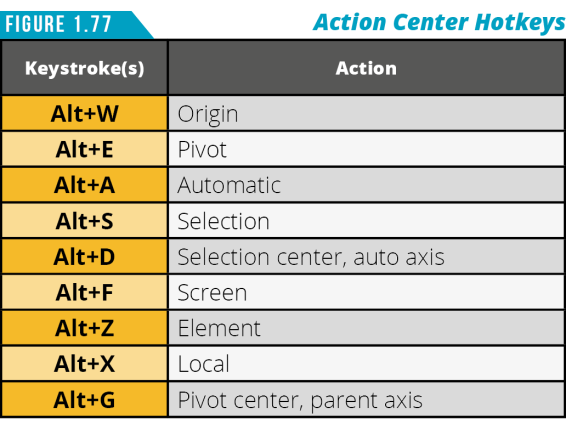
When set to None, the active tool handles will be positioned to the center of the current selection and oriented to the World or Work Plane axes. Clicking on the Action Center Button will present a menu of action center options. You can also use keyboard shortcuts (Figure 1.77) to quickly enable some of the commonly used action centers. It’s important to understand that Action Centers are persistent until disabled, and work with all tools in Modo.
In Modo, elements are either selected or not selected. This means the effect of a tool happens at a constant rate across the selected range. Using Falloffs, you can attenuate the effect a tool has over a selection, gradually increasing or decreasing a tool’s intensity across a defined range.
Using the Falloff Button (Figure 1.76), you can define a falloff by selecting it from the list. Just like Action Centers, Falloffs are persistent until disabled. If you’re new to working with Falloffs, I recommend taking advantage of the Show Falloffs display option (View/Show Falloffs).
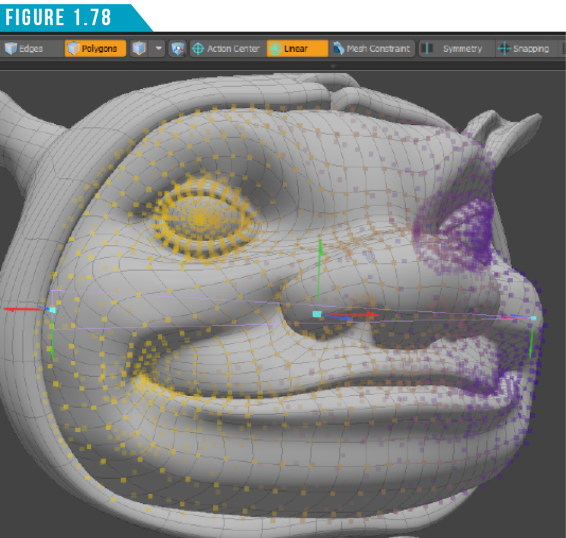
This will give you visual feedback of how the Falloff is going to affect the selected elements. (Figure 1.78) shows an example of a Linear Falloff being used. Yellow areas are affected 100% by the current tool’s actions while purple elements have no effect.
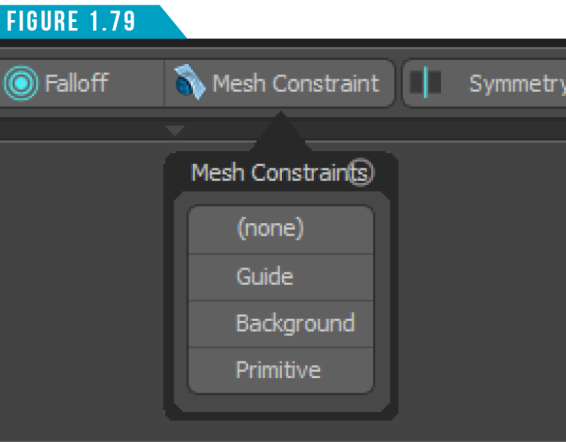
The Mesh Constraint Button (Figure 1.76) enables and disables the currently selected constraint. There are three types of mesh constraints; Guide, Background and Primitive.
These three Mesh Constraint types enable you to use meshes to assist you in aligning elements, enhance curve tool handles for better transform operations, and retopology.
By default, the Mesh Constraint type is set to Background, but you can quickly change to another type by holding the (Alt) key and clicking on the Mesh Constraint Button. (Figure 1.79)
Note: When the (Alt) key is held down, the Mesh Constraint Button will be relabeled Options.
The Symmetry Button (Figure 1.80) toggles the symmetry feature on and off. Just like the Mesh Constraints Button, holding the (Alt) key and clicking will display the functions options.
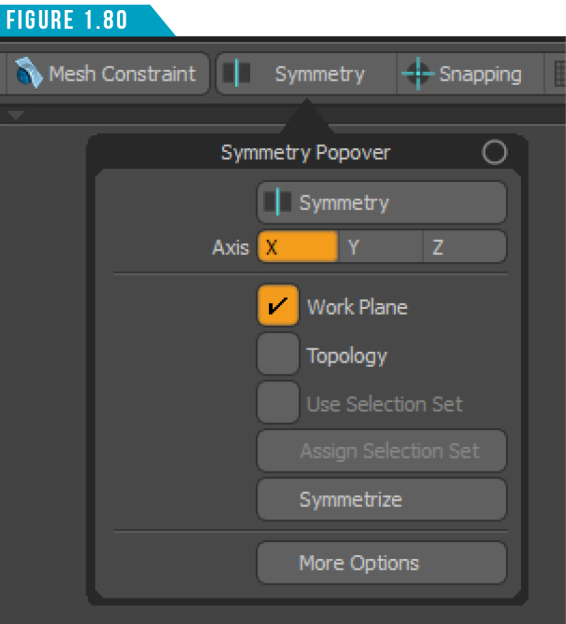
The Symmetry function enables you to work on one half of a symmetrical mesh, and have the other half mirror the actions. Once Symmetry is enabled, any operations performed in the component modes (vertices, edges, polygons), such as selecting polygons or deforming edges, are mirrored across the chosen axis to the corresponding geometry. For best results, I recommend working with your mesh items centered at the Origin when working with the Symmetry function.
Snapping is disabled by default, but it can be quickly enabled by clicking the Snapping button (Figure 1.81). When the Snapping function is enabled, you can accurately create and align elements in relation to one another, or in relation to the grid.
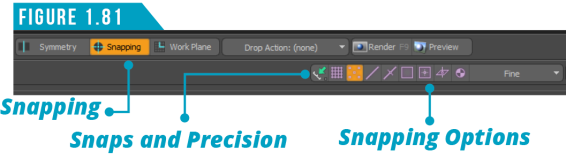
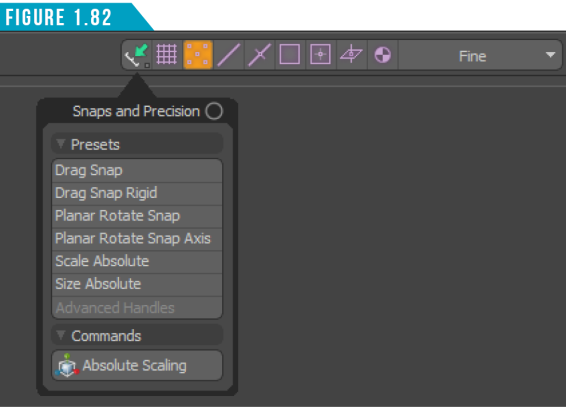
If the Viewport Switcher Bar is active as shown in (Figure 1.81), you’ll have quick access to some of the common snapping options. You’ll also have access to the Snaps and Precision Palette (Figure 1.82), which includes several tool options you can use for precision transforms such as Absolute Scaling.
Holding down the (Alt) key and clicking on the Snapping Button will give you access to the Snapping Popover (Figure 1.83), which allows you to control what scene features respect snapping. You can select any number of controls simultaneously as well as the Mode that determines when the snapping occurs.
Warning: It’s common for artists to forget they’ve enabled functions such as Symmetry, Mesh Constraints and Snapping. If you experience unexpected results when using tools, a quick look at the Modo Modes bar can tell you if any of these features are active. Active features’ buttons are highlighted in orange.

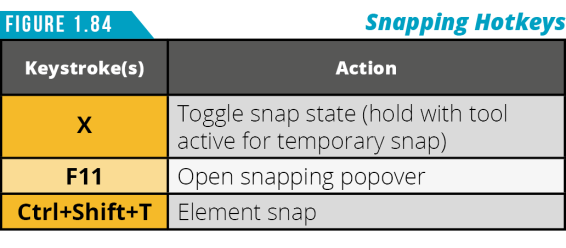
Use the keyboard shortcuts shown in (Figure 1.84) to speed up working with snapping.
When the Work Plane feature is enabled using the Work Plane Button, a white grid will appear in the 3D Viewport (Figure 1.85).
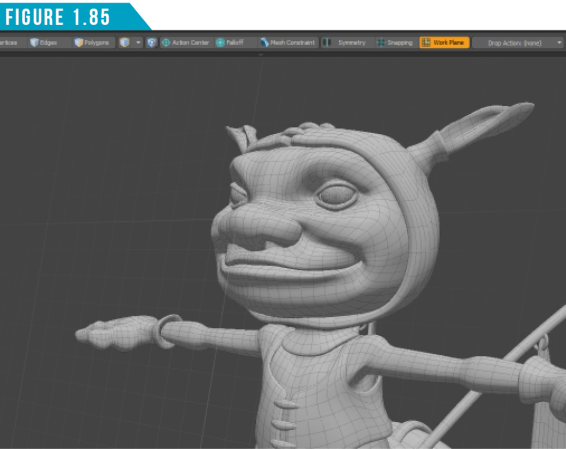
The Work Plane is an adaptive modeling aid that automatically adjusts itself to match the two major axes most closely aligned to your current screen axis. When you rotate the Perspective viewport, the Work Plane snaps to one of the dominant planes: XY, XZ, or ZY.
The Work Plane can also be locked and used as a construction plane. When applied as such, the Work Plane effectively positions the entire Modo universe to that fixed angle and position.
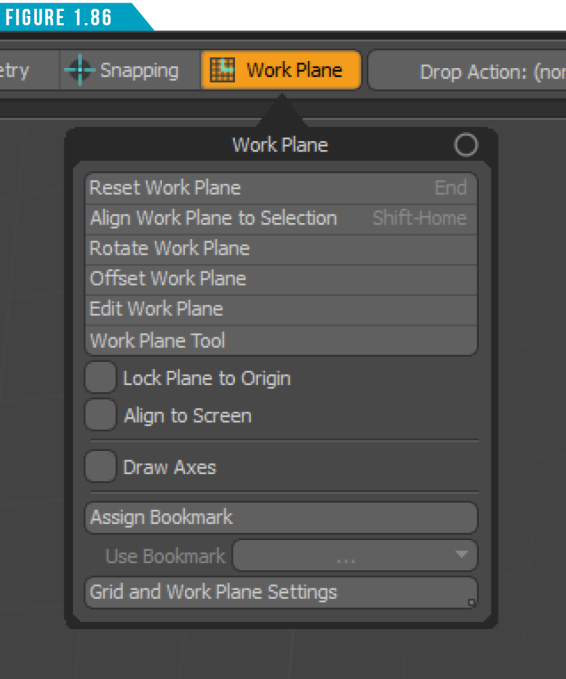
Holding the (Alt) key and clicking the Work Plane Button will display the Work Plane Popover (Figure 1.86), which will give you access to the Work Plane options. The Work Plane allows you to do most, if not all, of your modeling in a single perspective viewport, so you’ll want to get familiar with it over time.
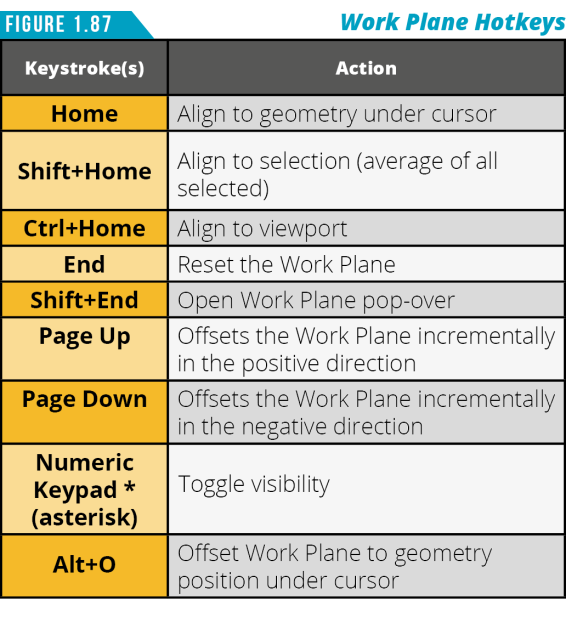
Use the time-saving keyboard shortcuts shown in (Figure 1.87) to enhance your experience when using the Work Plane.
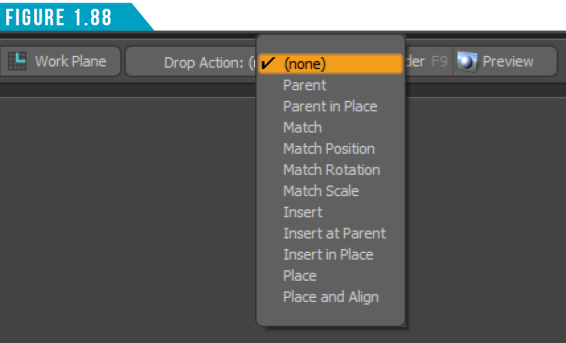
To the right of the Work Plane button is access to an often overlooked feature set called Drop Actions. The Drop Action Menu (Figure 1.88) defines what action happens when you drag one item onto another.
To set one of the drop actions, simply click the Drop Action Menu and select an action. Now, when you drag an item (the Source item) onto another item (the Destination), Modo implements the specified action. It’s important to remember that you must be in Items Selection Mode with no active tools for the actions to work.
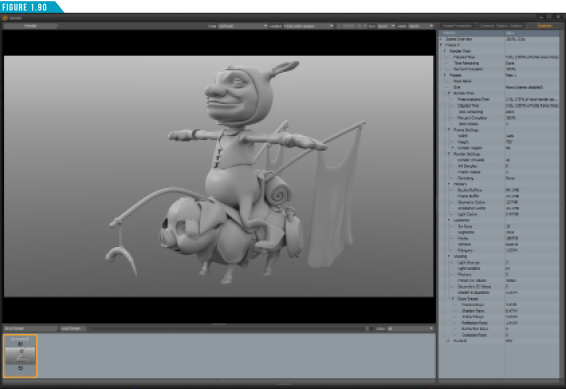
Rendering is the process of converting all the elements that make up a scene into a two-dimensional image. The Render Button (Figure 1.89) gives you quick access to the most common render command in Modo.

While it’s handy to have it available on the UI for new users, the average user takes advantage of the keyboard shortcut (F9). Clicking the Render Button or using the keyboard shortcut (F9) will open the Render Display Window (Figure 1.90) and start the rendering process.
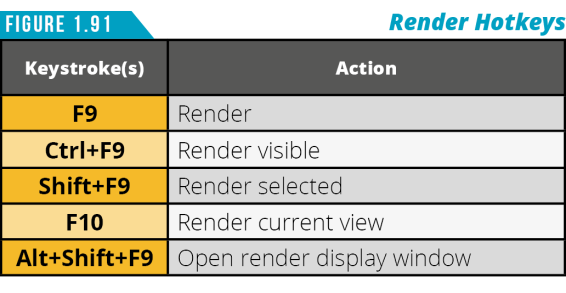
There are additional keyboard shortcuts that are good to have on hand shown in (Figure 1.91).
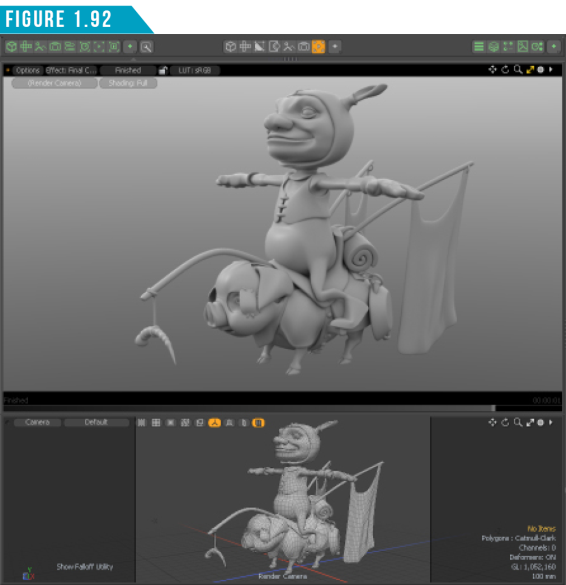
The Preview Button (Figure 1.89) to the right of the Render Button opens the Preview Viewport (Progressive Render Viewport).
This powerful viewport uses the Modo render engine in a progressive refinement mode that allows you to see all changes in a scene as a fully rendered image. While having a floating preview window can be useful, I tend to convert either my center or lower viewports to the Preview as shown in (Figure 1.92).
Take advantage of the keyboard shortcuts in (Figure 1.93) when working with the Preview Viewport.
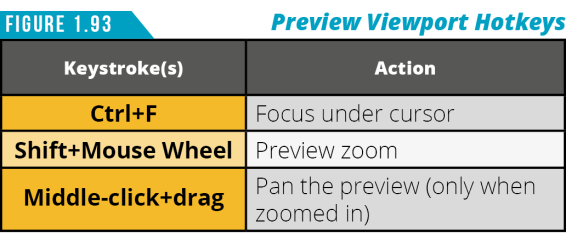
The main advantages to using the Preview Viewport is the fast display of the rendered scene and the ability to Navigate the camera around just like any other 3D Viewport set to camera. You can also zoom in for a closer look without affecting the camera’s position with a middle scroll wheel mouse (Shift+Mouse Wheel).
That wraps up our brief tour of the Modo layout. Before moving on, be sure to get comfortable with all of the buttons on the Modo Modes bar.
Modo User Interface Wrap-Up
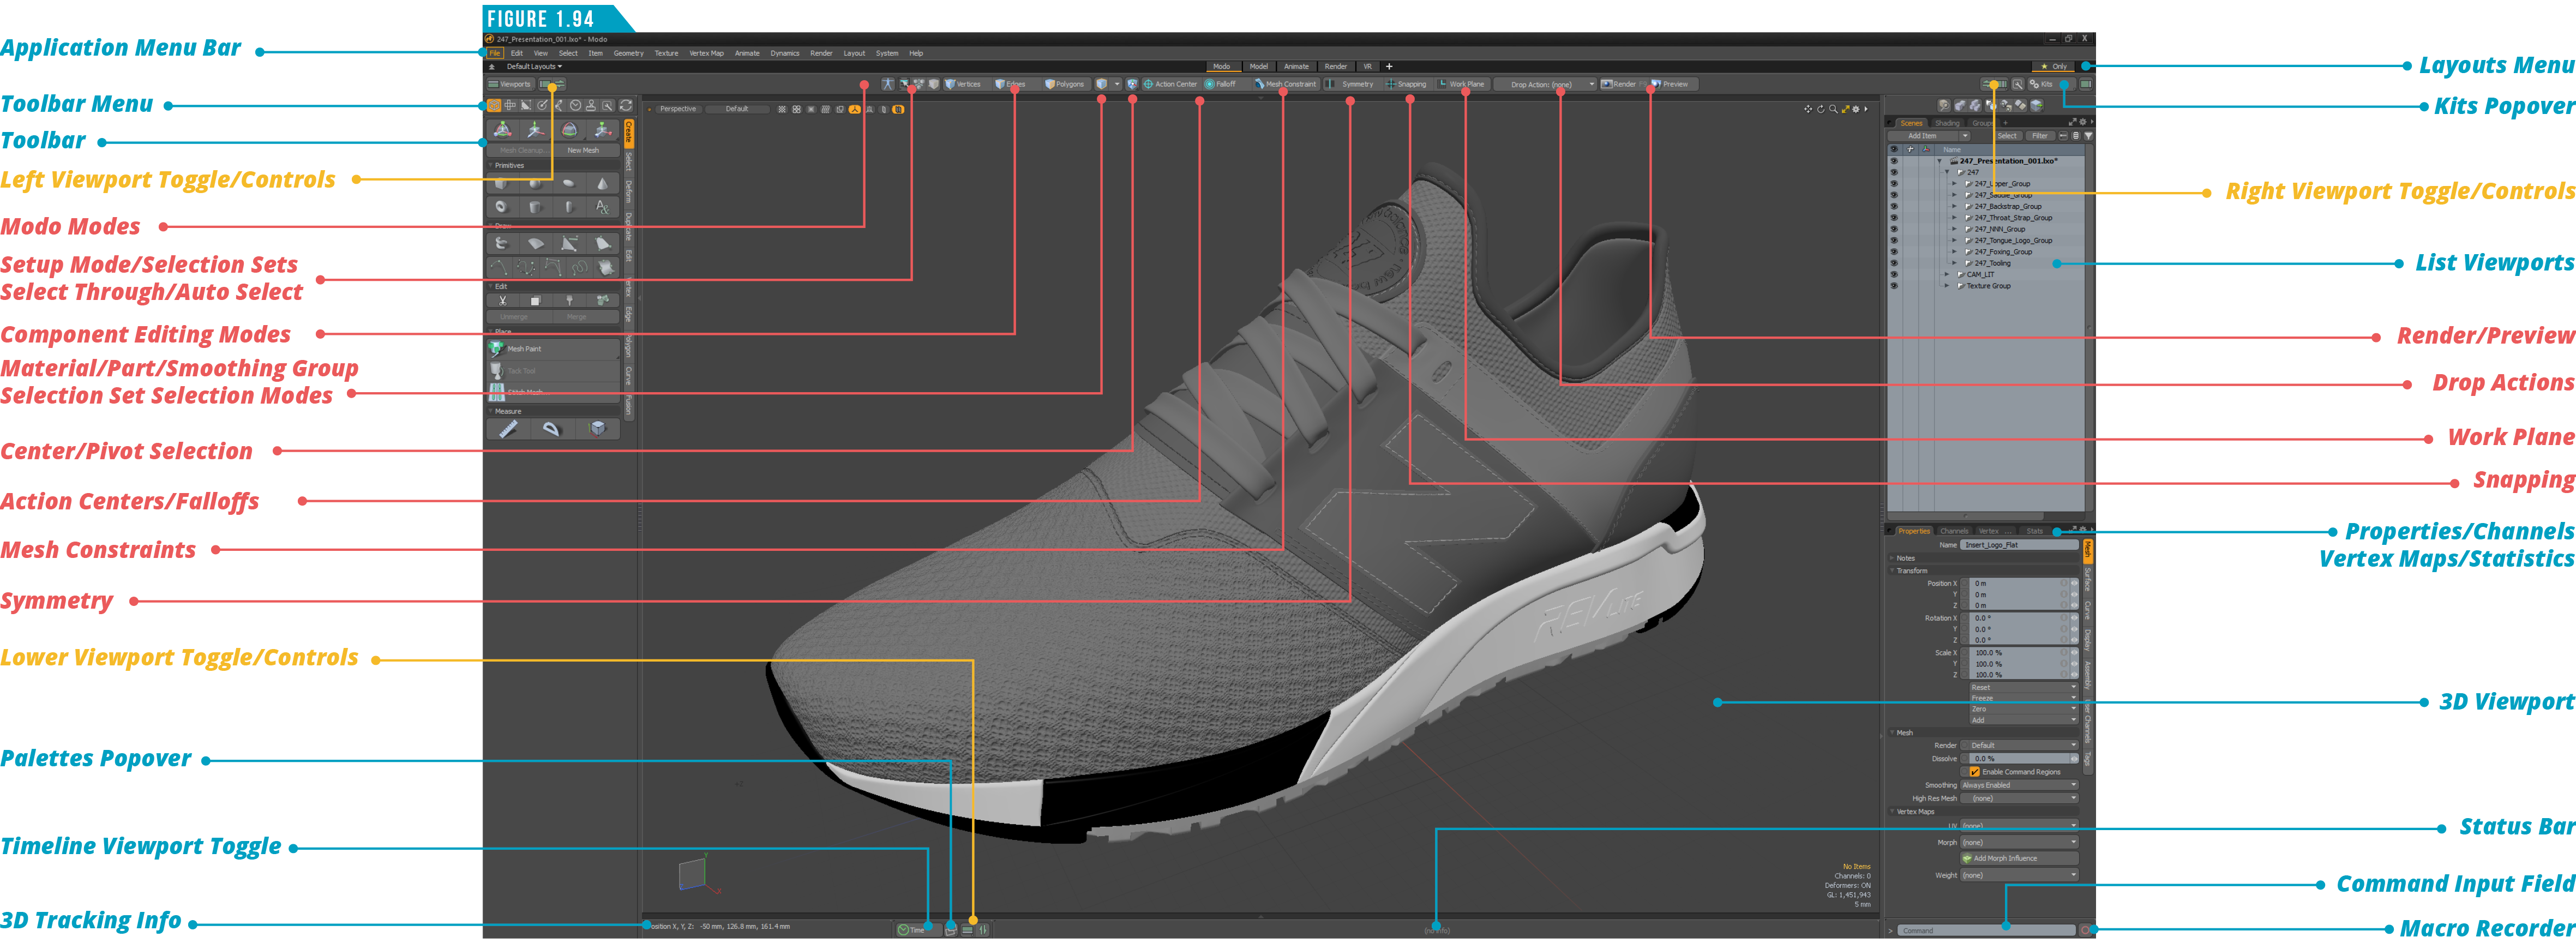
You’ve successfully made it to the end of Section 1 and are well on your journey through this weekend crash course. I’ve included the breakdown of the Modo Layout below (Figure 1.94), so you can review what we’ve covered throughout the first section of the book. If one of the labeled elements of the UI doesn’t sound familiar, jump back to that portion of Section 1 for a refresher. You can also return to this section at any time to reference keyboard shortcuts, which will take some time to store into memory.
Keep in mind that you don’t have to be capable of using all the features discussed so far. At this point, it’s more important that you are aware of the options that are available, so you can navigate the Modo workspace and have features on display be familiar.
There are many aspects to working in Modo, but I have found the two most common operations needed in any given work session are navigating the user interface and selecting. We’ve explored the first of these two and in the next section we’ll tackle selection.
I’m pretty sure you’re excited to keep moving forward, but before you do, take a short break. If you’re anything like me, you’ve been glued to this guide and could use a stretch and a little time for all this new information to sink in. Come back refreshed and ready to advance your Modo skillset. The guide will be waiting for you when you return.
Note: If you’re feeling a little overwhelmed by all the features we’ve discussed so far, don’t forget that you won’t be using everything that is on display in an average work session.