Search is based on keyword.
Ex: "Procedures"
Do not search with natural language
Ex: "How do I write a new procedure?"
Contact Support
Localizing Media
Nuke Studio has the facility to cache source clips locally, either individually or by setting an automatically localized folder (NUKE_TEMP_DIR/localize, by default), to help guarantee playback stability. Local caching is controlled initially in the Preferences dialog, then on a clip-by-clip basis.
Setting Localization Preferences
The Preferences control how Nuke Studio deals with new source clips as they are ingested, but does not affect existing source clips in the project. If you plan to localize source clips in your project, it's a good idea to set the Preferences before ingesting your source clips.
| 1. | Press Shift+S to open the Preferences dialog and navigate to Performance > Localization. |
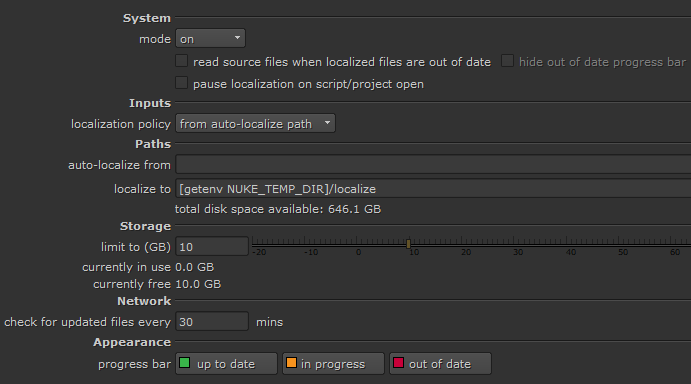
| 2. | Set the required localization mode: |
• on - checks for updates to source clips for all localization policies, and localizes those files set to On or From auto-localize path automatically. On demand source clips must always be localized manually.
• manual - checks for updates to source clips and prompts you to update them manually. Only those with the policy set to off are not updated.
• off - no source clips are localized, regardless of the their localization policy.
Note: The current localization mode is displayed in the status bar at the bottom-right of the interface.
| 3. | Set the default localization policy for new source clips using the dropdown: |
Note: The localization policy for existing source clips in the project must be set individually. See Managing Localization for more information.
• on - always localize source clips with this policy.
• from auto-localize path - localize these source clips automatically if they reside in the auto-localize from directory.
• on demand - only localize these source clips when you manually update them. See Updating On Demand Clips for more information.
• off - never localize these source clips.
| 4. | Enter a file path for auto-localize from, if required. |
Any files that reside in this directory are automatically cached when ingested into Nuke Studio, providing that theLocalization Policy is set to From auto-localize path.
Note: Localization in both the timeline and Node Graph is paused during compositing Viewer playback so that performance is not affected.
| 5. | Enter a file path for localize to. Leaving this field as the default creates a sub-directory in the Temp Directory as the local cache. |
Note: On Windows, files saved to the localize to directory replace \\ (double back slashes) and : (colon drive signifiers) with underscores so that the file path works as expected between operating systems. For example:
\\windowspath\to\my\network\file.dpx is saved as __windowspath\to\my\network\file.dpx
t:\my\network\path\file.dpx is saved as t_\my\network\path\file.dpx
| 6. | Enter a value for limit to (GB) to control how much disk space is available in the cache directory. |
Note: Negative values in this field reserve the specified amount of space at all times. For example, -2 stops 2 GB of memory being used for caching.
| 7. | You can specify the time interval (in minutes) before localized files are checked for updates using the check for updated files every ## mins control. |
The default setting checks for new versions of files every 30 minutes, but you can set this control to any value. Any files that have changed since the last update check are flagged red in the Project bin.
Tip: You can change the default localization indicators using the Appearance controls.
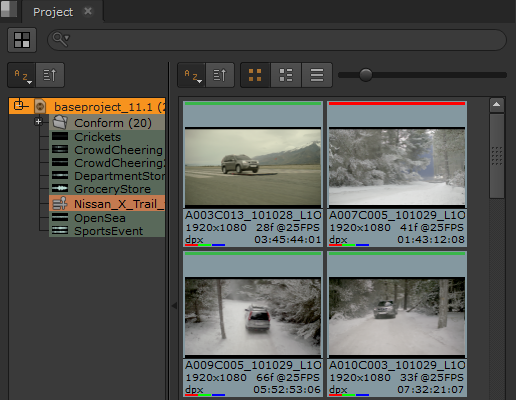
If read source files when localized files are out of date is enabled, source clips referencing cached files that have changed since they were localized revert to reading the source files. Source clips that are reading from the source files are marked with a striped red bar on the clip.

Enabling hide out of date progress bar hides the localization state of out of date files so that the source clip appears the same as regular clips.
Note: The out of date localized files are not discarded, disabling read source files when localized files are out of date picks up the out of date files instead of reading the source files.
Managing Localization
As well as the overall Preferences for when new source clips should be localized, you can set localization on a file-by-file basis. The localization policy for any existing source clips in your project must be managed individually.
Tip: If you find that localization is slow to copy files, you can increase the number of threads that Nuke uses to process jobs. Set the NUKE_LOCALIZATION_NUMWATCHERS environment variable to the number of threads you want to use. See Environment Variables for more information.
To set the localization policy for source clips:
| 1. | Select the clip(s) in the bin view. |
| 2. | Right-click and select Localization Policy to display the available options: |
• On - the files are localized, regardless of location, as long as the limit to (GB) limit is not breached.
• From auto-localize path - the files are localized if they reside in the auto-localize from directory, as long as the limit to (GB) limit is not breached.
• On Demand - the files are only localized when you update them manually. See Updating On Demand Clips for more information.
• Off - the files are never localized, regardless of location.
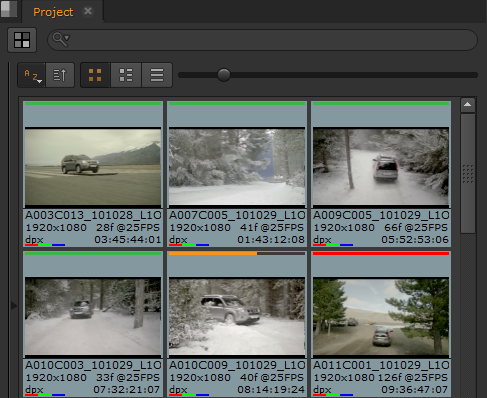
As clips are localized, an amber progress bar displays in the thumbnail. Fully cached clips are marked with a green bar at the top of the thumbnail and out-of-date clips are marked in red.
Note: Container formats, such as .mov and .r3d, do not display progress bars during localization. The source clip only shows the green indicator once the entire file is localized successfully.
Note:
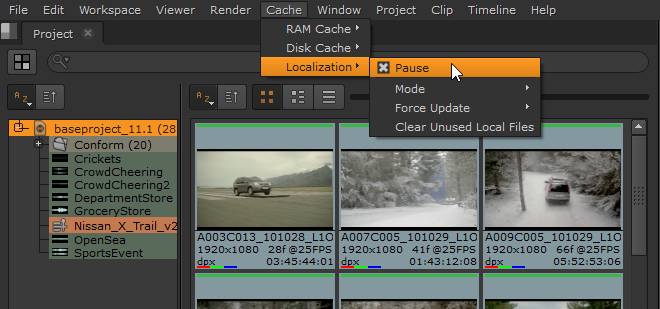
| 3. | If you need to pause localization temporarily, navigate to Cache > Localization and select Pause. |
| 4. | If you find that your cache is filling up regularly, you can: |
• Increase the amount of available space for localization by raising the limit to (GB) preference,
• Navigate to Cache > Localization > Clear Unused Local Files (see Clearing Localized Files), or
• Manually clear files from the cache directory in NUKE_TEMP_DIR/localize, by default.
| 5. | You can force |
Note: Each file has its own update time, which is reset whenever the source files are checked.
The following table is a quick reference guide to when and how source clips are localized, where:
• green - clips are localized automatically.
• amber - clips are localized when updated manually.
• red - clips are not localized.
|
System Preference |
Source Clip Preference |
|||
|---|---|---|---|---|
|
on |
auto-path |
on demand |
off |
|
|
on |
|
|
|
|
|
manual |
|
|
|
|
|
off |
|
|
|
|
Updating On Demand Clips
Source clips with their localization policy set to on demand are polled to check for updates at the interval set in the Preferences. If the file has changed, the source clip is marked with a red bar to show it is out of date.
To update a single on demand source clip:
| 1. | Double-click the source clip in the Project bin to display its Properties. |
| 2. | Click Update. |

Note: If a Read node's localization policy is set to on demand and it hasn't been localized previously, clicking the Update button localizes the file.
The local copy of the source clip is updated from the remote source clip.
To update all on demand source clips:
| 1. | Navigate to Localization > Force Update. |
| 2. | Click On demand only. |
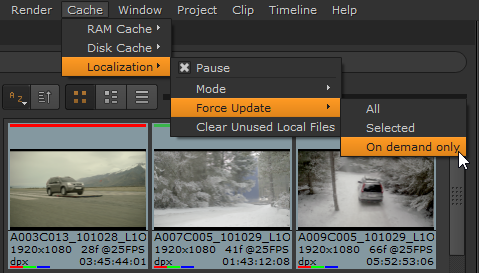
The local copy of all on demand source clips is updated from the remote source clip.
Clearing Localized Files
Localizing a large amount of files can fill up the localization cache quite quickly if you leave the limit to (GB) preference at the default 10 GB. When the cache runs out of space, a Failed to Localize File dialog displays and localization pauses.
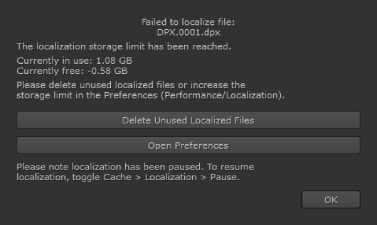
You can delete localized files by clicking Delete Unused Local Files (or by navigating to Cache > Localization > Clear Unused Local Files).
Tip: You can also open the Preferences from this dialog to adjust the localization behavior, such as increasing the limit to (GB) preference.
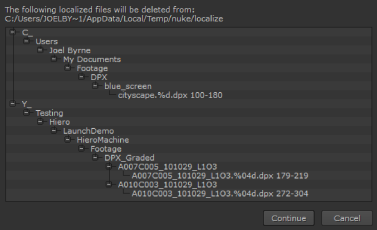
Click Continue to delete the localized files or Cancel to keep the cached files.