Constraining Warps
Warping a sequence can deform straight lines as part of the global warp applied to the camera views. Adding constraints to known straight lines in the rectilinear input images can reduce this deformation by pinning areas in the global warp.
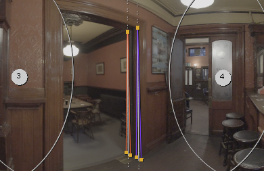
Typically, constraints are applied to a feature that appears in two adjacent views and then C_GlobalWarp ensures that those marked areas are warped to the same destination.
|
|
|
|
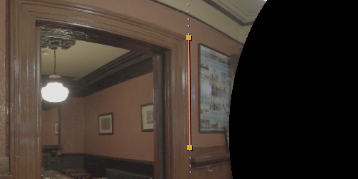
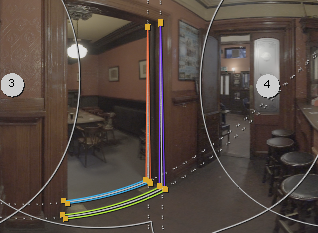
Constraints marked in Cam3 and Cam4. |
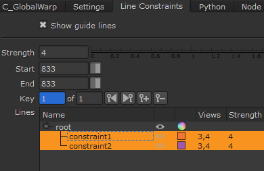
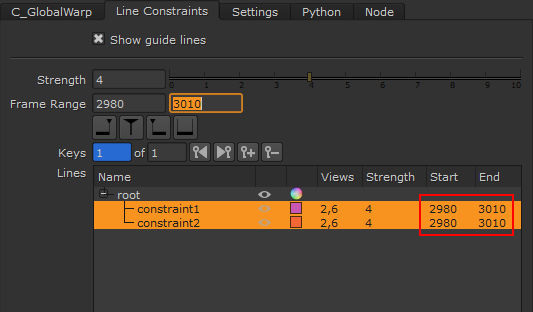
Constraints in the Properties panel. |
Viewing Warped Images
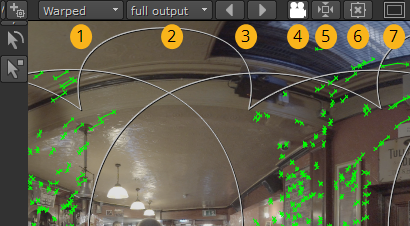
You can view the full output or individual views using the tools at the top-left of the Viewer. Each view is available as the warped result or as the source view in latlong and rectilinear.
|
1 |
Output Mode |
Switches the Viewer between the warped output and the source latlong from C_CameraSolver. |
|
2 |
Output View |
Sets the view to output. You can select individual views by camera, or examine the full output. |
|
3 |
Previous/Next View |
Swap quickly between output views. |
|
4 |
Projection |
Switches between latlong and rectilinear display in the Viewer. |
|
5 |
Center View |
Click to center the view when in rectilinear or single camera view. This button has no effect in full output mode. |
|
6 |
Reset Rotation |
Click to reset any rotation applied to the cameras in C_GlobalWarp. |
|
7 |
Show Cameras |
Click to toggle the camera overlay on and off. |
Adding Constraints
Constraints pin areas of camera views to ensure that the warp of adjacent cameras have the same destination and all the points overlapping the line overlay are mapped to a straight line. You cannot add constraints in the full output mode, so make sure you have either:
• an individual camera view selected using the view buttons above the Viewer, or
• if you're in the main view, a camera selected from the Output View dropdown.
To add constraints:
| 1. | Locate a known linear feature that occurs in two adjacent cameras. Examples include door frames, table tops, tiles, and so on. |
| 2. | Select the first view containing the feature and click the Add Point |
Tip: You can also add points by holding Ctrl/Cmd+Shift and clicking in the Viewer.
| 3. | Click in the Viewer where the constraint starts and ends. |
|
|
|
|
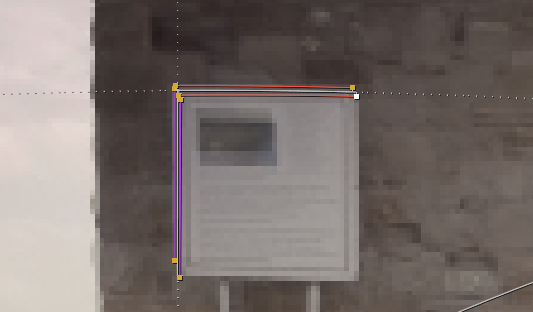
A constraint in a rectilinear view. |
The same constraint projected into latlong space. |
| 4. | Select the second view containing the feature and click in the Viewer where the constraint starts and ends. |
If you switch back to the main view or full output, the constraint points connect up between views.
|
|
|
|
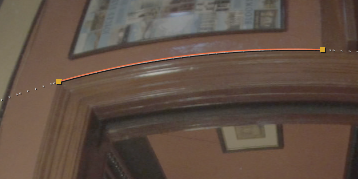
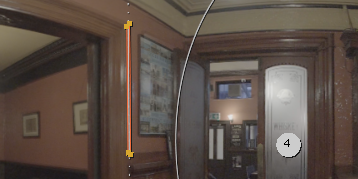
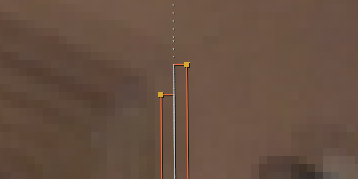
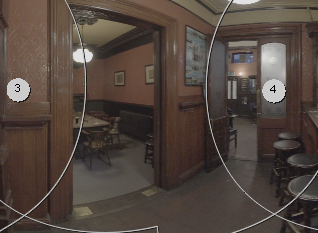
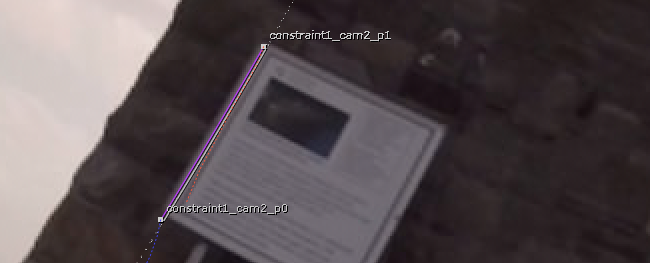
A two-view constraint in the main view. |
A close up of the constraint. |
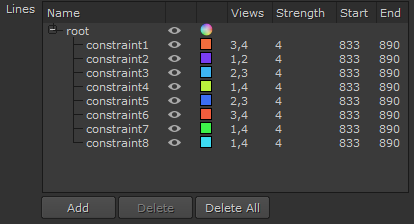
| 5. | Select the constraint in Properties > Line Constraints > Lines table and set the Strength and frame range controls. |
• Strength - sets the strength bias for the constraint. Increasing the strength of a constraint forces the warped output to converge at the constraint. Constraints have a similar weighting to user matches in C_CameraSolver.
• Start and End - sets which frames the constraint influences. You might use these controls if the constraint feature moves out of shot or becomes occluded.
| 6. | Set keyframes for the constraint if the associated feature moves or changes shape. See Animating Parameters for more information on animated key frames. You can also track constraints using C_GlobalWarp's Tracking controls. See Tracking Constraints for more information. |
| 7. | Add as many constraints as required in the areas you want to preserve. |
Make sure you have finished drawing one constraint before starting another, otherwise the next point is added into the previous constraint. The easiest way to complete a constraint is to click an empty space in the Lines table.
If you're adding points to an existing constraint by holding Ctrl/Cmd+Shift and clicking in the Viewer, you can start a new constraint by pressing N (the New Constraint keyboard shortcut), and then all subsequent points are added to the new constraint.
Tip: If you constrain too many areas, the global warp might have difficulty producing sensible warp because 'everything' is pinned.
The Lines table displays all the constraints you've added, including which Views they're in and the Strength bias assigned to them.
Note: You can show and hide individual constraints using the ![]() button, but remember that hidden constraints do not affect the warp.
button, but remember that hidden constraints do not affect the warp.
| 8. | When you're finished constraining, click Warp to recalculate the global warp taking the constraints into account. You can add more constraints at any point and click Warp again to integrate the new data. |
|
|
|
|
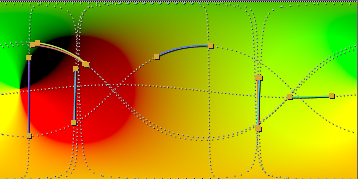
Constraints pre-warp. |
The resulting warp. |
Tracking Constraints
Constrained areas are likely to move through a shot, meaning extra keyframing work to maintain accuracy. C_GlobalWarp's tracking feature can speed up this process by automating some of the work for you. You can also export tracks to individual C_Tracker nodes and then re-import the refined tracks for difficult sequences.
| 1. | Add your constraints as normal. For example: |
See Adding Constraints for more information.
| 2. | Select the constraints you want to track in the Properties panel Line table. |
| 3. | Set the Frame Range you want to track. The frame range for the individual constraints is updated. |
| 4. | Click Track to begin tracking the selected constraints. |
Note: If you click Track without setting a Frame Range, an Enter tracking range dialog is displayed allowing you to specify the range.
C_GlobalWarp tracks the selected points over the frame range.
| 5. | You can adjust the tracking parameters in the Properties panel under Settings > Tracking: |
• Step - sets the number of frames between tracking keyframes. Increasing the steps between keyframes speeds up processing, but can impact accuracy.
• Patch Size - sets the size of the image patch around constraint points. Increasing the patch size can improve track quality, but larger patches increase processing time.
• Error Threshold - sets the image change threshold a constraint track can tolerate before terminating. Reducing this threshold makes tracking more tolerant to image changes, producing longer tracks.
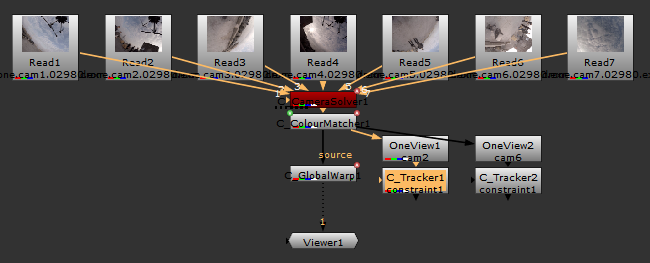
| 6. | You can export the tracks to C_Tracker nodes to improve the results further by selecting the required constraint and clicking Export. |
Each constraint is exported per view using OneView nodes. For example, a constraint that occurs in cam2 and cam6 produces a Node Graph similar to that shown in the image.
| 7. | Double-click the C_Tracker node to display tracking keyframes for the required view. |
See Tracking and Stabilizing for more information on how to use C_Tracker in CaraVR.
| 8. | When you're happy with the result from C_Tracker, open the C_GlobalWarp Properties panel, select the exported constraint(s), and then click Import. |
The improved track is imported from C_Tracker and you can then warp the image as normal. See Adding Constraints for more information.
C_GlobalWarp Output
C_GlobalWarp's Cam Warp control is set to Unwarped by default, so the warp does not affect the camera views and latlong output passed down the node tree, but rather writes the warp to a stitch_map layer that C_Stitcher can use to influence the final stitch.
If you want to pass camera warps downstream, set the Cam Warp control to Warped. The individual camera views are then rendered with the warp applied.
Additionally, C_GlobalWarp overwrites the rig rotation metadata from C_CameraSolver. The Viewer toolbar includes a resetRotation button that resets the rig rotation to the original values read from the metadata. C_Stitcher then processes the metadata in the same way as C_CameraSolver metadata. See Stitching Images Together for more information.